05.09.2026
13 min
299



A step-by-step guide using a Google Pixel 10 and macOS Tahoe 26: from backing up your data and granting USB permissions to flashing the operating system, locking the bootloader, and completing the initial setup. No command line or Android Studio required.
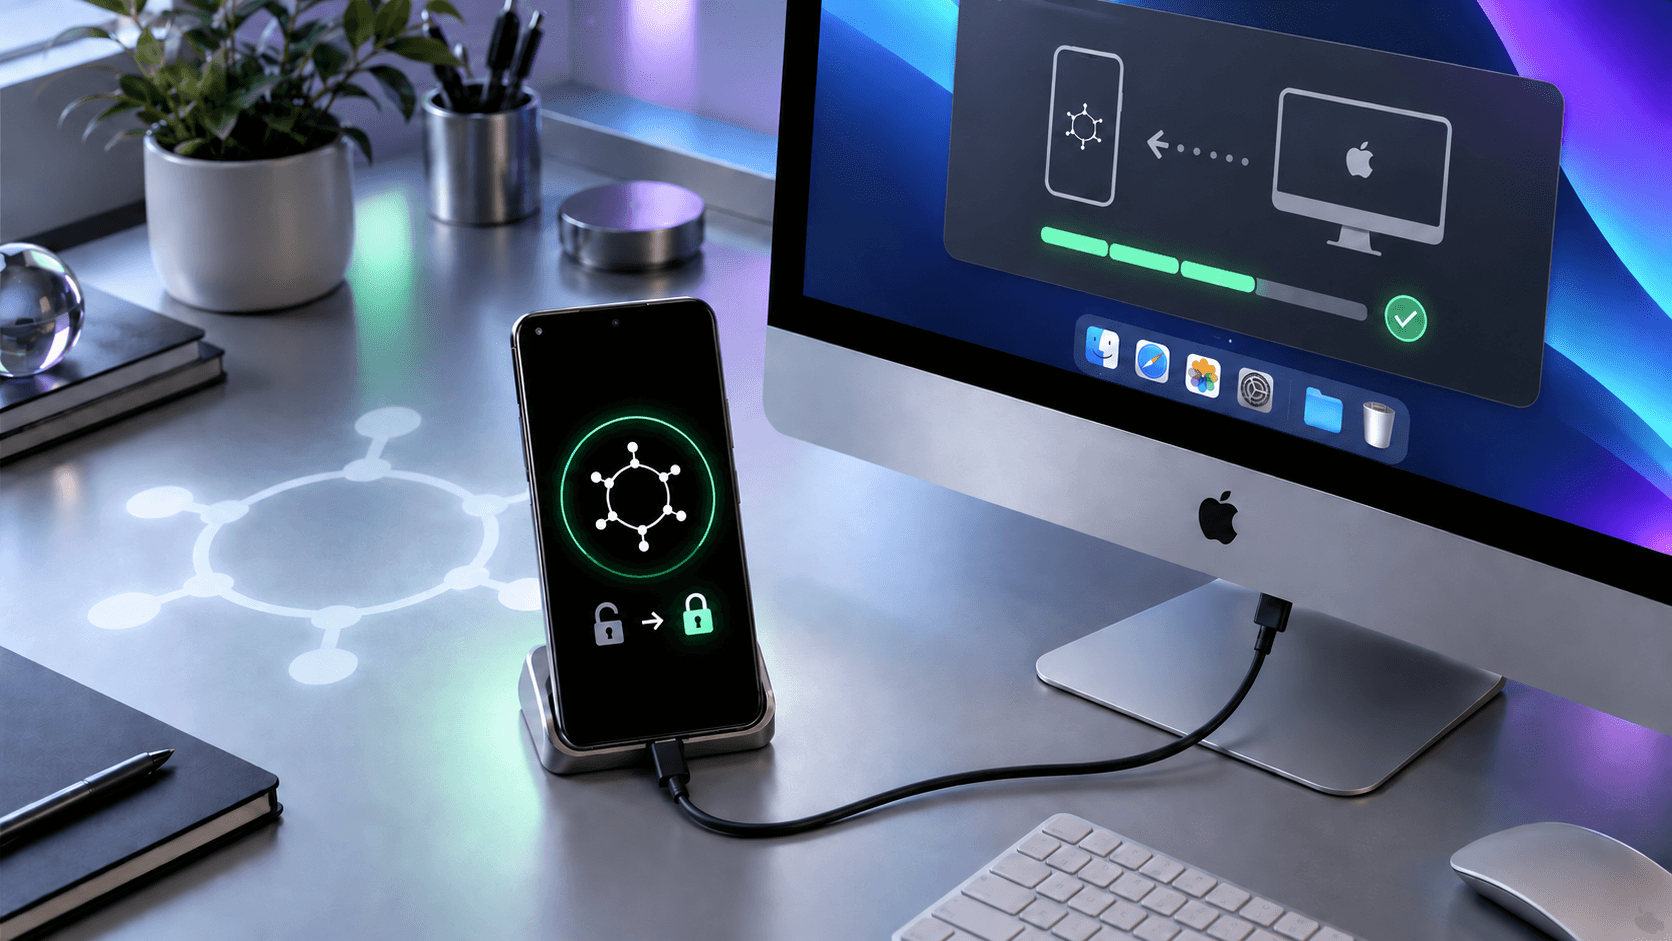
Installing GrapheneOS on a compatible Google Pixel can be done using a MacBook, iMac, Mac mini, or another Mac running a supported version of macOS. During this process, the computer only downloads the system image and transfers it to the smartphone. GrapheneOS is installed on the Pixel, while the Mac’s operating system and files remain unchanged. We will use Chrome and the official Web Installer, which works over USB without requiring a separate flashing application.
The main example in this guide covers installing GrapheneOS on a standard Google Pixel 10 using macOS Tahoe 26, for which Apple publishes the latest updates in its list of macOS releases. The Web Installer also supports macOS Sonoma 14 and Sequoia 15. In future versions of macOS, the names or locations of certain settings may change slightly, but the overall installation process should remain virtually the same. Below, we will separately explain the possible differences for Mac laptops, desktop Macs, and older versions of macOS.
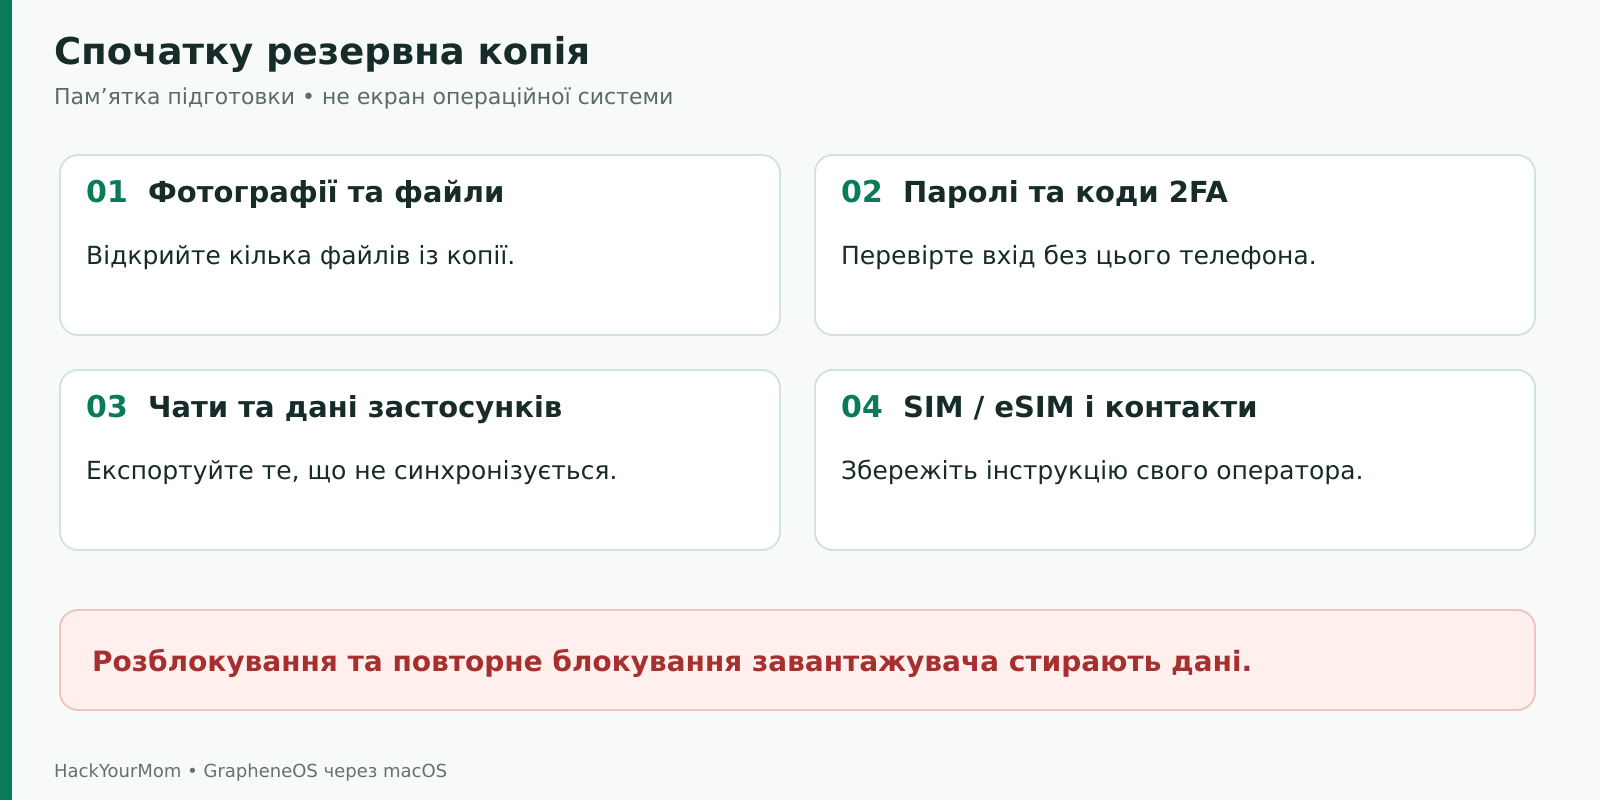
Warning! All data on the Pixel will be erased. Unlocking the bootloader and locking it again erase user data. Do not begin these operations until you have verified your backups and confirmed that you can sign in to important accounts without using this phone.
This guide has two separate requirements: the Mac must be able to run a compatible browser on a supported version of macOS, and the smartphone must appear on GrapheneOS’s official device list and allow bootloader unlocking. A compatible computer does not make every Android phone compatible. Likewise, having a standard USB-C port does not make a device suitable for this operating system.
As of the date of verification, the list of devices supported by GrapheneOS includes the Pixel 10, Pixel 9, Pixel 8, Pixel 7, and Pixel 6 families, their supported variants, as well as the Pixel Fold and Pixel Tablet. Before you begin, find the exact full name of your model on this list. The system images for the Pixel 10, Pixel 10 Pro, Pixel 10 Pro XL, and Pixel 10a are different; our example uses the standard Pixel 10 without any additional designation.
As of September 2026, the Pixel 11 is not included in the official list of devices with production GrapheneOS support. You must wait until support is officially added and check the latest device list. Neither this guide nor the Pixel 10 system image can be used as confirmation that the Pixel 11 is compatible.
For the computer, the official Web Installer explicitly lists Sonoma 14, Sequoia 15, and Tahoe 26. Intel-based Macs may also be suitable if they run a supported operating system and browser. Not every Mac that still receives certain security updates can install Tahoe, so check compatibility with the latest major macOS version using Apple’s official list. You do not need to force-install an unsupported version of macOS using third-party tools to flash the phone.
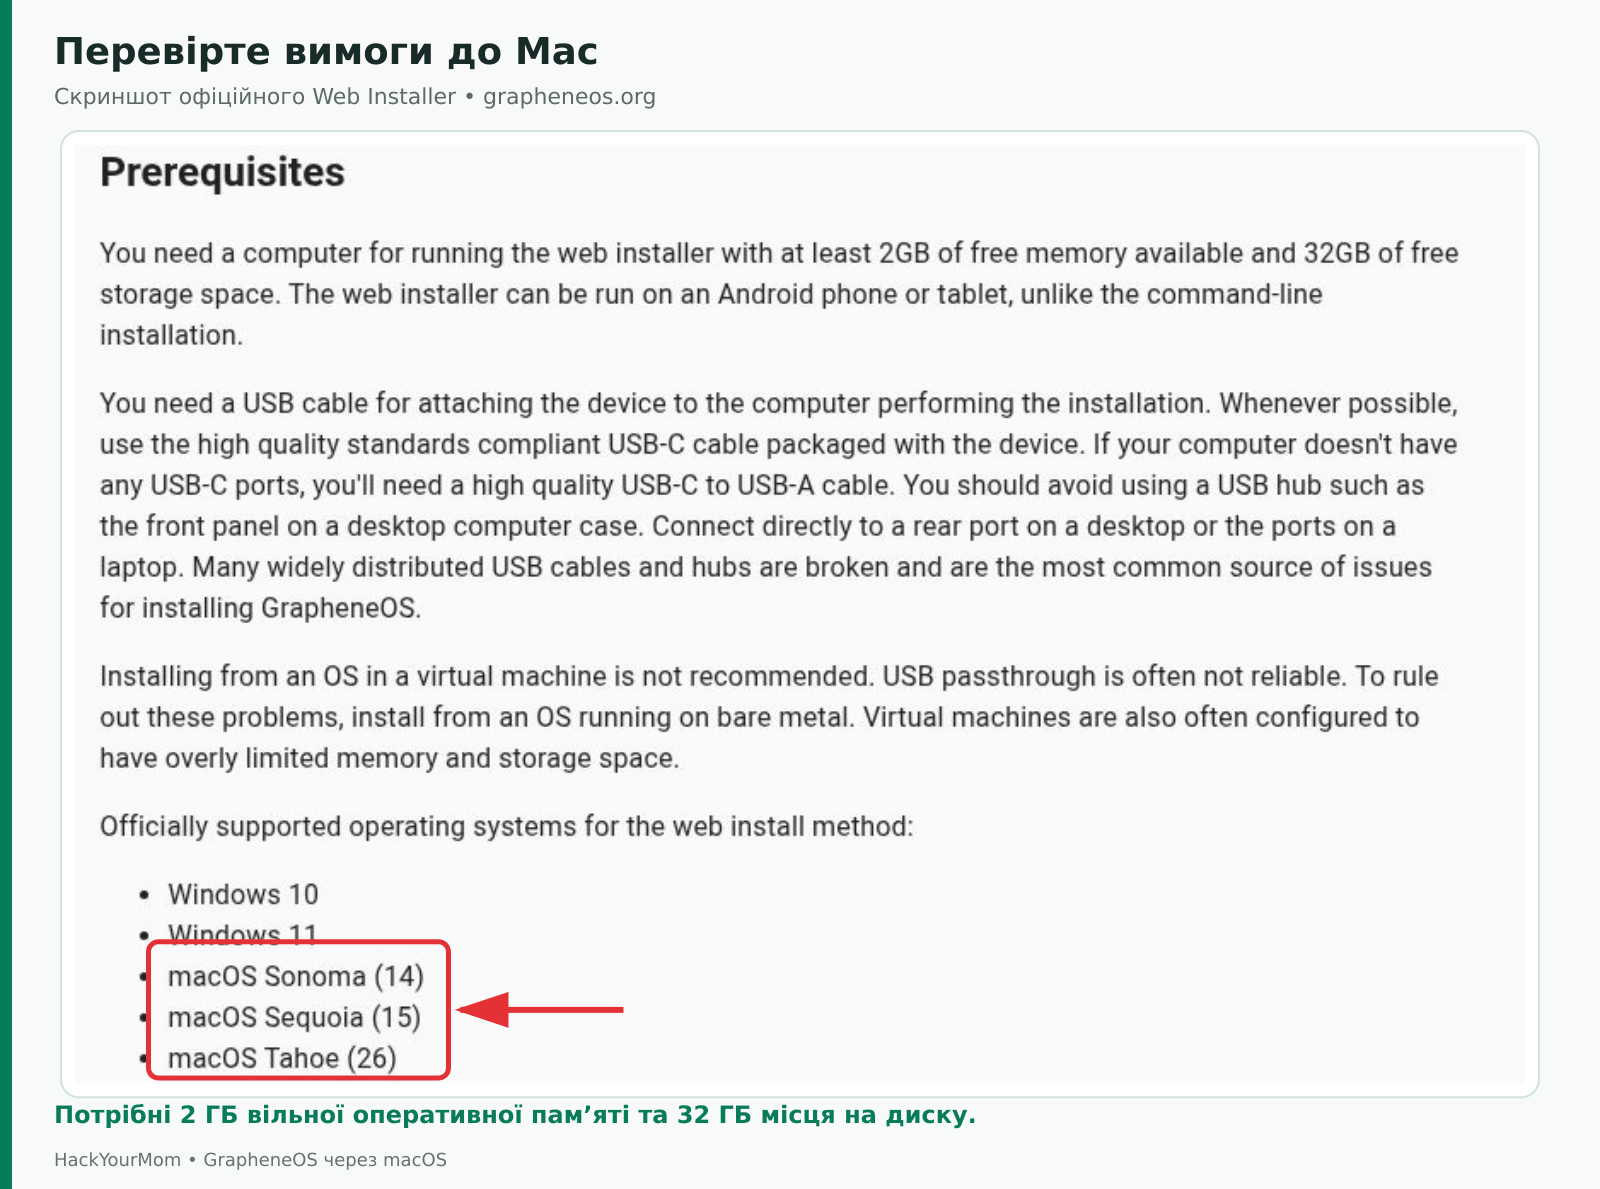
You need at least 2 GB of available RAM and 32 GB of free storage space on your Mac. This does not mean you need to buy a computer with only 2 GB of RAM; what matters is how much memory is available while the browser is running. Close any unnecessary resource-intensive applications and browser tabs, and leave some extra free disk space. Downloading, verifying, and preparing the system image may require more resources than simply opening a webpage.
Prepare a high-quality USB cable that supports data transfer. Whenever possible, use the cable supplied with your Pixel and connect it directly to a USB-C port on your Mac. If your computer only has USB-A ports, you will need a suitable high-quality USB-A-to-USB-C cable. The fact that the phone charges does not necessarily mean the cable can transfer data: some cables and adapters are designed for charging only or may have faulty data lines.
A Pixel with OEM unlocking available. A carrier-locked bootloader may prevent installation even if the smartphone accepts SIM cards from other carriers.
A sufficiently charged Mac and smartphone. For convenience, charge the Pixel to approximately 60% or more and connect your MacBook to a power source. This provides a safety margin for the procedure and is not a formal installer requirement.
A stable internet connection. Do not plan to download the system image through the same Pixel’s mobile hotspot because the phone will need to be switched to a different mode and restarted.
A verified backup and enough uninterrupted time. Set aside approximately 30–60 minutes, excluding large file transfers or lengthy system updates. The actual duration depends on your internet connection and hardware.
Avoid using a virtual machine, USB hub, or docking station if you can connect the devices directly. During the flashing process, the Pixel switches modes and restarts, and an additional USB connection may make it more difficult for the Mac to detect the device again. Place the Mac and phone on a stable surface beforehand so that you do not accidentally knock or disconnect the cable.
First, determine which data from the phone has already been saved elsewhere and which data exists only locally. Google Photos synchronization does not mean that every folder, document, download, or app data file has been backed up automatically. Open the backup on your Mac or another device and check several photos, videos, and documents. A cloud icon or a notification about a previous backup is not a substitute for verifying the files yourself.
Pay particular attention to two-factor authentication. If a required code is generated only on the Pixel, wiping the phone could cause you to lose access not only to a single application but also to your email, cloud storage, and other services. Check your backup codes, authenticator synchronization or export options, password-manager access, and an alternative sign-in method. Do not include secret keys or codes in screenshots for the guide or send them to anyone else.
For messaging apps, use their built-in transfer or export features. A complete backup created by standard Android tools does not guarantee that every application will be restored automatically on GrapheneOS. Save any necessary contacts and ask your carrier about the eSIM reactivation process. Do not assume that every eSIM will necessarily be deleted or will survive every operation; prepare a way to restore your mobile service in advance.
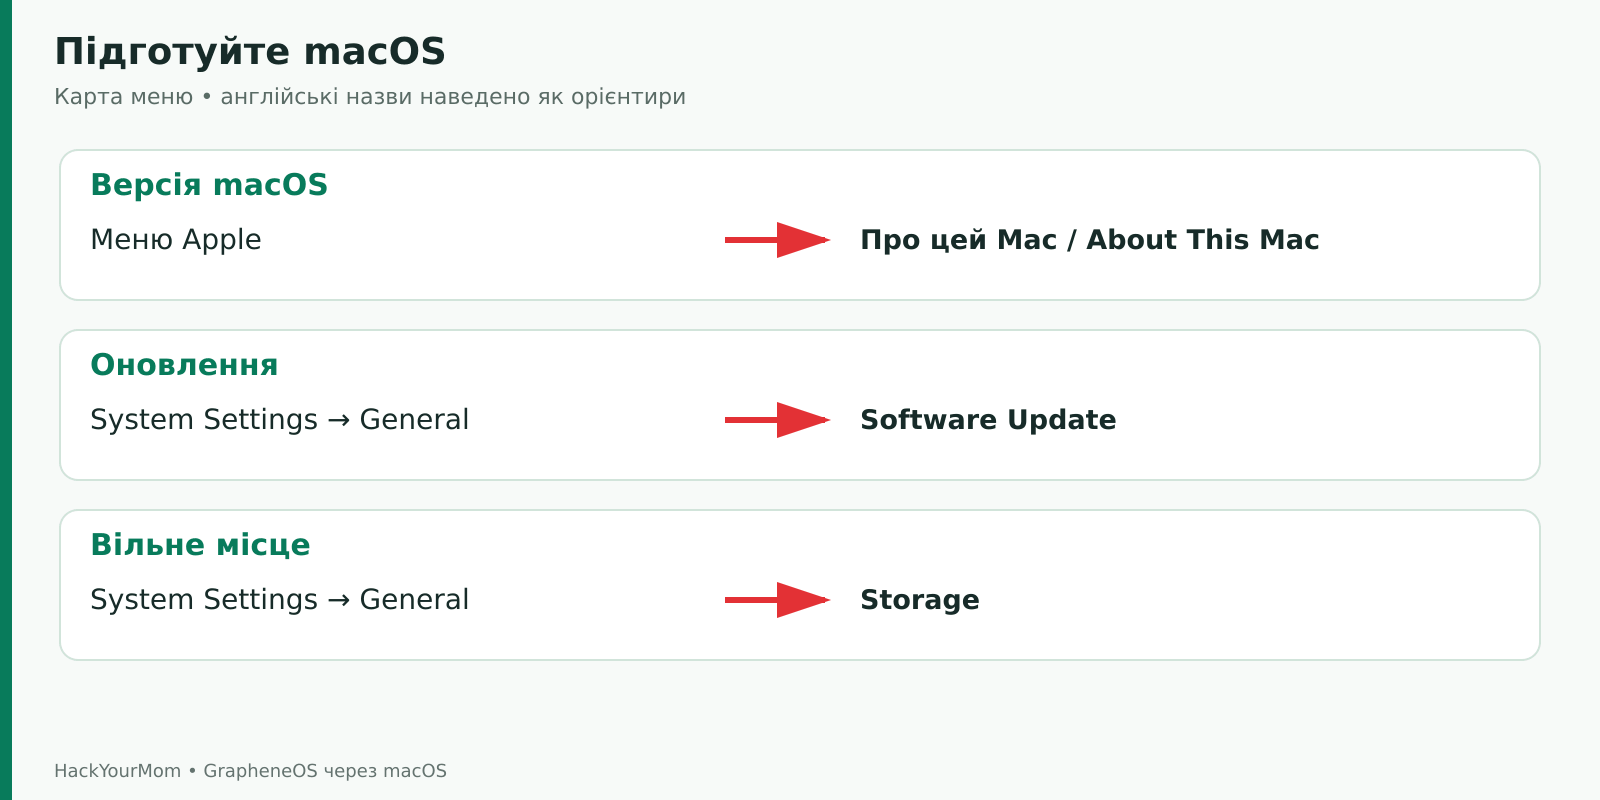
On your Mac, open the Apple menu → About This Mac to check your operating system version. To check for updates, go to System Settings → General → Software Update. Install all available updates for your version of macOS and complete any required restarts before connecting the phone for flashing. Do not update macOS while GrapheneOS is being installed.
Check the available storage space under System Settings → General → Storage. Free up space using standard methods: move unnecessary large files or delete files that you are certain have been backed up elsewhere. Do not use random “cleaner” applications or commands that delete system folders. If there is not enough free space, stop at this preparation stage—it is much easier to resolve the issue now than to troubleshoot a failure while the system image is being extracted.
For installation through the Web Installer, you do not need to install Homebrew, Android Studio, ADB, Fastboot, or Google USB Driver. These names may appear in instructions for other installation methods or platforms. In this case, the browser sends commands through WebUSB. You also do not need to disable FileVault, System Integrity Protection, Gatekeeper, or the Mac’s startup security features, as none of these actions is part of this procedure.
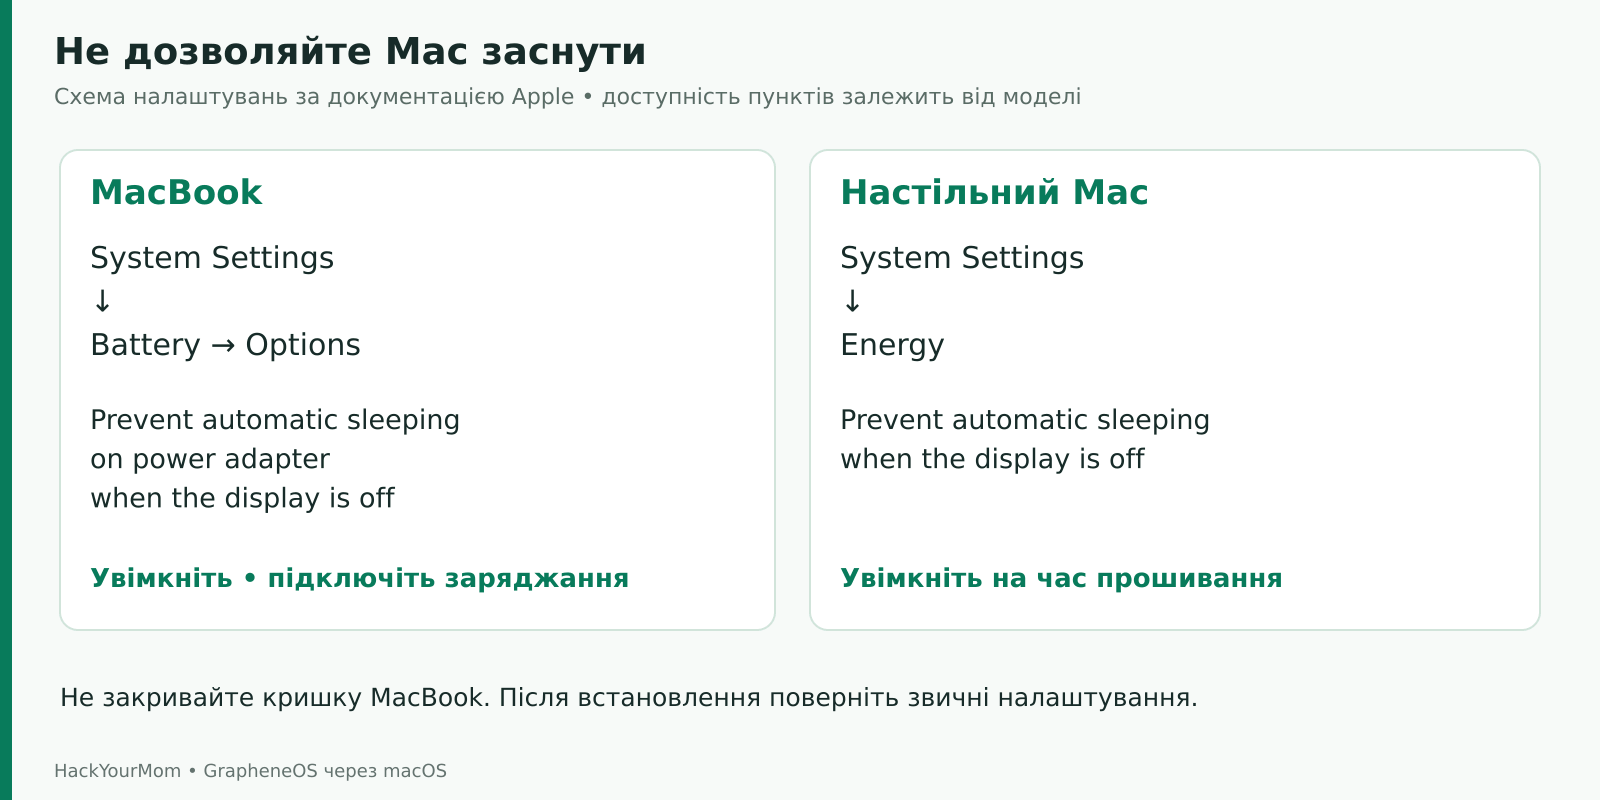
On a MacBook connected to a power adapter, open System Settings → Battery → Options. Enable Prevent automatic sleeping on power adapter when the display is off, if this option is available. On a desktop Mac, look for the corresponding setting under System Settings → Energy: Prevent automatic sleeping when the display is off. These are the paths provided in Apple’s guide to preventing a Mac from going to sleep; the available options depend on the Mac model.
Do not close your MacBook’s lid during installation. Turning off the display and putting the computer to sleep are not the same thing, so simply extending the amount of time before the display turns off is not enough. After the installation is complete, restore your usual energy settings. If your Mac is managed by an organization and the required settings are locked, do not attempt to bypass its management policies. Use an approved computer or contact your administrator.
For the main installation process, we will use the latest version of Google Chrome in a regular browser window. If Chrome is not installed, download it from the official Google Chrome website, install it on macOS as usual, and launch it. If Chrome is already installed, open its Help menu or the About Google Chrome section, wait for it to check for updates, and restart the browser if prompted.
Safari and Firefox are not compatible with this Web Installer. Microsoft Edge is also included in the list of supported browsers, while Brave requires you to disable Shields only on the installer page. To avoid mixing different interfaces and settings, we will continue using Chrome in the following steps. Do not use Incognito mode, as its storage limitations may interfere with system image preparation.
Enter https://grapheneos.org/install/web in the address bar. Make sure you have opened the official grapheneos.org domain rather than an advertisement, mirror, or similarly named website. This is a long page containing requirements, explanations, and operation buttons, not a short setup wizard with a single “Next” button. You do not need to look for a separate GrapheneOS application for Mac or download the system image from a third-party website.
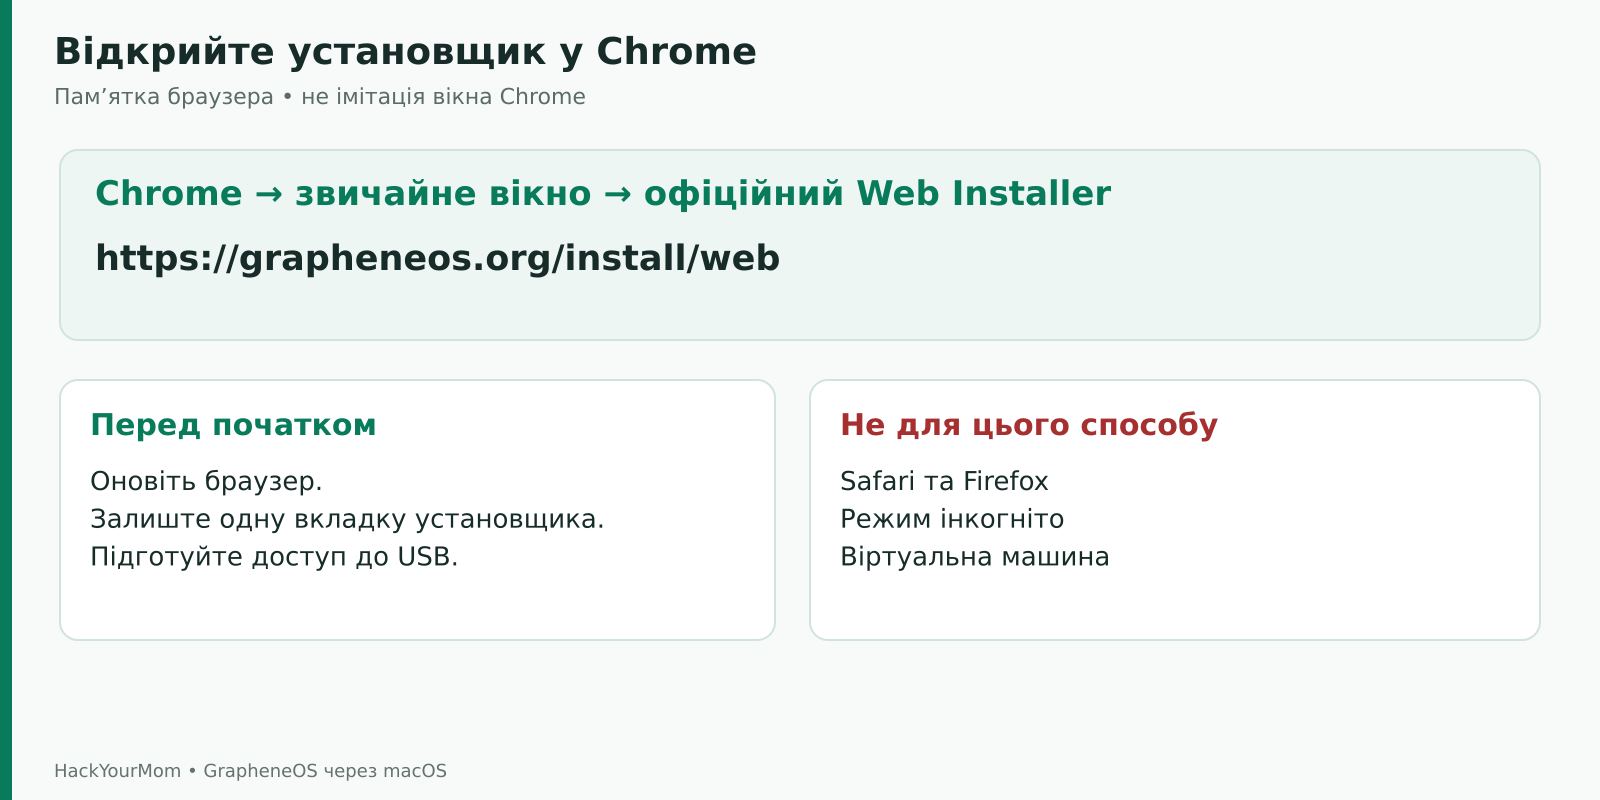
At this stage, simply review the page. The Unlock bootloader, Download release, Flash release, and Lock bootloader buttons are used in sequence, but only after the phone has been prepared. Do not click them randomly just to test them. Do not keep multiple installer tabs open at the same time, and close any other applications that may communicate with an Android device over USB.
Before changing any settings, download all available updates for the standard Google operating system and complete their installation. Make sure the phone has sufficient battery power and that all important data has already been backed up. Updating allows you to begin the procedure with the latest component firmware, but it does not replace the upcoming GrapheneOS installation.
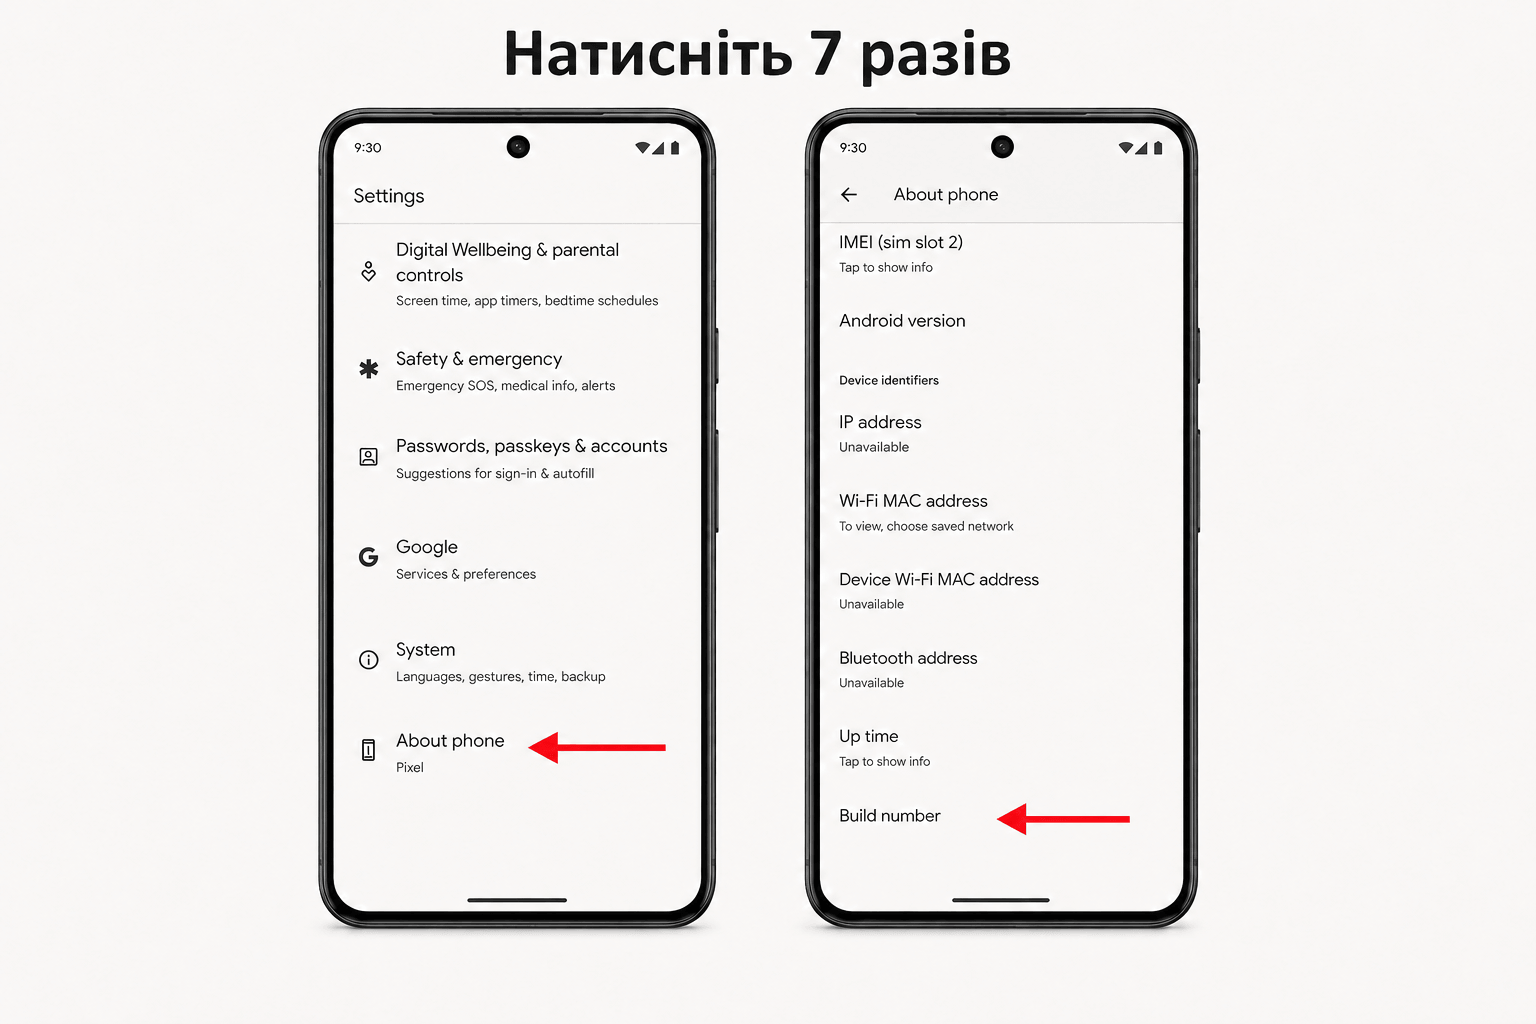
Open Settings → About phone. Find Build number and tap that specific entry seven times. If Android asks for your screen-lock PIN or password, enter it on the phone. After confirmation, a message will appear indicating that Developer options are now available. You do not need to tap “About phone” seven times—it only opens the page containing the build number.
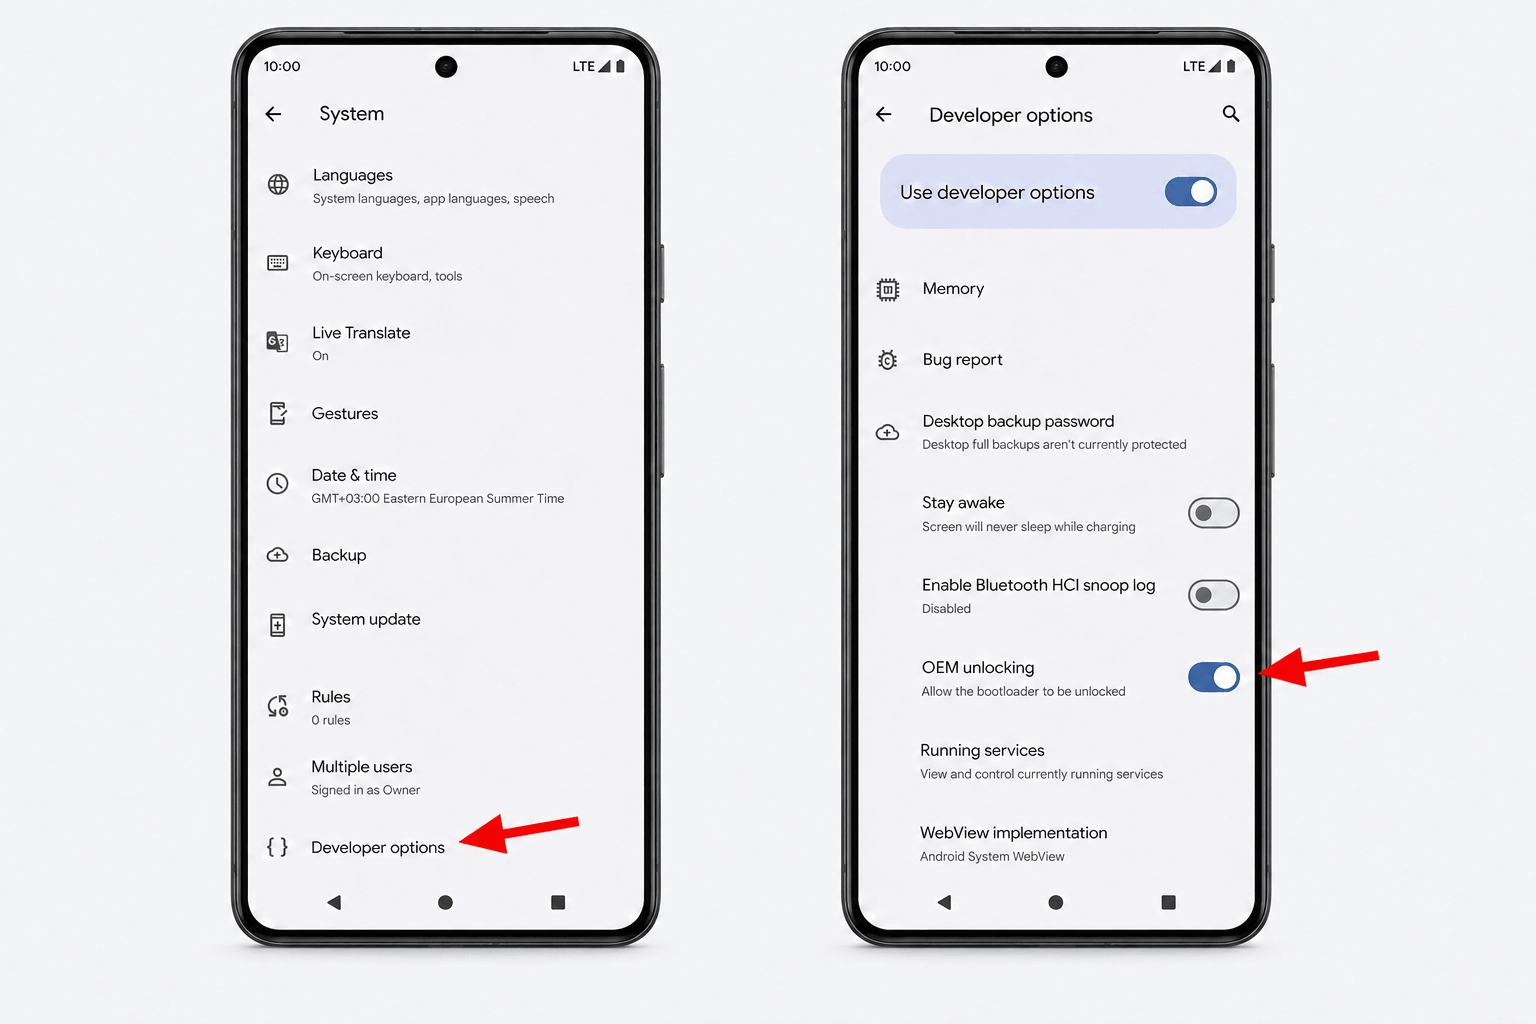
Return to Settings → System → Developer options. Find OEM unlocking, enable it, and confirm the system warning. If the phone needs to verify whether unlocking is permitted, make sure it has internet access. Enabling this setting only allows the next operation; it does not mean that the bootloader has already been unlocked.
USB debugging is not required for the method described in this guide. Do not confuse it with OEM unlocking, as these are separate settings that serve different purposes. Instructions that begin with ADB commands or ask you to confirm a computer key on the Android screen may describe a different installation method rather than the Web Installer and Fastboot Mode process used here.
If OEM unlocking is unavailable, check the internet connection, make sure the stock operating system is up to date, and verify where the smartphone was purchased. A SIM-unlocked phone and a phone with an unlockable bootloader are not the same thing. Restrictions on carrier models cannot be removed by installing a driver on your Mac. Do not continue with the flashing process until you have identified the cause, and do not purchase random paid “unlocking” services that promise to bypass this restriction.
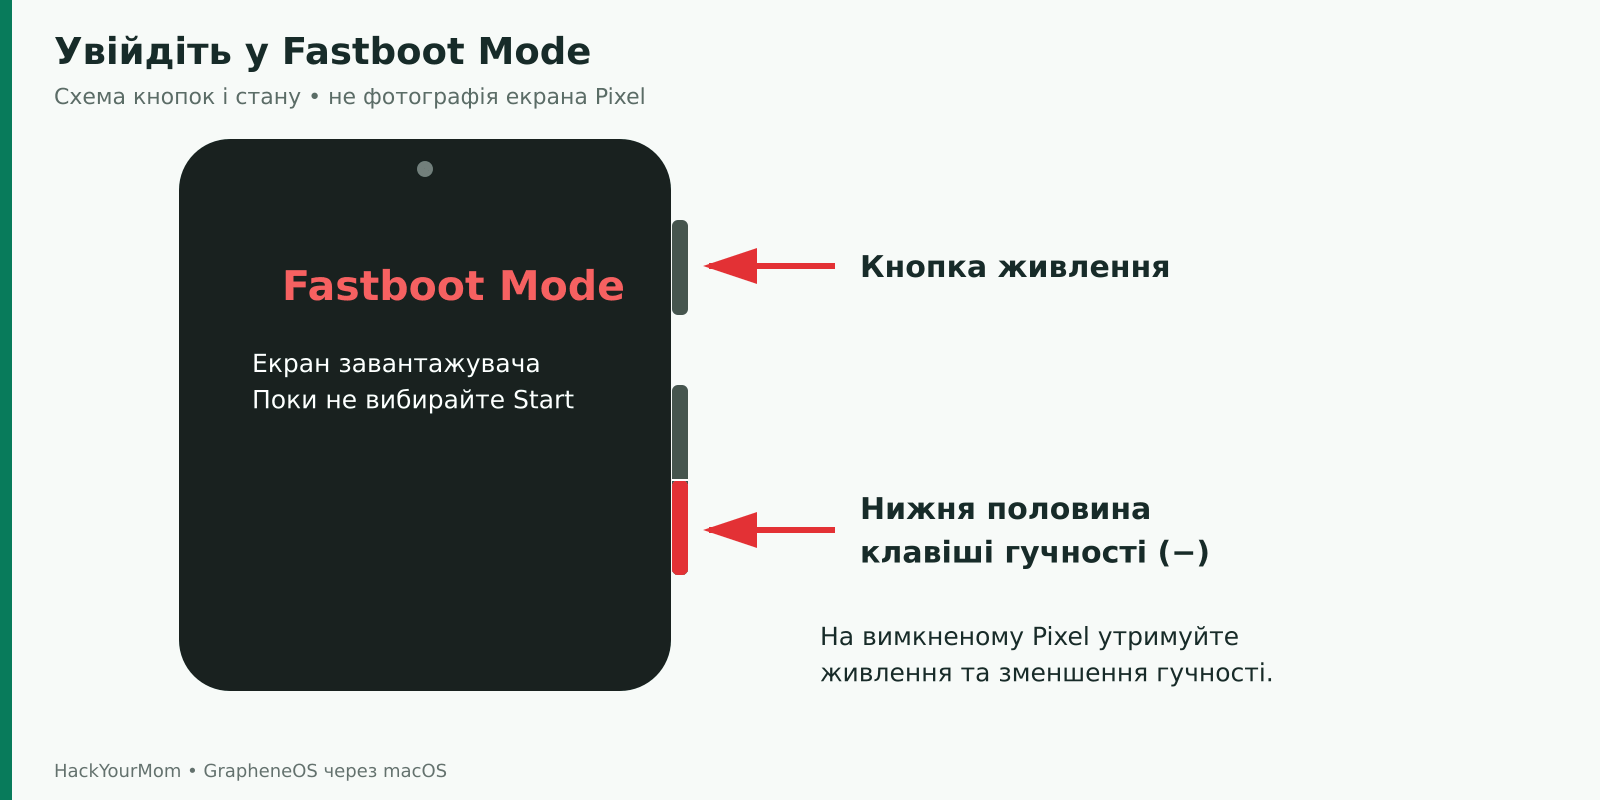
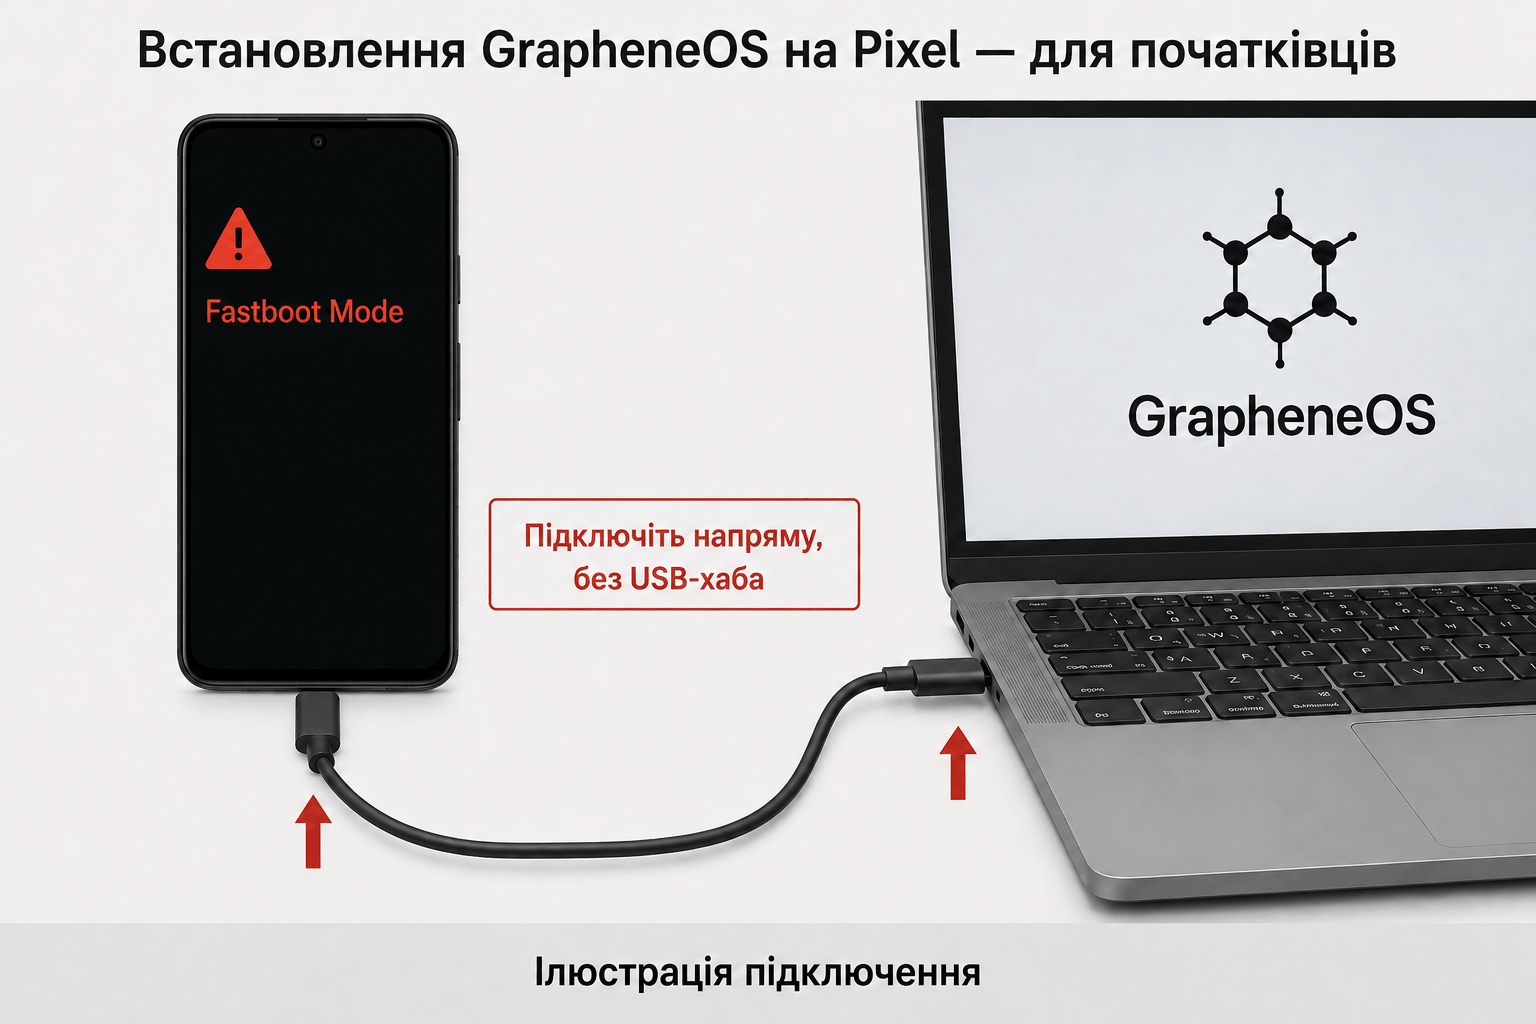
Turn off the smartphone. With the Pixel powered off, press and hold the power button and the lower half of the volume button until the bootloader interface appears. The official instructions also describe an alternative method: restart the phone and hold the volume-down button as it begins to boot. In either case, look for the words Fastboot Mode on the screen.
Do not select Start at this stage. It will boot the operating system, while the phone must remain in the bootloader interface for installation. Use the volume buttons to move through the Fastboot menu and press the power button to confirm an action. Tapping the options shown on the screen is not the correct way to control the phone during these steps.
With the Pixel still in Fastboot Mode, connect it directly to your Mac using a data-capable USB cable. On a MacBook, use an available USB-C port and, if possible, connect the laptop to a power source separately. Do not move the cable to another port while the system is actively being flashed. Try a different port only before flashing begins or after you have identified the cause of an error.
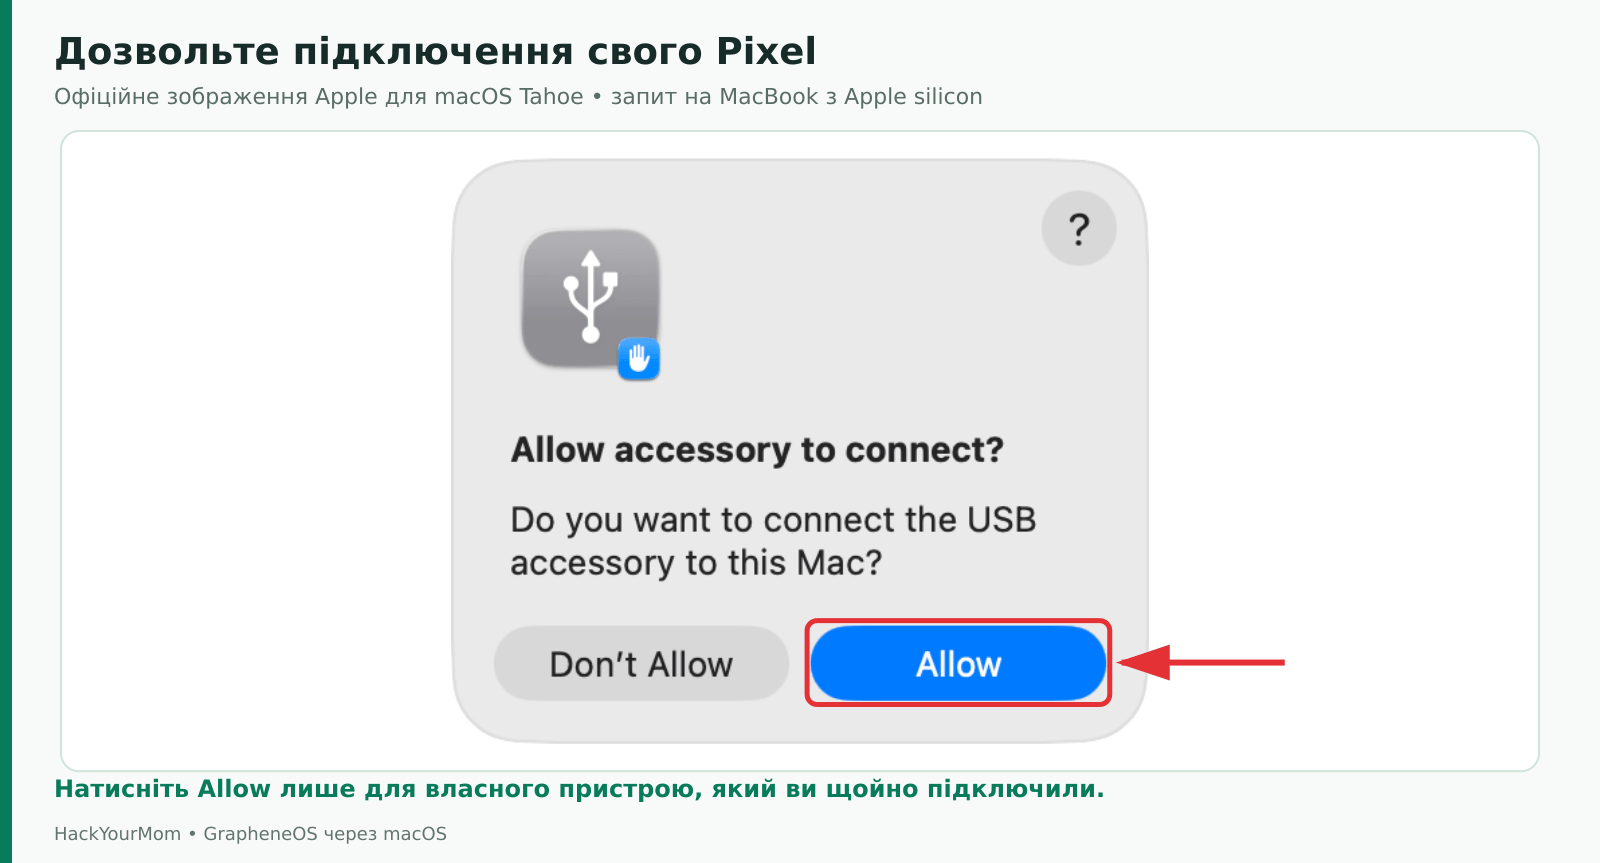
On a MacBook with Apple silicon, macOS may display an “Allow accessory to connect?” prompt. Unlock your Mac and click Allow for the Pixel you have just connected. If you select Don’t Allow, the phone may continue charging, but data access will be blocked. Therefore, if the phone is charging but Chrome cannot detect it, this does not necessarily mean there is a problem with the Web Installer.
You can review how this security feature behaves under System Settings → Privacy & Security → Accessories → Allow accessories to connect. In some earlier versions of macOS, this setting may appear without a separate Accessories section. Keeping the prompt enabled for new accessories is a reasonable choice: you do not need to permanently allow every unknown USB device to connect automatically just for a single installation.
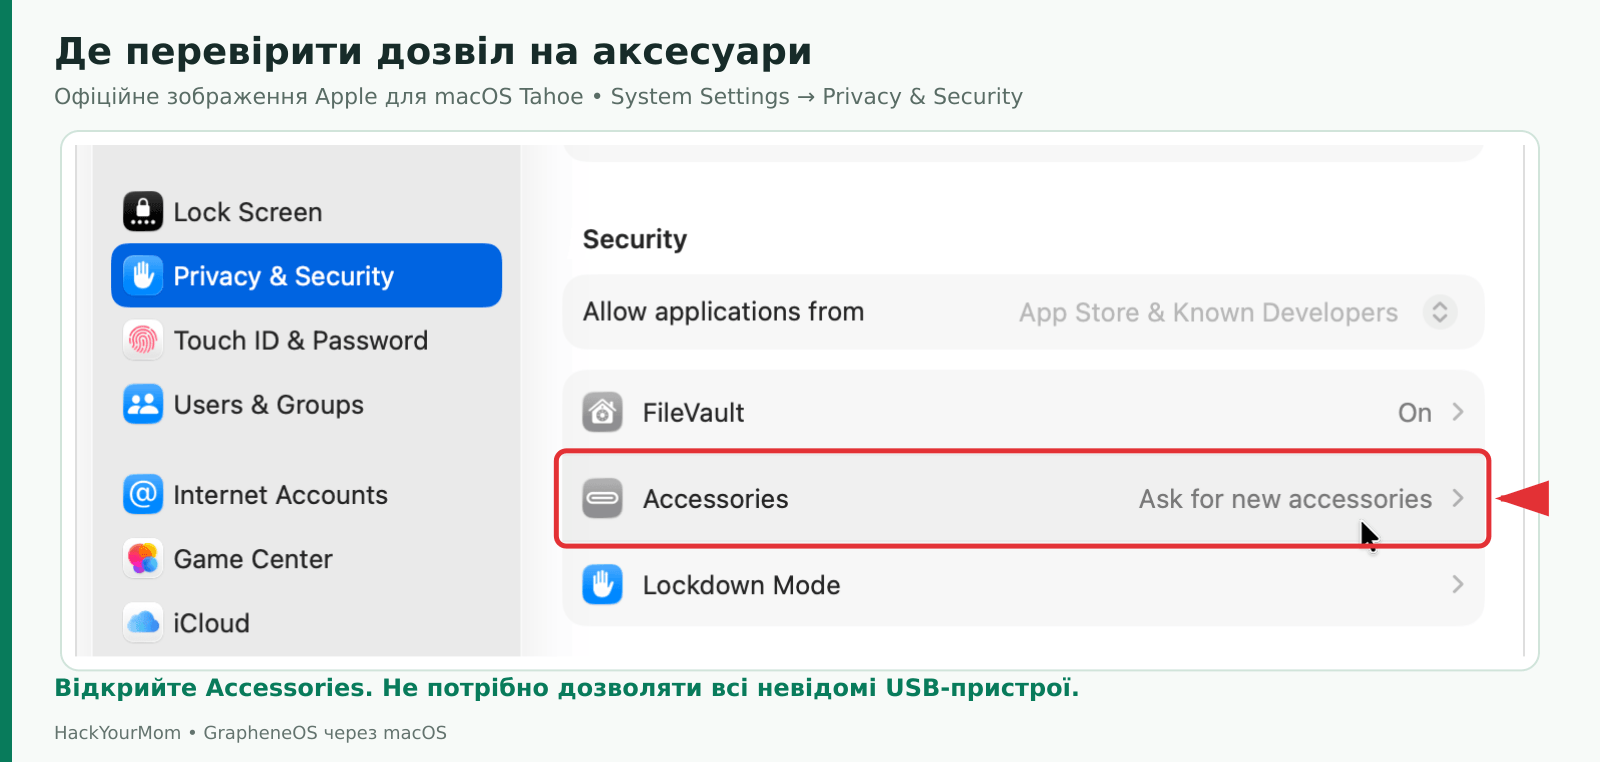
Apple primarily documents this prompt for Mac laptops with Apple silicon. On a desktop Mac or an Intel-based Mac, the corresponding prompt may not appear. Do not waste time looking for it if the system does not display it. If USB accessory permissions are controlled by an organization, contact the administrator. More information is available in Apple’s official guide to USB accessories.
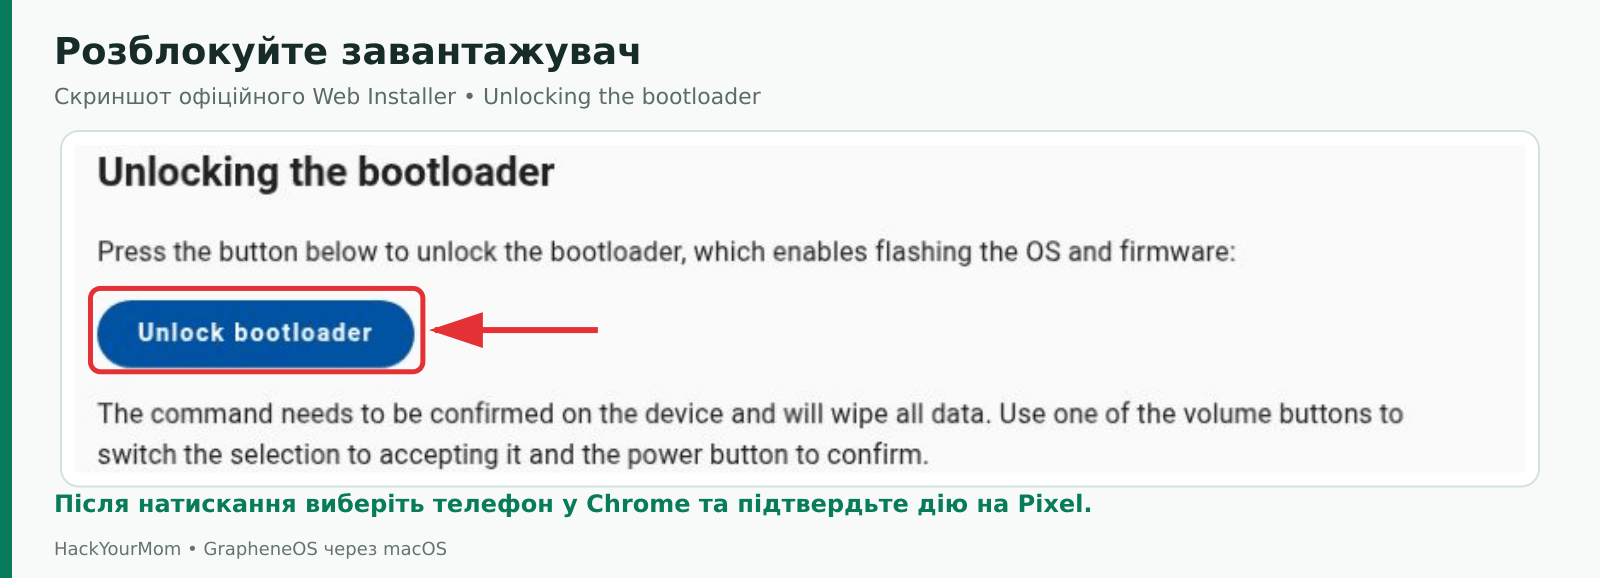
Return to the Chrome tab containing the official installer. Find the Unlocking the bootloader section. Before clicking the button, confirm once again that your backup is ready, the correct phone has been selected, and you understand that its data will be erased. If other Android devices are connected to your Mac, disconnect them before starting the operation to avoid selecting the wrong device.
This step involves several levels of confirmation, and none of them replaces the others. macOS allows the physical USB accessory to connect, Chrome grants the official website access to the selected USB device, and the Pixel separately asks you to confirm bootloader unlocking. If your Mac did not display a system prompt, proceed with the browser permission request—there is no need to make a missing prompt appear.
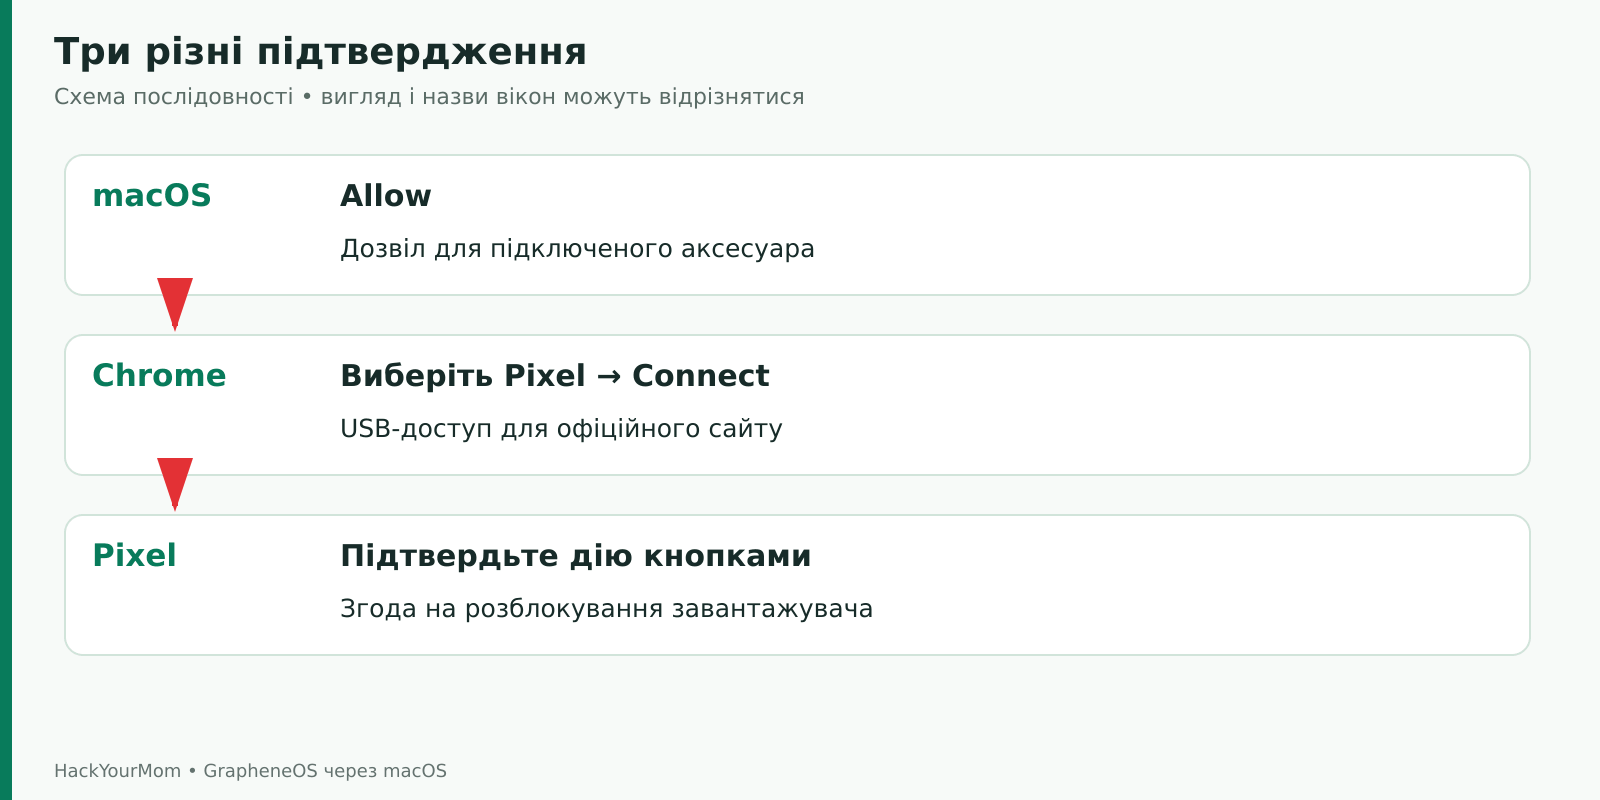
Click Unlock bootloader. Chrome will open a USB device selection window if the required permission has not yet been granted. Select the connected Pixel—it may appear under its model name or as an Android device in bootloader mode—and click Connect. If the list is empty, do not proceed to the next buttons. Go back and check the cable, USB permission, and Fastboot Mode.
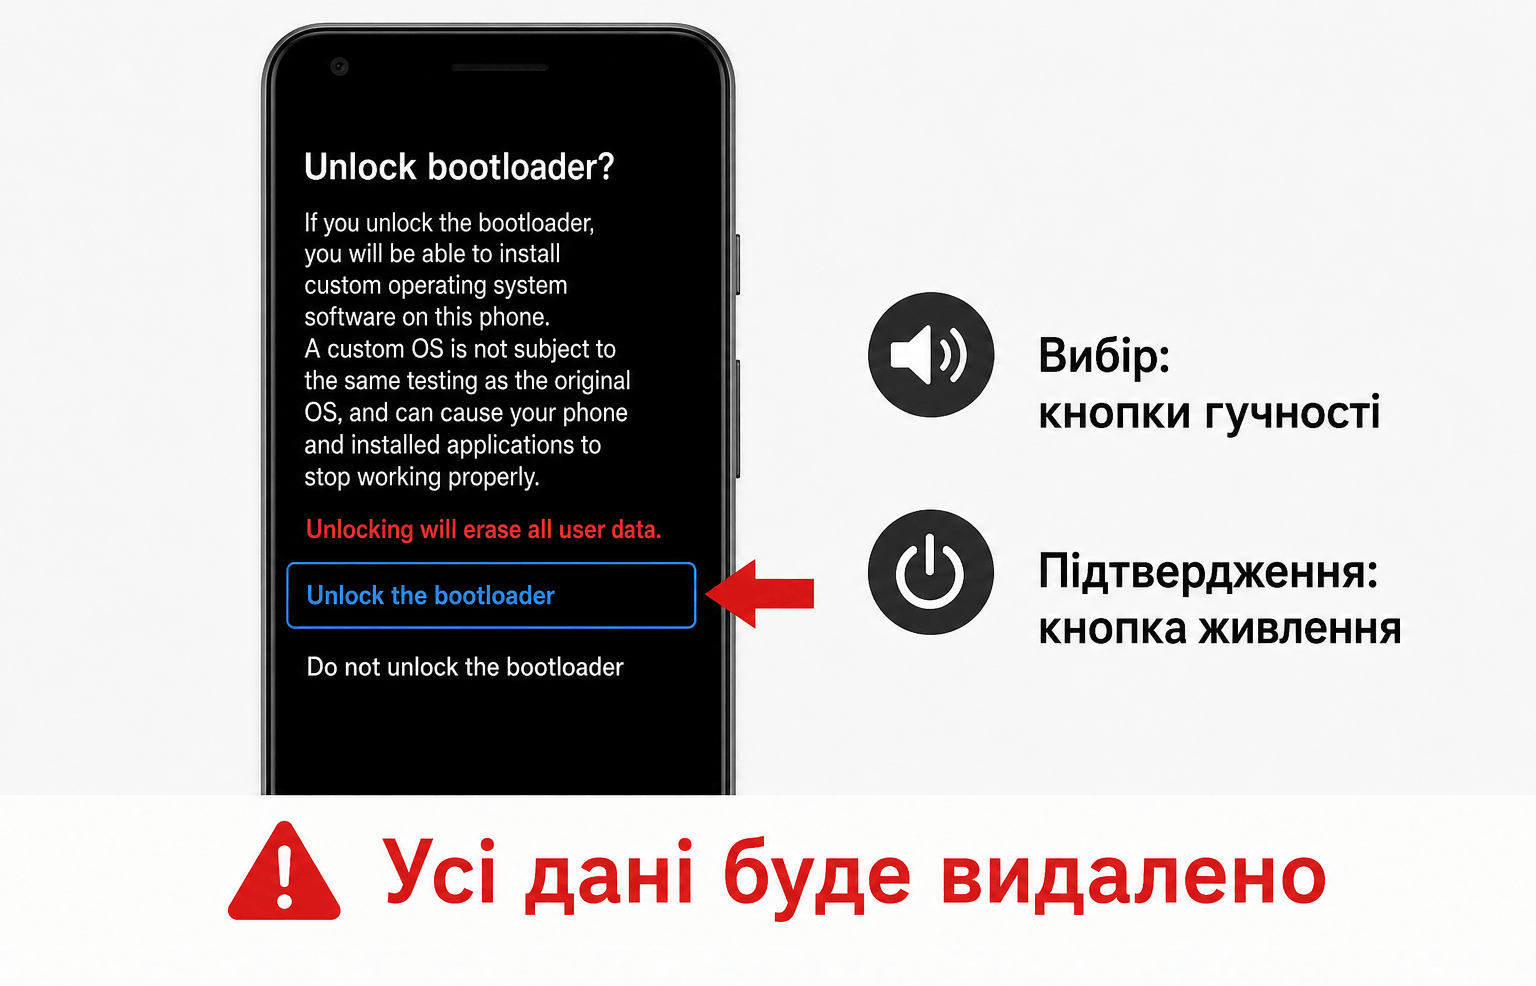
A warning will appear on the Pixel. Use the volume buttons to select Unlock the bootloader, then press the power button to confirm. Once confirmed, all data will be erased. Do not select the similarly named option that cancels the operation, and do not try to confirm by tapping the screen. Read the message displayed on your phone even if its appearance differs from the illustration.
Wait for the operation to finish. If the smartphone exits Fastboot Mode, return it to this mode using the method described above. Do not set up the stock operating system again or restore any backups in the middle of the procedure. The next step is to download GrapheneOS in the same browser tab.
In the Obtaining factory images section, click Download release. The installer detects the connected device model and uses the corresponding official image. Do not manually select an image intended for a different model. If you see an unexpected device name or a device detection error, stop and check the connection before proceeding with the flashing process.
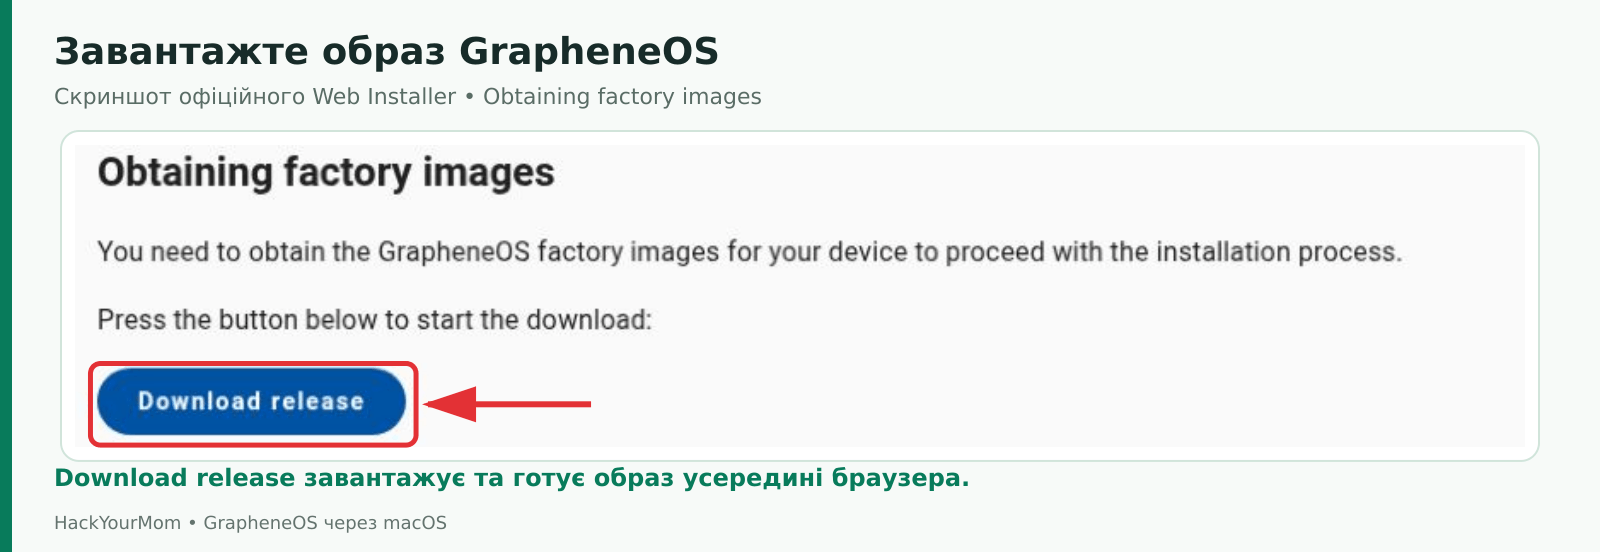
The image is prepared inside the browser, so you should not necessarily expect to find a ZIP file in the Downloads folder. Do not refresh the page, clear the site data, or close the tab. If this stage is interrupted, part of the preparation process may need to be repeated. The speed depends on your internet connection and the Mac’s available resources, so follow the installer’s status rather than relying on an estimated completion time.
If a low storage quota warning appears, check the amount of free disk space, make sure Chrome is running in a regular window, and verify that browser storage is not restricted. If you are using Brave, also check that Shields are disabled for the installer page. This warning indicates a problem with preparing the image in the browser; it does not mean that you need to delete system files from the Pixel or format your Mac’s storage drive.
After the image has been downloaded and prepared, go to Flashing factory images and click Flash release. This is when the installer writes the system components to the phone. Before you begin, check your Mac’s power connection, make sure the cable is secure, and confirm that the sleep settings are configured correctly. Do not move your workstation or switch hardware while the flashing operation is in progress.
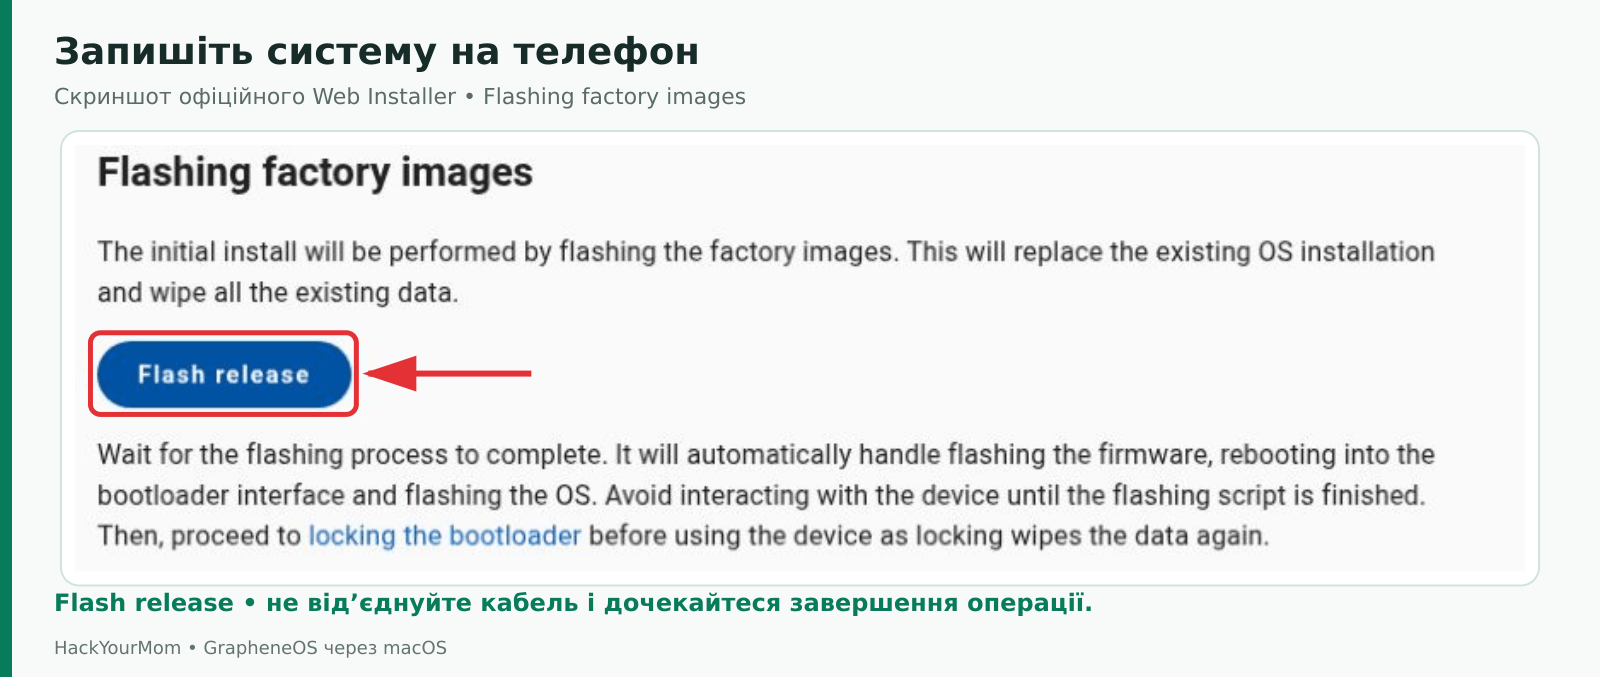
The phone may restart several times and the screen may change during the process. This does not mean that you should select Start, enter Recovery, or try to assist the installer with random commands. Allow the process to finish. Even if the smartphone briefly disappears from the list of USB devices, follow the installer’s messages and wait for its instructions on what to do next.
If the installer asks you to Reconnect device, click that button and select the same Pixel again in Chrome. If macOS displays another accessory permission prompt, verify that it refers to your phone and approve the connection. Do not unplug the cable simply because you see the word “reconnect.” First, perform the specific action requested by the webpage.
Proceed to bootloader locking only after the flashing process has completed successfully. If the progress indicator does not move for a short time, do not assume that flashing is complete. If an error appears, save its exact wording and stop to troubleshoot it. Do not click the next button in an attempt to skip a failed stage.
After GrapheneOS has been flashed successfully, the smartphone should be in the bootloader interface. Open the Locking the bootloader section and click Lock bootloader. Locking the bootloader again is an essential part of completing the installation, not an optional cosmetic step. It restores secure boot with operating system verification and prevents unauthorized flashing through Fastboot.
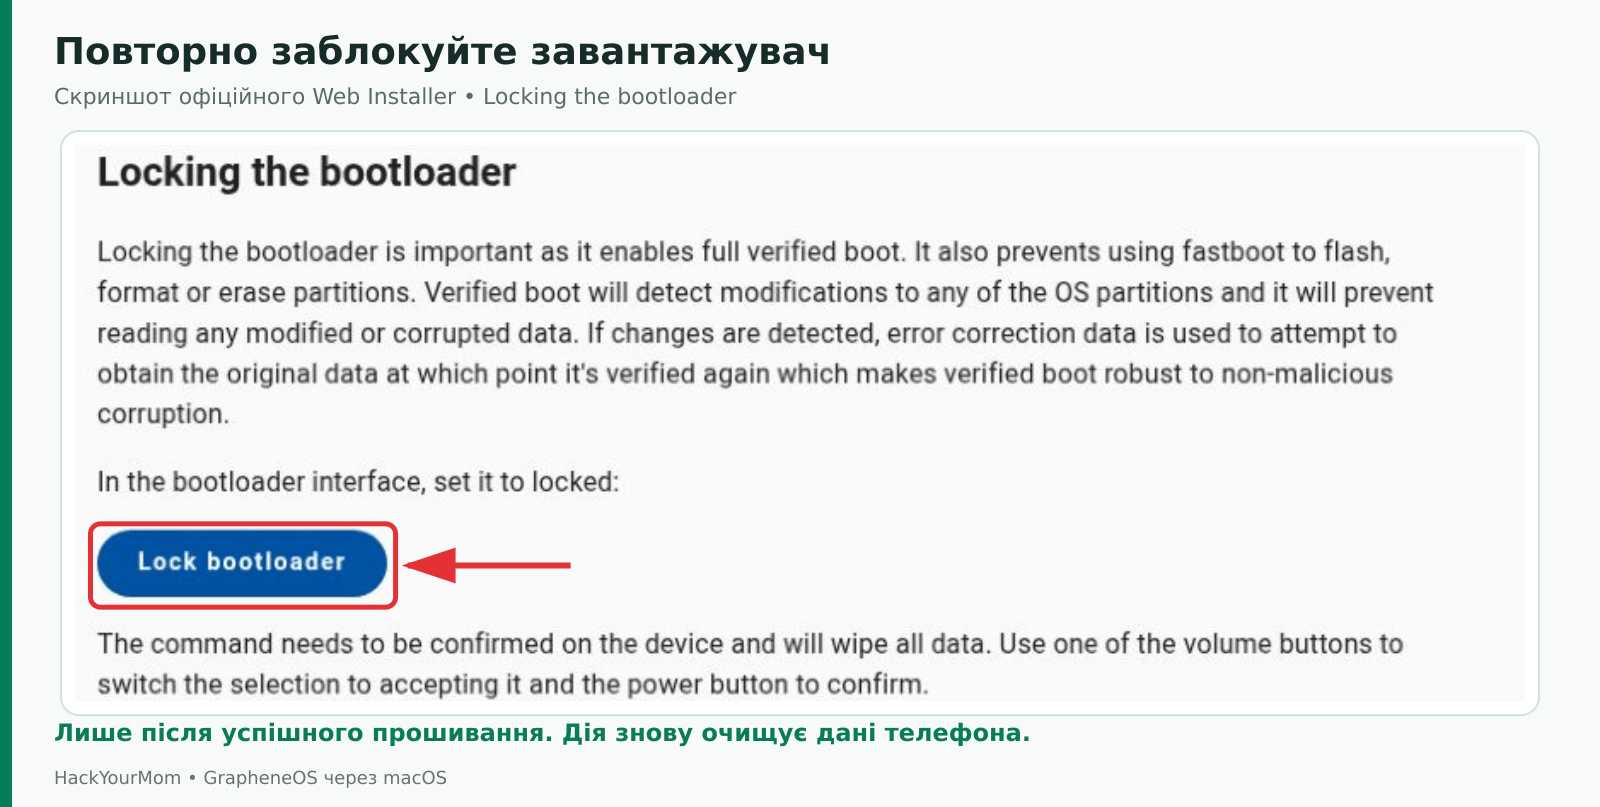
On the Pixel screen, select Confirm Lock with the volume buttons and press Power. Data is being wiped again, so we haven’t restored any files or accounts at this point. Wait for it to finish. If the installer or your phone reports an error, don’t proceed with normal use, assuming the lock worked anyway.
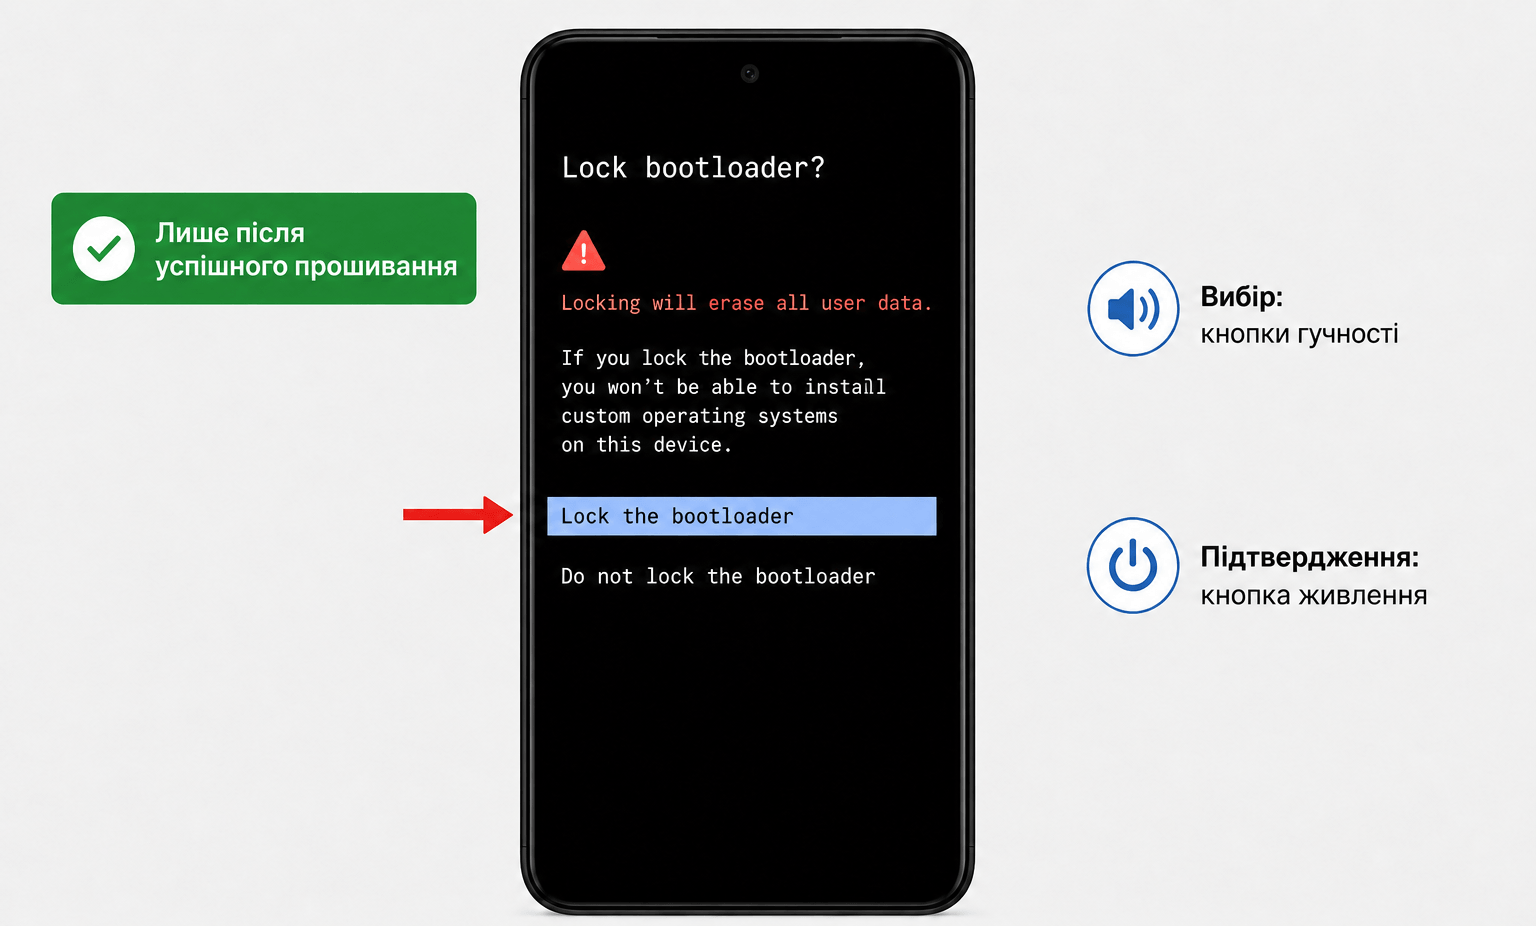
Do not confuse this operation with disabling OEM unlocking in Android settings. A locked bootloader and disabled permission for future OEM unlocking are two different things. First, complete the bootloader locking process here, and then check the permission status after the initial setup.
In Fastboot Mode, select Start and press the power button. At this stage, this option is required because it starts the installed operating system. Wait for the initial setup wizard to appear and follow its instructions for selecting a language, connecting to a network, and configuring a screen lock. Do not expect the first startup to take the same amount of time as a normal restart of a phone that has already been configured.
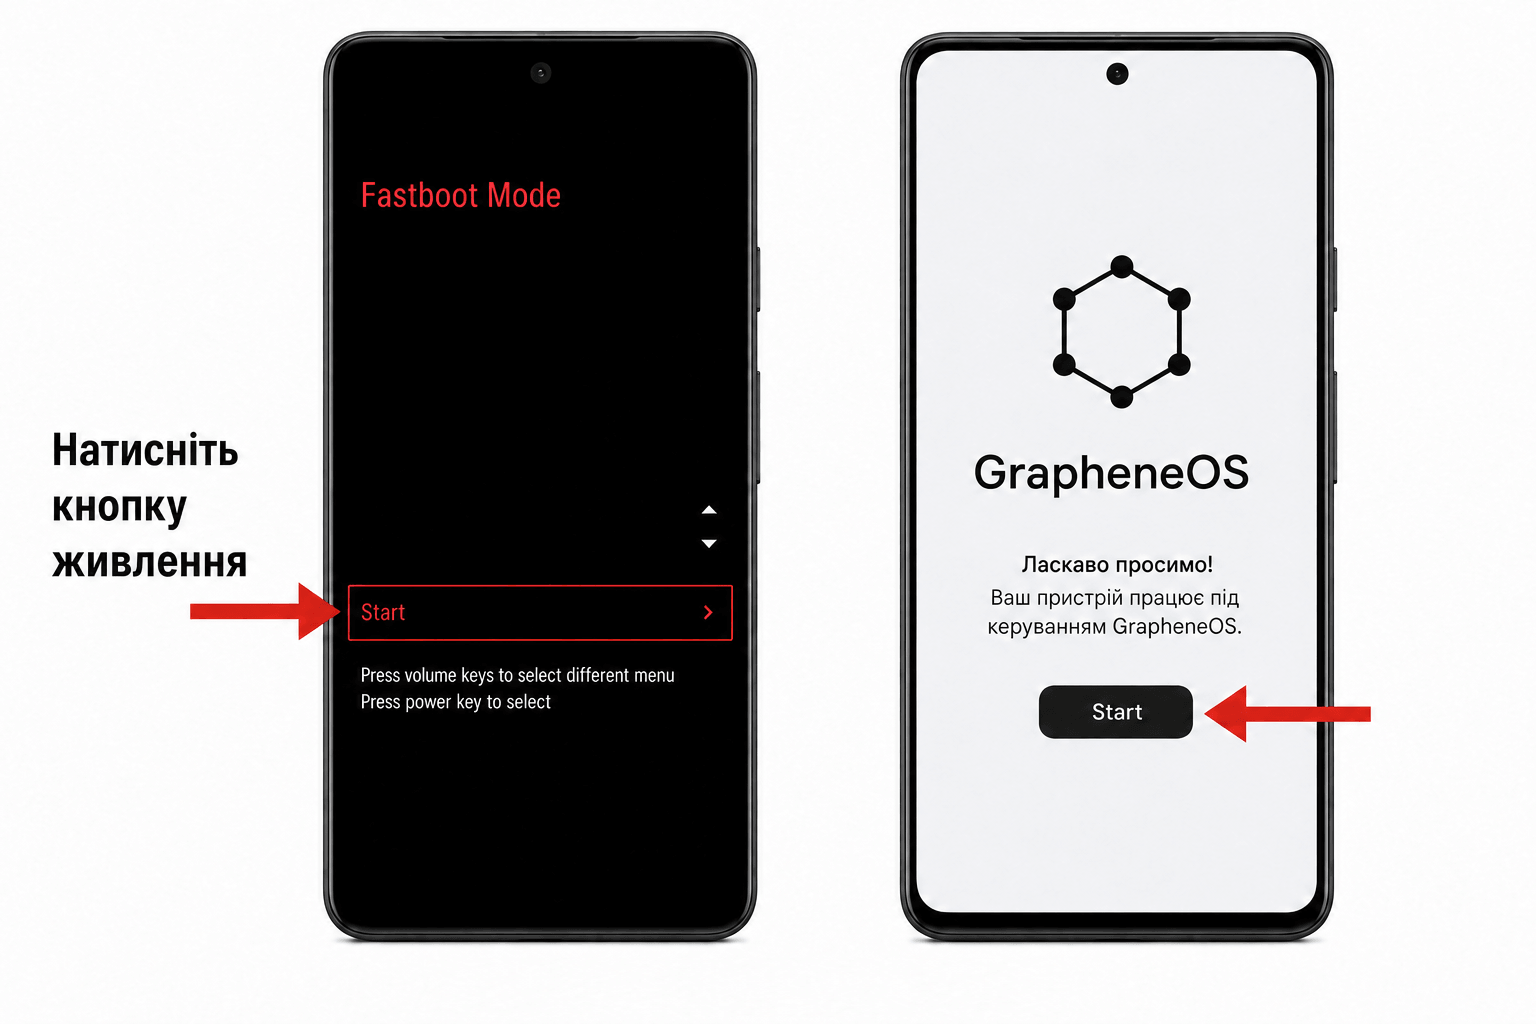
Set a strong PIN or password that you can remember without relying on a hint stored on the same phone. A Google account is not required to use GrapheneOS. Do not rush to reinstall all your applications immediately. First, verify that the installation has been completed successfully, check your network connection, and install any available updates. Then restore your data in stages.
The final screen of the initial setup includes an option that disables OEM unlocking. According to the official instructions, this option is selected by default, and you should leave it selected. This can be confusing: a selected option in the setup wizard means that OEM unlocking will be disabled, while the OEM unlocking setting in Developer options should remain turned off afterward.
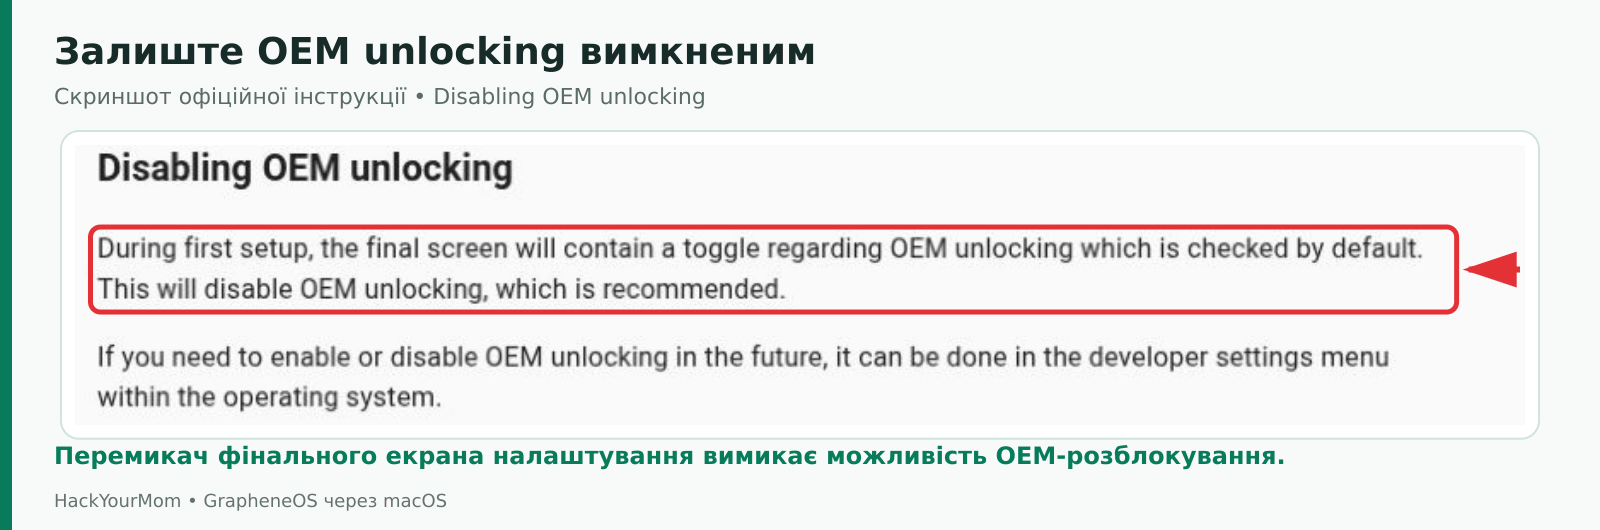
If you open Developer options later, check the name and status of the OEM unlocking setting specifically, not the main Developer options toggle. You do not need to enable USB debugging or leave OEM unlocking permitted for normal GrapheneOS use. Future standard system updates will not require you to repeat this entire process.
After installing an alternative operating system on your Pixel, a yellow warning containing a Verified Boot key identifier may appear during startup. The yellow color alone does not mean that the phone is infected or that the bootloader locking process was unsuccessful. What matters is the message itself, the bootloader status, and whether the key matches your device model. Do not ignore other warnings simply because this guide mentions a yellow screen.
On your Mac, open the official list of Verified Boot key hashes and find Pixel 10. Compare the complete identifier displayed on the phone with the corresponding entry. Do not use the hash for the Pixel 10 Pro or another variant, and do not compare only the first few characters. This guide does not reproduce the long code manually: checking the original source reduces the risk of copying errors and ensures that readers have an authoritative reference after the article is published.
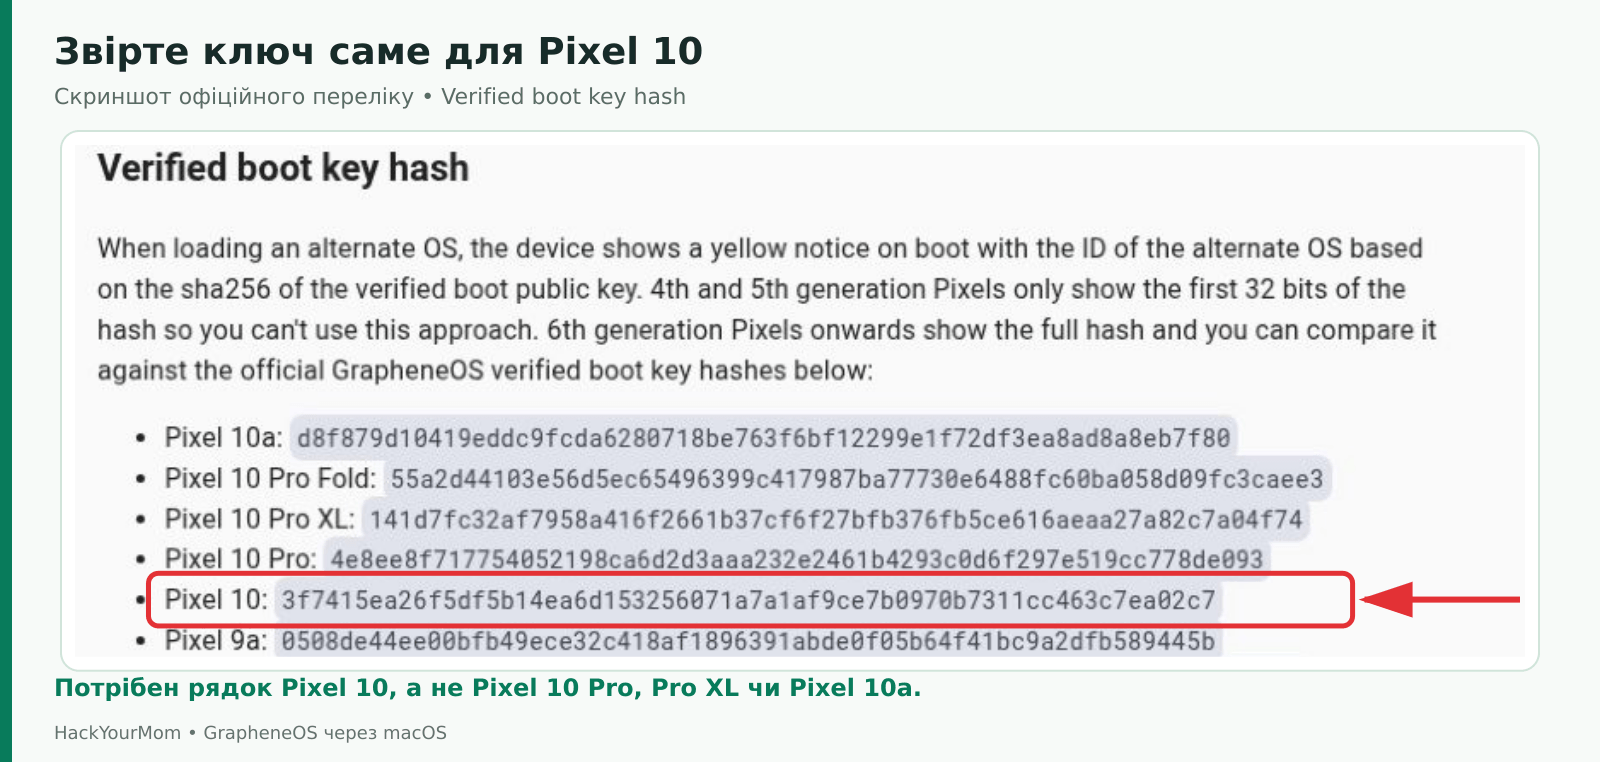
For additional verification, you can use Auditor. This is a separate hardware-based attestation procedure, not a green indicator in an arbitrary Security → Verified Boot menu. Local verification requires a second Android device, and remote integrity monitoring is also available. The procedure is described in the official Auditor guide. If the key does not match or you are uncertain whether the flashing process was successful, do not enter important passwords into the system until you have identified the cause.
Google Play is optional on GrapheneOS. If the applications you need work without it, you can use the system without Google services. If they depend on Play services, open the built-in GrapheneOS App Store on the phone, select Google Play services, and install the suggested package. This does not refer to the App Store on your Mac or a random APK file found through a web search.
The current GrapheneOS instructions explain that Google Play services and the Google Play Store are installed as interdependent components. In older illustrations, the built-in app store may be called Apps. For this guide, follow the current documentation rather than outdated instructions that tell you to find and install three separate APK files manually.
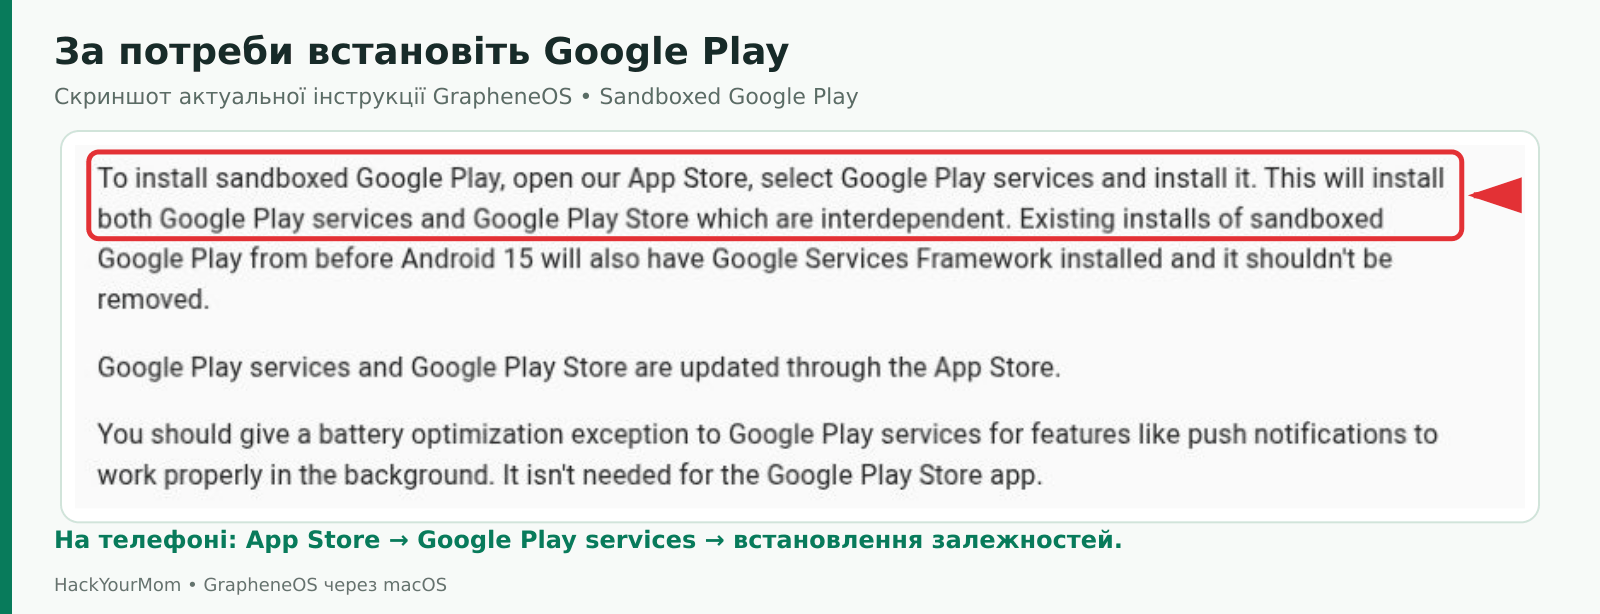
These components run as regular sandboxed applications without privileged system access. Install them in the profile where the applications that depend on them will be used. For background push notifications, the documentation recommends allowing Google Play services to run without battery optimization restrictions; the Play Store itself does not require this exception. Signing in to Google is necessary for features that require an account, including downloading applications through the Play Store.
Do not assume that installing Play services will automatically make every banking application or contactless payment service compatible. Before switching completely, test the applications you need, notifications, calls, and work-related services. If an application does not work, treat it as a separate compatibility issue, not as a reason to leave the bootloader unlocked or disable system security features.
First, determine which stage of the process failed. An empty USB device selection window before flashing begins, an image download error, and a failure during Flash release are different problems. Record the exact error message, device model, macOS version, and browser version. Do not replace the message with a vague description such as “nothing works”: the exact wording is far more useful for troubleshooting.
Check each possible cause one at a time instead of changing everything simultaneously. First, look at the phone: it must be in Fastboot Mode, not on the regular Android screen. Next, make sure the Mac is unlocked and that you approved the accessory connection prompt if it appeared. Only then should you check the cable and try a direct connection to another port.
Make sure the cable supports data transfer and is not designed only for charging.
Do not use a USB hub or docking station during installation.
Close other flashing tools, unnecessary browser tabs, and applications that may be accessing the Android device.
Make sure the official website is open in an up-to-date supported browser.
On a managed Mac, check whether the organization’s policies restrict USB access.
A Pixel in Fastboot Mode does not necessarily appear in Finder as a storage device. Do not switch it to file transfer mode simply to view its folders, as that is a different operating mode. Likewise, installing a Windows driver package will not fix a connection problem on macOS.
Check your internet connection and available storage space, and make sure the browser is not running in private mode. If the process has not yet progressed from downloading to writing data to the phone, fixing the browser environment is generally more appropriate than modifying the smartphone’s partitions. Do not manually select images intended for other Pixel models in an attempt to bypass the error. After resolving the cause, follow the instructions provided by the official installer.
Do not click Lock bootloader after an unsuccessful flashing attempt, and do not enter random commands copied from a third-party forum. If the installer asks you to select the device again, perform that exact action. If the cause is unclear, save the log or take a screenshot of the error after hiding serial numbers and other personal information, then contact the official GrapheneOS community channels.
Do not interpret every delay as evidence that the phone has been damaged. At the same time, there is no universal recovery button for every possible failure: the correct next step depends on what has already been written to the device and which mode it is currently in. Until you have determined this, do not restore personal data or begin using the system as though the installation were complete.
After completing the setup wizard, take a few minutes to verify the result. Reaching the home screen does not confirm that every security step has been completed. Do not delete your backups immediately either: first make sure that the required files and account access can be restored and that essential everyday functions work correctly.
Flash release completed successfully, with no unresolved errors.
The bootloader has been locked again and was not left in the unlocked state.
OEM unlocking is disabled after the initial setup.
The Verified Boot key has been checked against the entry for your exact model on the official website.
A strong screen lock has been configured, and Wi-Fi, mobile connectivity, and required applications have been tested.
System updates remain enabled; restart the phone whenever required to complete their installation.
The Mac’s sleep settings have been restored to their usual configuration, and any temporary permission changes have been reviewed.
GrapheneOS will subsequently receive standard updates directly on the phone. You do not need to connect it to your Mac and unlock the bootloader again for every update. Restore applications and files gradually, keeping only what you actually need. Limiting unnecessary applications and managing permissions carefully is more effective than relying on the operating system’s name alone to protect against every possible risk.
Installing GrapheneOS through macOS follows a clear sequence: prepare your backups and Mac, enable OEM unlocking, put the Pixel into Fastboot Mode, grant the required USB permissions, unlock the bootloader, download and flash the system image, and then lock the bootloader again. The main differences compared with Windows involve preparing macOS, granting accessory permissions, and managing the computer’s power settings, not using a different system image for the phone.
This guide uses a Google Pixel 10 and macOS Tahoe 26 as its example, but the official compatibility lists available at the time of installation remain the deciding factor. Take your time, read the warnings displayed on both devices, and proceed to the next step only after the previous one has finished. This careful approach, rather than additional tools or random commands, makes the installation process understandable and controlled.