
20.03.2024
14 min
3279

Discusses how to manage and enforce firewall policies in a GNU/Linux infrastructure, with a particular focus on controlling access permissions between different network zones and devices. A step-by-step guide is provided for configuring firewall rules to enable certain connections, such as allowing a relay host in one VLAN to connect to a server in another via SSH by configuring the necessary firewall commands. The use of a firewall for these configurations is also covered, emphasizing the importance of understanding these policies for effective network administration and security.


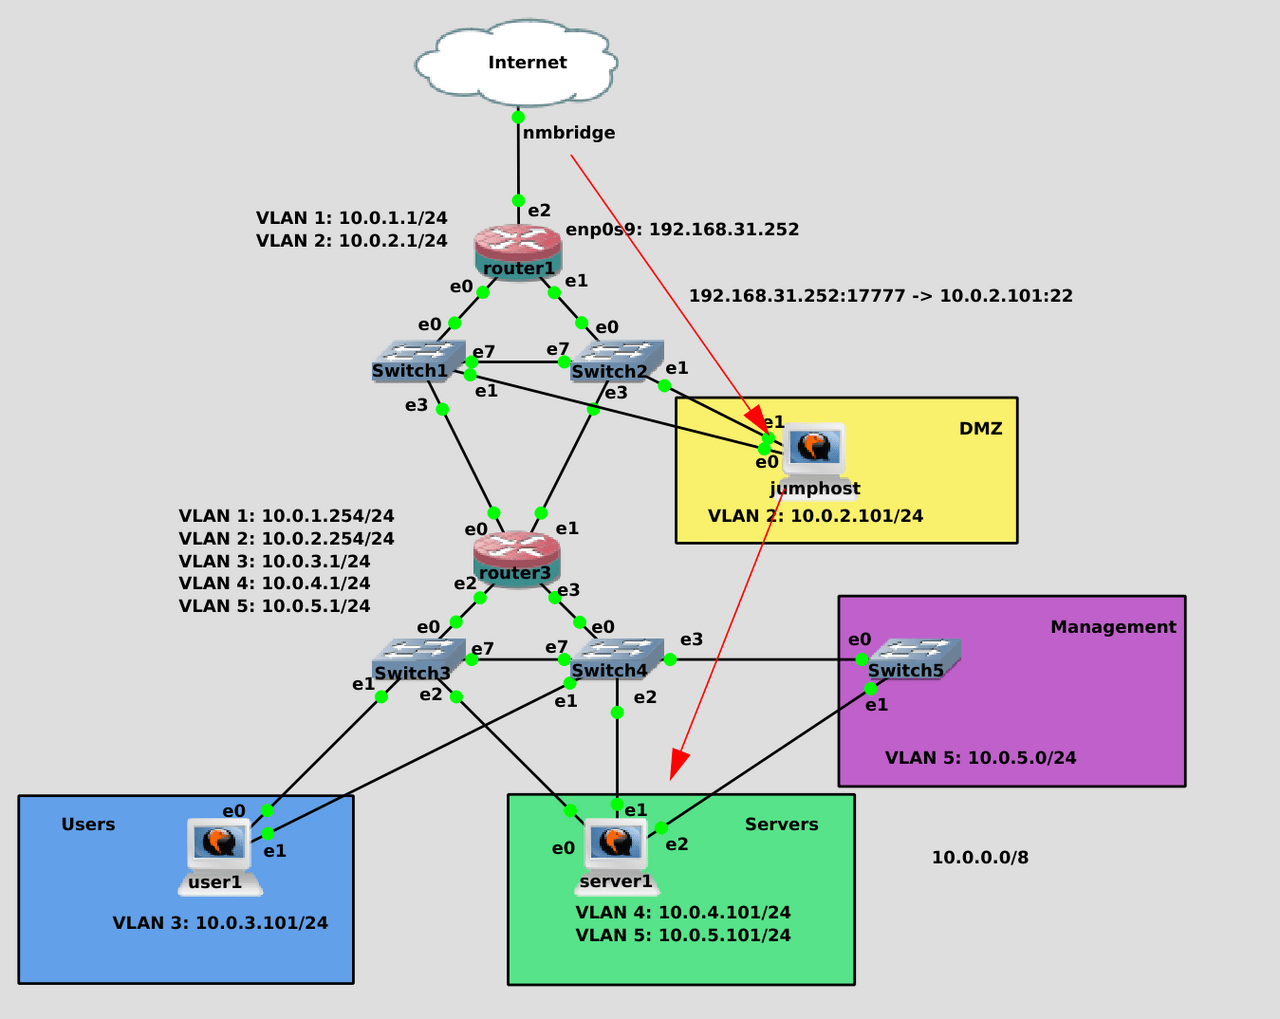
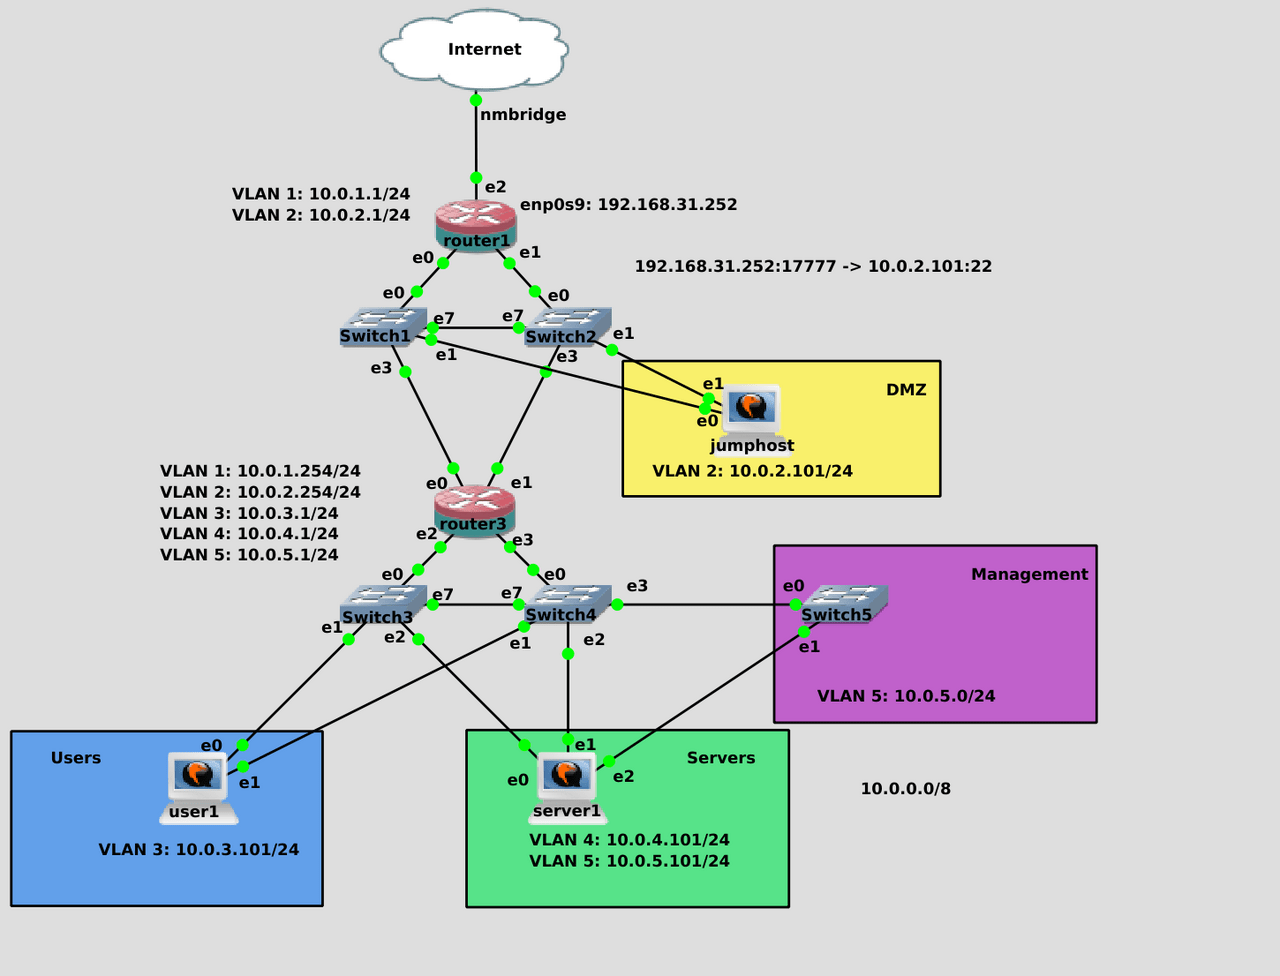
Last time we zoned our network, thereby blocking all access. Today we will figure out how to issue these access points. In the real infrastructure, this is usually done by the information security department, but we also understand it for a reason. Usually, when an administrator configures and links some servers in different zones, he should contact the security department and let them know what he needs. For example, I have a jumphost in the second lane with IP 10.0.2.101 and I need it to be able to connect to server1 at the address 10.0.5.101 and port 22. That is. Asking for access on the firewall is a standard procedure for an administrator. And in order to fix it in our heads and understand when it is necessary and when it is not, we ourselves will prescribe these rules as needed. Yes, in real infrastructure no one does this through firewalld, but the main thing for us is to understand the idea itself, why and how to do it. And this tool or another is absolutely unimportant.
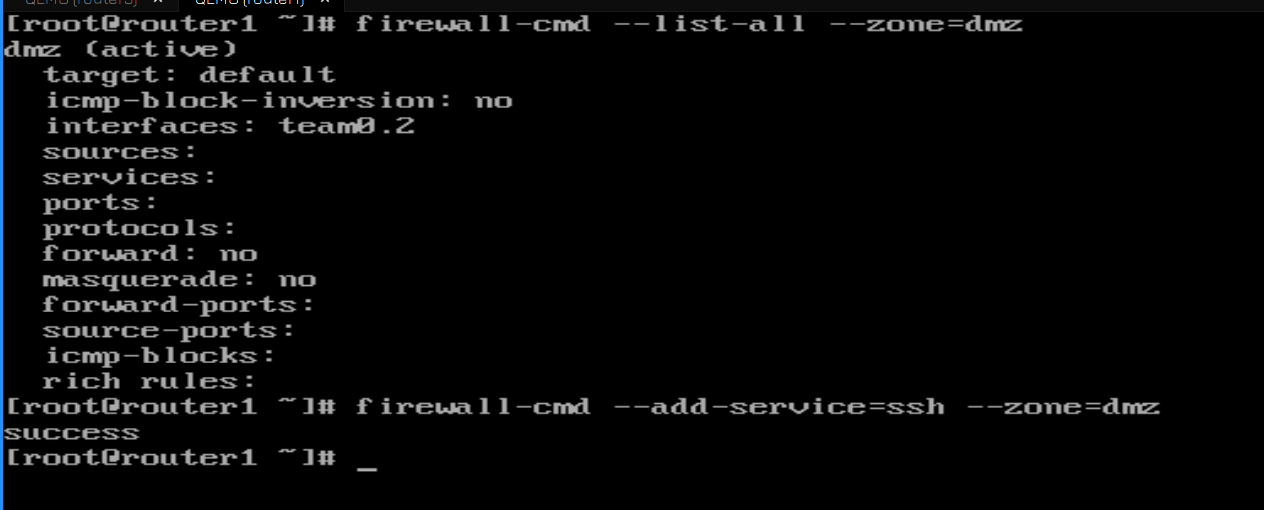
Today we will work with router 1 and 3. Last time, we prohibited connecting to router 1 from jumphost:
firewall-cmd --list-all --zone=dmz
And in order not to configure everything through the console, let’s temporarily enable ssh:
firewall-cmd --add-service=ssh --zone=dmz
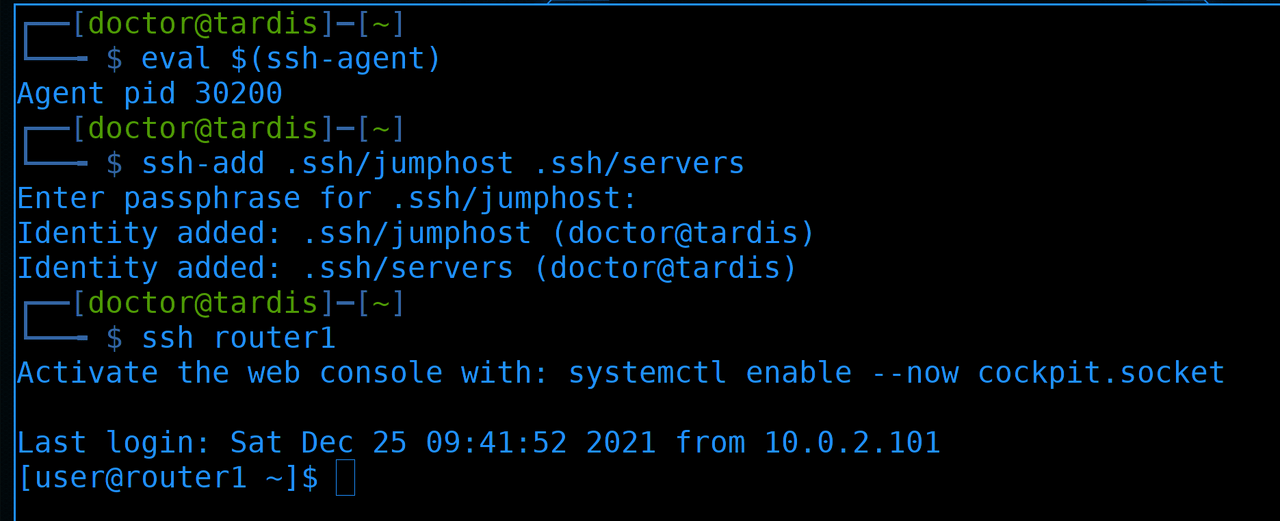
Let’s start the ssh-agent:
eval $(ssh-agent)
add the keys:
ssh-add .ssh/jumphost .ssh/servers
And we hack into the router:
ssh router1
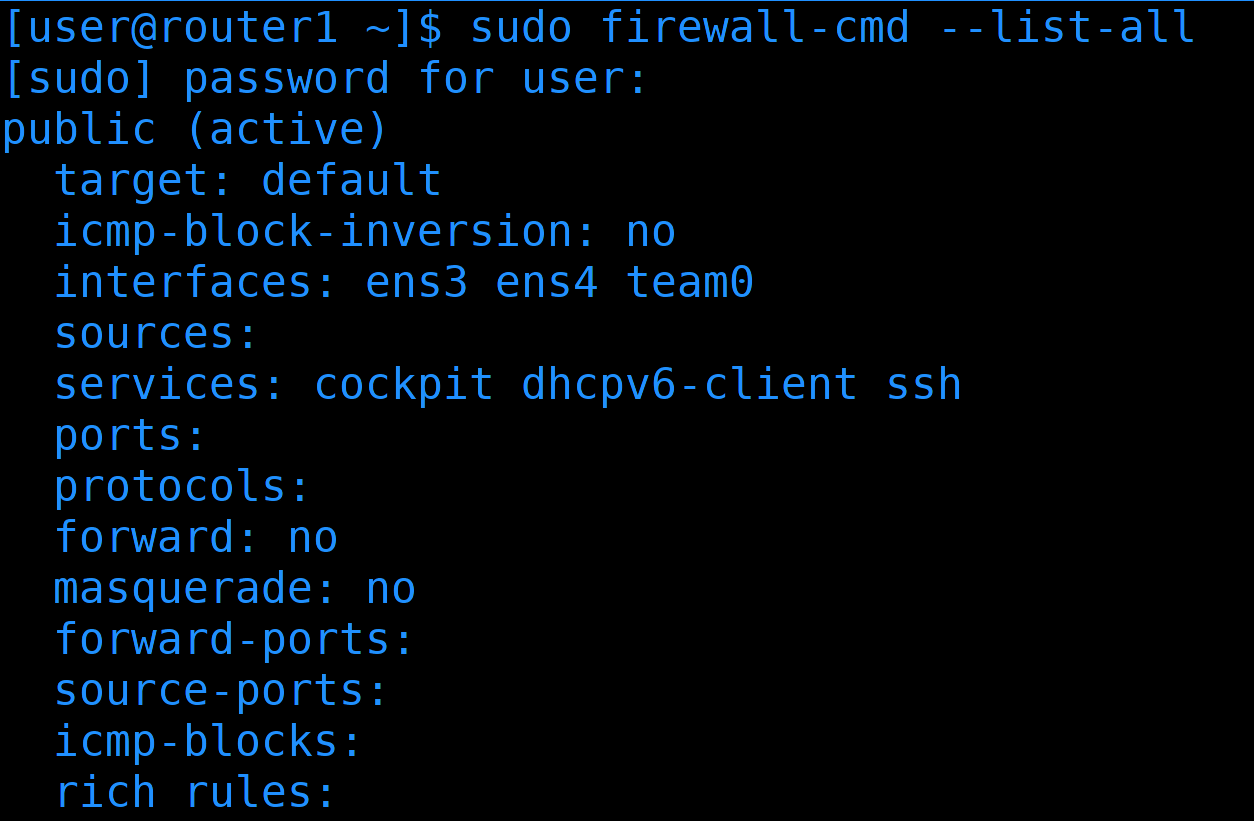
Last time, on router 3, we created the routers zone, and on router 1, everything remained in the public zone:
sudo firewall-cmd --list-all
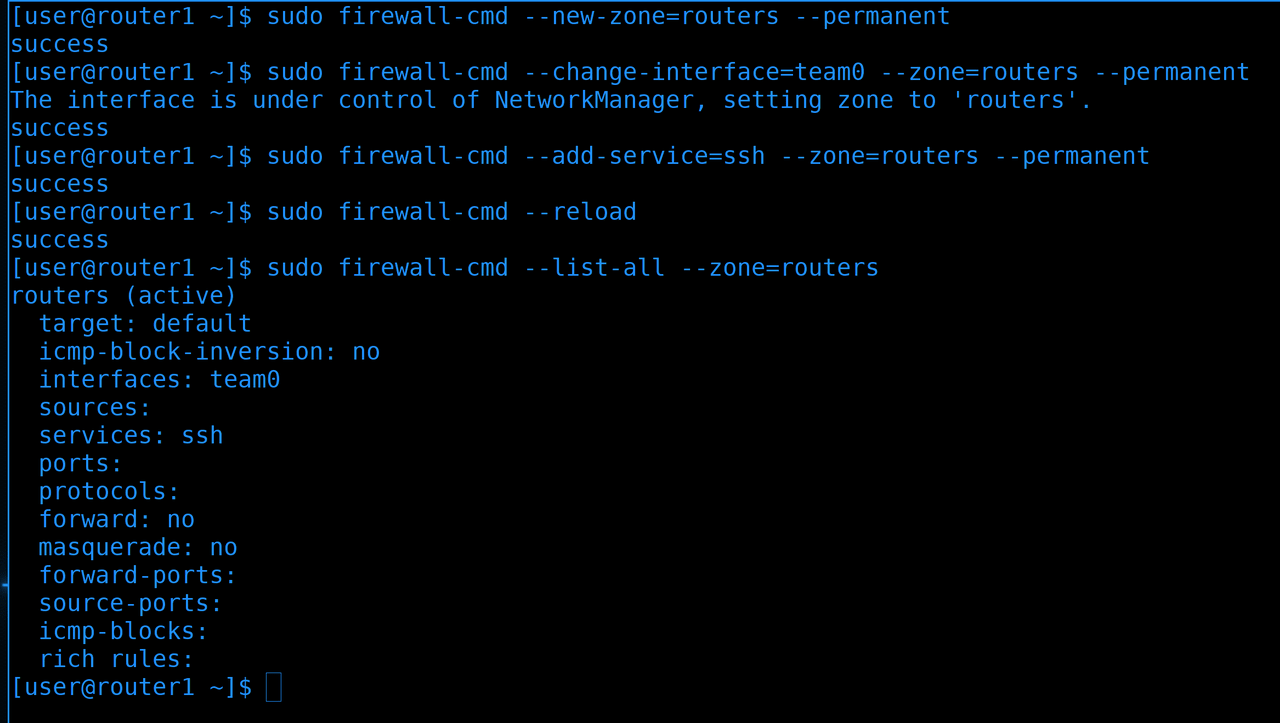
Let’s fix it. First, let’s create the routers zone:
sudo firewall-cmd --new-zone=routers --permanent
Let’s move to it the interface that is in the same network as router 3:
sudo firewall-cmd --change-interface=team0 --zone=routers --permanent
Let’s add ssh to this zone so that we can connect to router 1 from router 3:
sudo firewall-cmd --add-service=ssh --zone=routers --permanent
Because it is not possible from the jumphost, otherwise only through the console. Let’s restart the firewall and check the new zone:
sudo firewall-cmd --reload
sudo firewall-cmd --list-all --zone=routers
Everything is as it should be.
I haven’t forgotten yet. We recently registered 3 routes on router1:
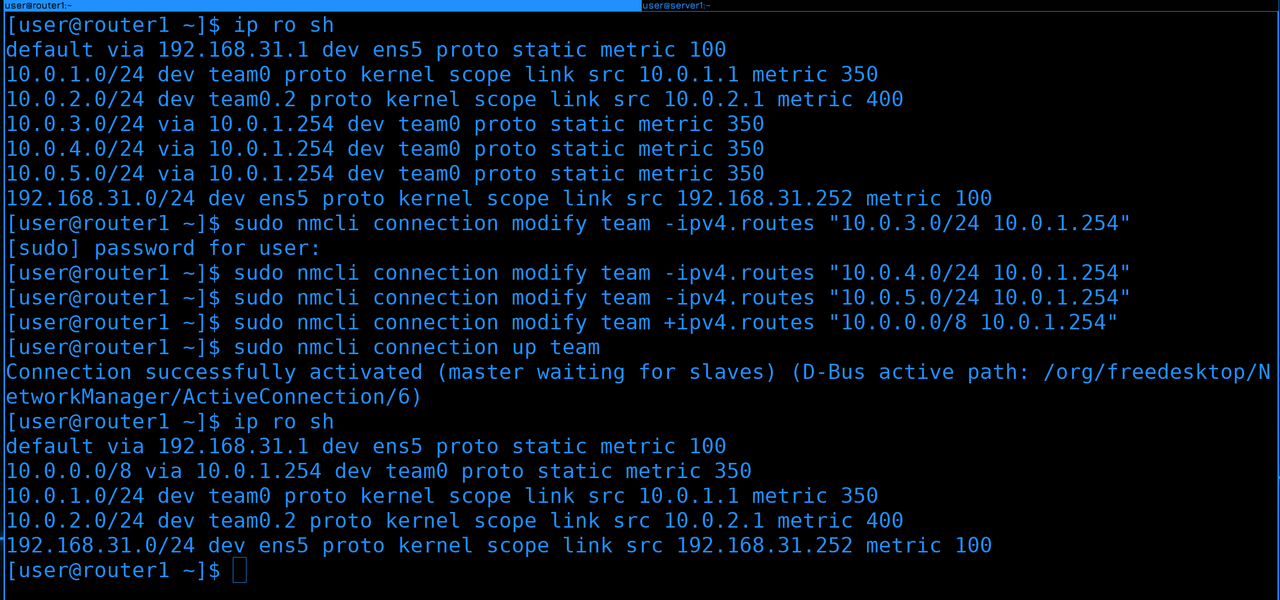
ip ro sh
3, 4 and 5 networks. But if our number of networks will constantly grow, so as not to forget to add them, let’s change the approach. Let’s remove these 3 networks:
sudo nmcli connection modify team -ipv4.routes "10.0.3.0/24 10.0.1.254"
sudo nmcli connection modify team -ipv4.routes "10.0.4.0/24 10.0.1.254"
sudo nmcli connection modify team -ipv4.routes "10.0.5.0/24 10.0.1.254"
and instead of them we will write the entire subnet 10.0.0.0/8 – this includes everything from 10.0.0.0 to 10.255.255.255.
sudo nmcli connection modify team +ipv4.routes "10.0.0.0/8 10.0.1.254"
Then we will raise the profile and check the routing table:
sudo nmcli connection up team
ip ro sh
Now everything related to the local network will be forwarded to the third router.
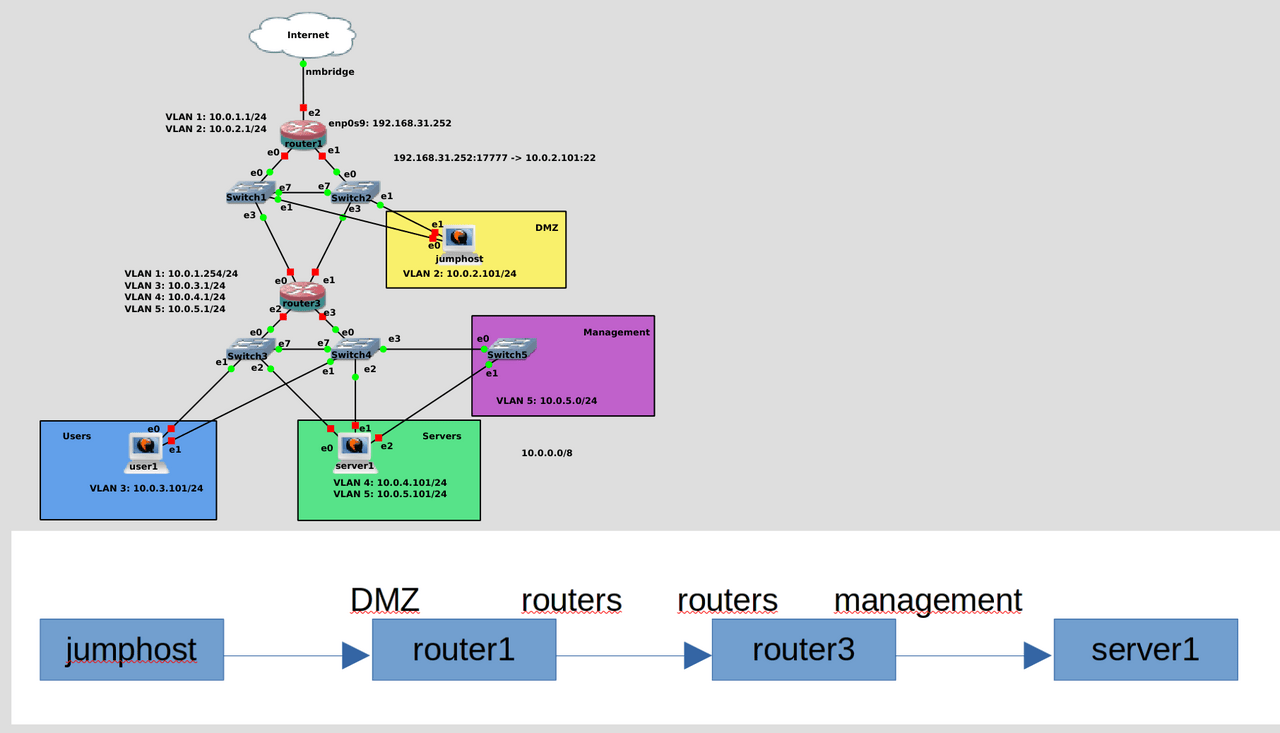
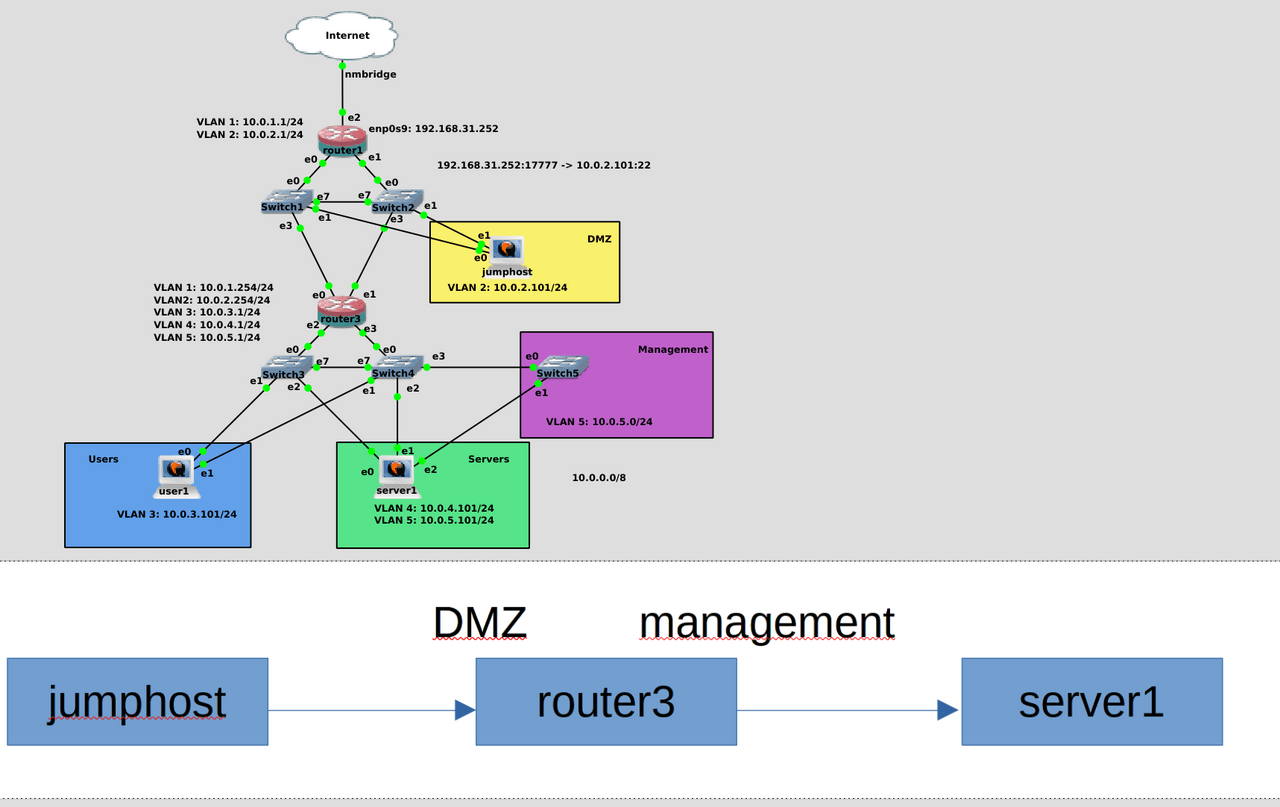
Let’s imagine the connection scheme of jumphost to server1. First, the packet goes from jumphost to router1. For router1, the jumphost is in the DMZ zone. Next, router1 forwards the packet to router3. For router1, router3 is in the routers zone. The same for router3 – router1 is in the routers zone.
As for router3, in our scheme now traffic from the DMZ zone to get to the internal network will have to go through router1 first, and only then through router3. And this means that we will divert excess traffic through router1. Therefore, let’s better add a second vlan to router3, so that devices from the DMZ directly pass through router3.
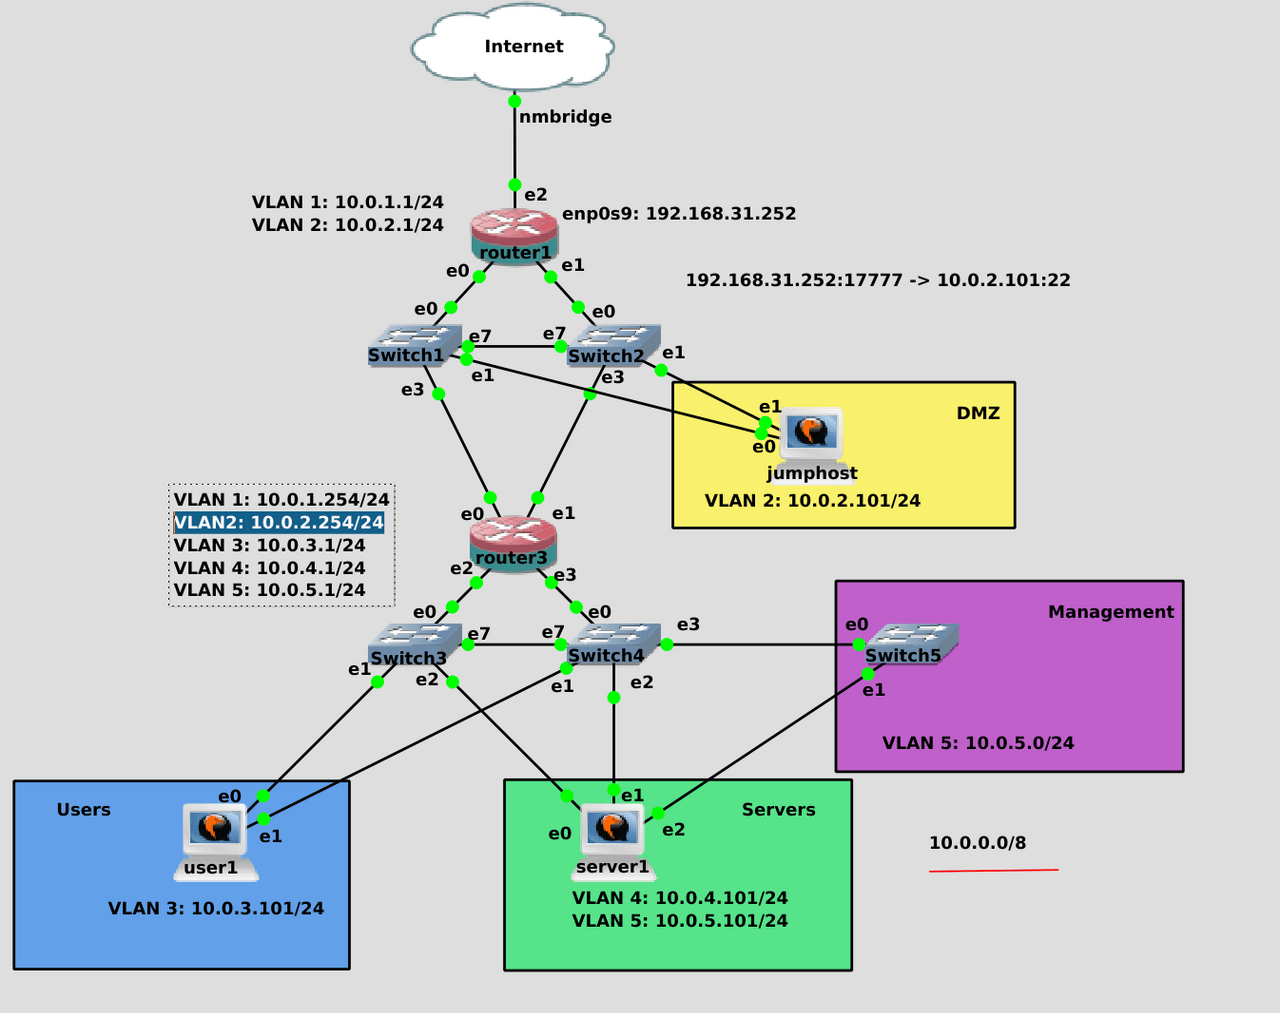
On router 3, I created a new vlan interface with the address 10.0.2.254 and added it to the DMZ zone.
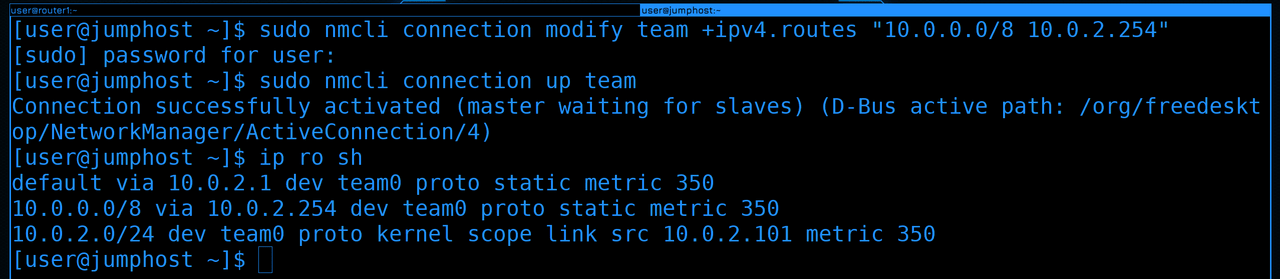
On the jumphost itself, so that it sends all packets to the internal network through the address of the third router, we will write a new route:
sudo nmcli connection modify team +ipv4.routes "10.0.0.0/8 10.0.2.254"
Then we will raise the interface and check the routing table:
sudo nmcli connection up team
ip ro sh
Here we can see that these are packets that will pass through router3 to the 10.0.0.0/8 network. And all other addresses are through router 1.

Now the connection from jumphost to the server looks simpler – only router3. Jumphost for router3 is in the DMZ zone, and server1 is in the management zone. More precisely, in two zones – servers and management, but we are currently interested only in the second zone.
Let’s connect to server1. You can hack into it via ssh only from 5 steering wheels:
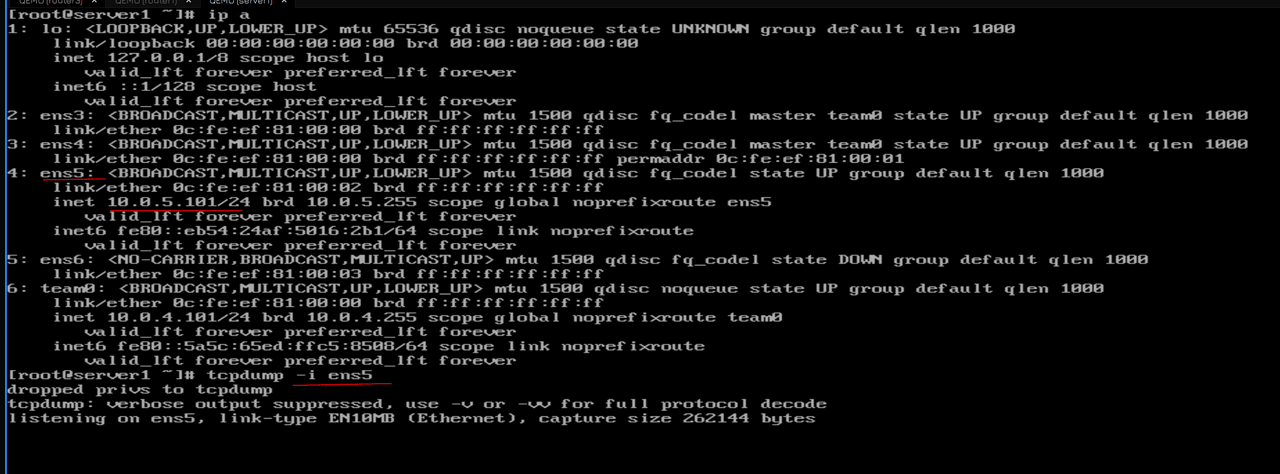
ip a
And we have it on the ens5 interface. Let’s take a look at tcpdump on this interface:
tcpdump -i ens5
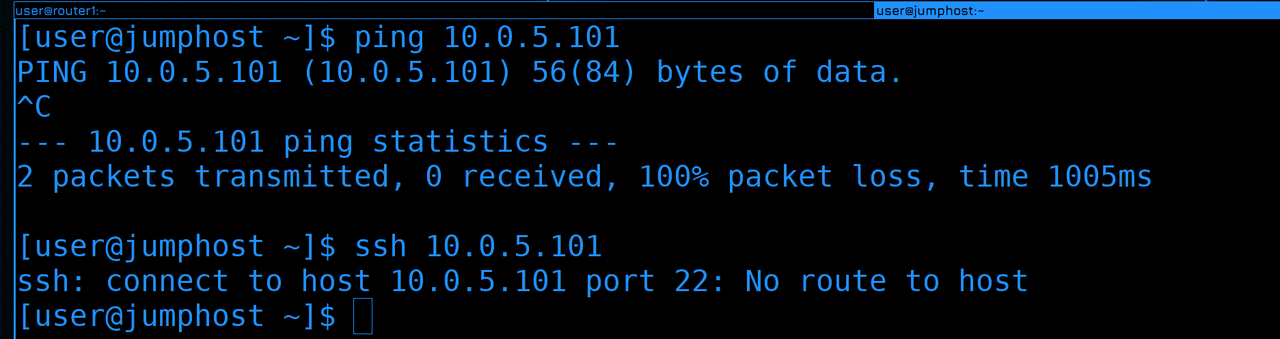
Now we go to jumphost and try to ping:
ping 10.0.5.101
There is no ping. But it’s not about the firewall, it allows all pings by default. It is also not possible to connect via ssh:
ssh 10.0.5.101
But it’s still clear, it’s a matter of firewall. We will come to it later, but for now we will try to figure out why server1 is not pinged.

Let’s go and see tcpdump. As you can see, there were no ssh packets, but pings were coming. But there was no answer to them. Why?
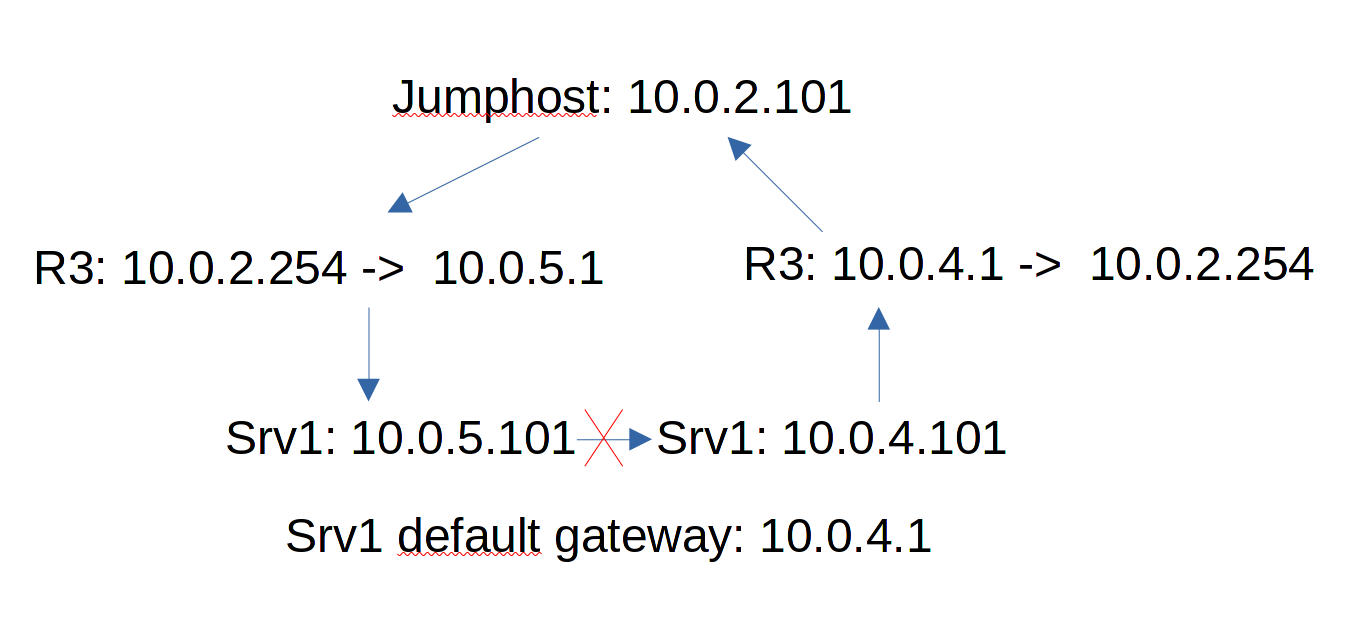
There is one peculiarity when you have several IP addresses in the system, as on our server1. It has two addresses – 10.0.4.101 and 10.0.5.101. But the default gateway is only 1 – 10.0.4.1. And imagine – the jumphost sends a ping to the address 10.0.5.101. Server1 should respond to the address 10.0.2.101. But it says in the routing table that this address is available at the address 10.0.4.1 – which means that the answer must be sent from another interface, on which the IP is 10.0.4.101. That is, the packet comes from one interface, and you need to respond from another. On the one hand, we could write a route through 10.0.5.1 to the address 10.0.2.101. But then there would be the reverse problem – if the request comes on 4.101, then the response will be sent from 5.101 – which will lead to the same problem.
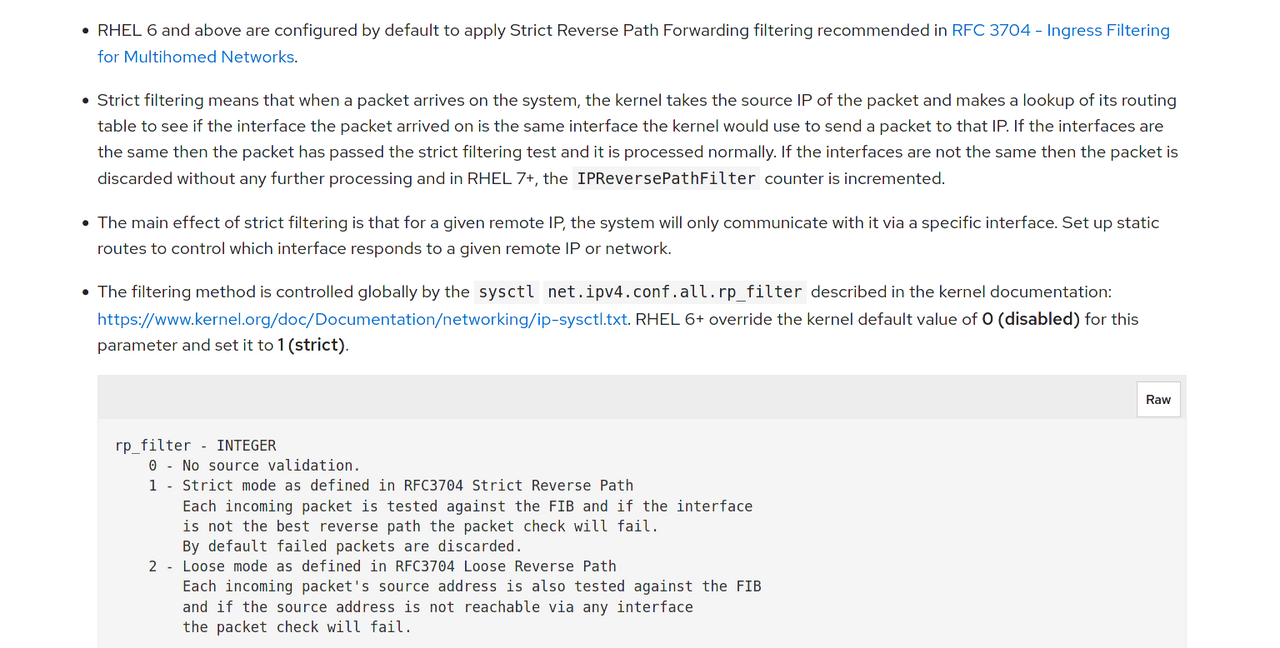
Usually it shouldn’t be. Therefore, the kernel blocks such responses by default. That is, if the packet comes from one interface, and the response needs to be sent from another – the kernel does not allow it. In general, of course, you can allow it, but from the point of view of routing it is not quite right. There is a better way. We need to write our routing table for the interface where the address is 5.101.
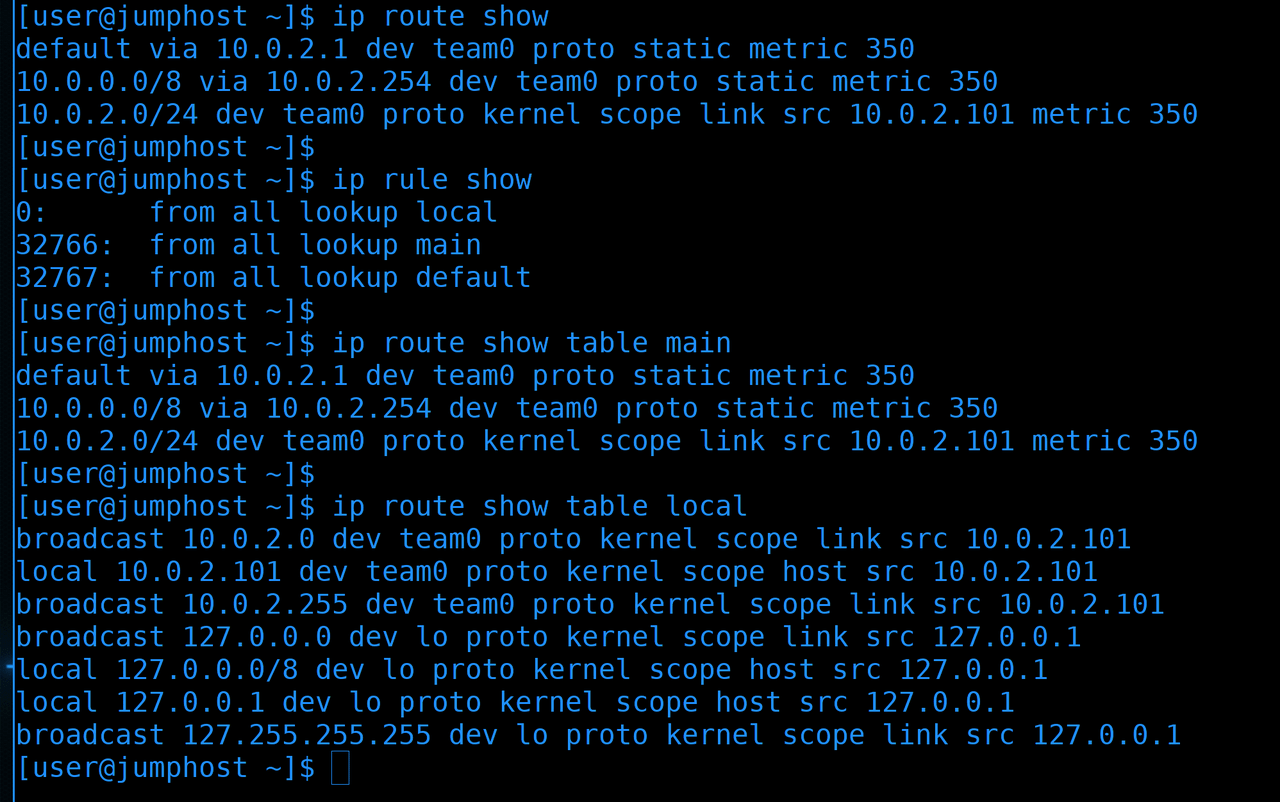
To begin with, let’s deal with routing tables and rules. Briefly, there is a routing table:
ip route sh
Nothing. There are also routing rules:
ip rule show
Numbers on the left are priority. The closer to 0, the higher it is. Further from whom – from all. Here we specify the source network. And then lookup and 3 values – local, main and default. These are the routing tables. The routing table that we see when typing ip ro sh is one of them – main. We can verify this by entering the command:
ip route show table main
There is also local:
ip route show table local
This is mainly about local networks.
That is, we can create several routing tables and we can write that requests from such networks should use such a routing table, while also taking into account the priority. To make it clearer, let’s do it on server1.

Let’s add a new route for the ens5 interface in the NetworkManager profile, specifying a table with some number, let’s say 2:
nmcli con mod management ipv4.routes "10.0.0.0/8 10.0.5.1 table=2" ipv4.routing-rules "priority 5 from 10.0.5.101 table 2"
And yes, we said in the profile of the ens5 interface that for the network 10.0.0.0/8 we need to use 10.0.5.1 as a gateway, while this refers to the routing table 2. And we immediately added a rule with priority 5 that the outgoing IP is 10.0.5.101 and this table 2.
Let’s raise the interface and look at the rules and the routing table:
nmcli con up management
ip rule list
ip route show table 2
As you can see, we now have a rule with priority 5, which points to table 2, where the route for the local network is specified. Theoretically, instead of 10.0.0.0/8, you could specify 0.0.0.0/0 so that each interface has its own default gateway, but since it concerns the management interface, I don’t want it to have a route to the Internet.
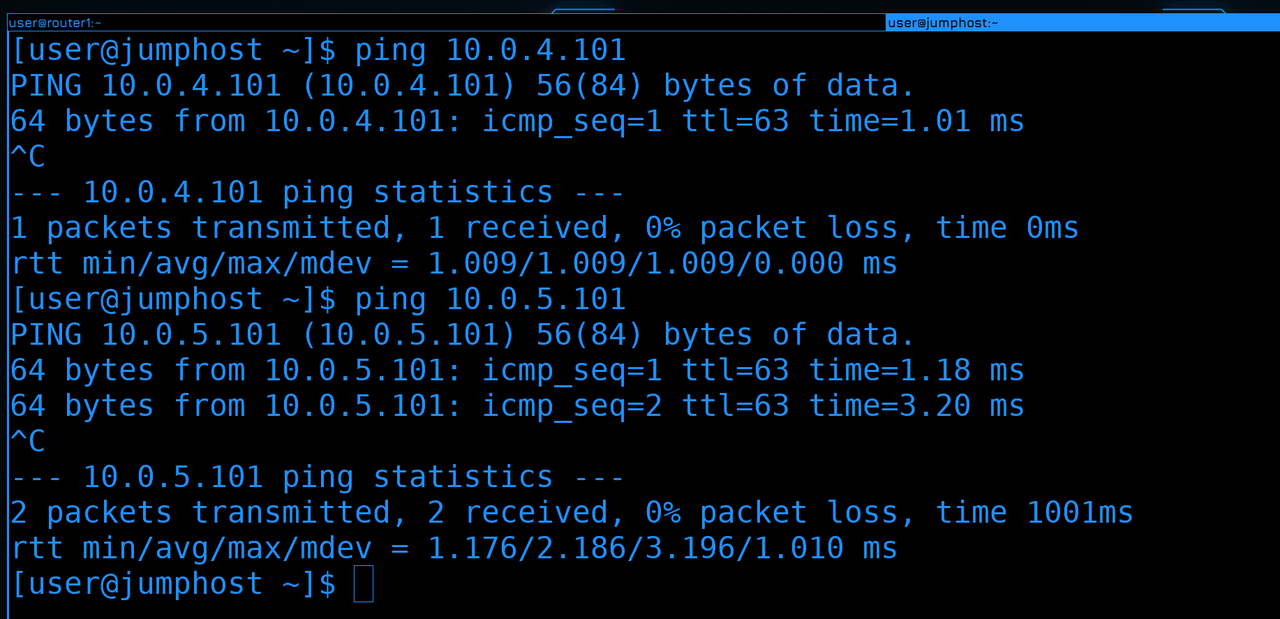
Now from the jumphost itself you can ping server1 at both 4.101 and 5.101:
ping 10.0.4.101
ping 10.0.5.101
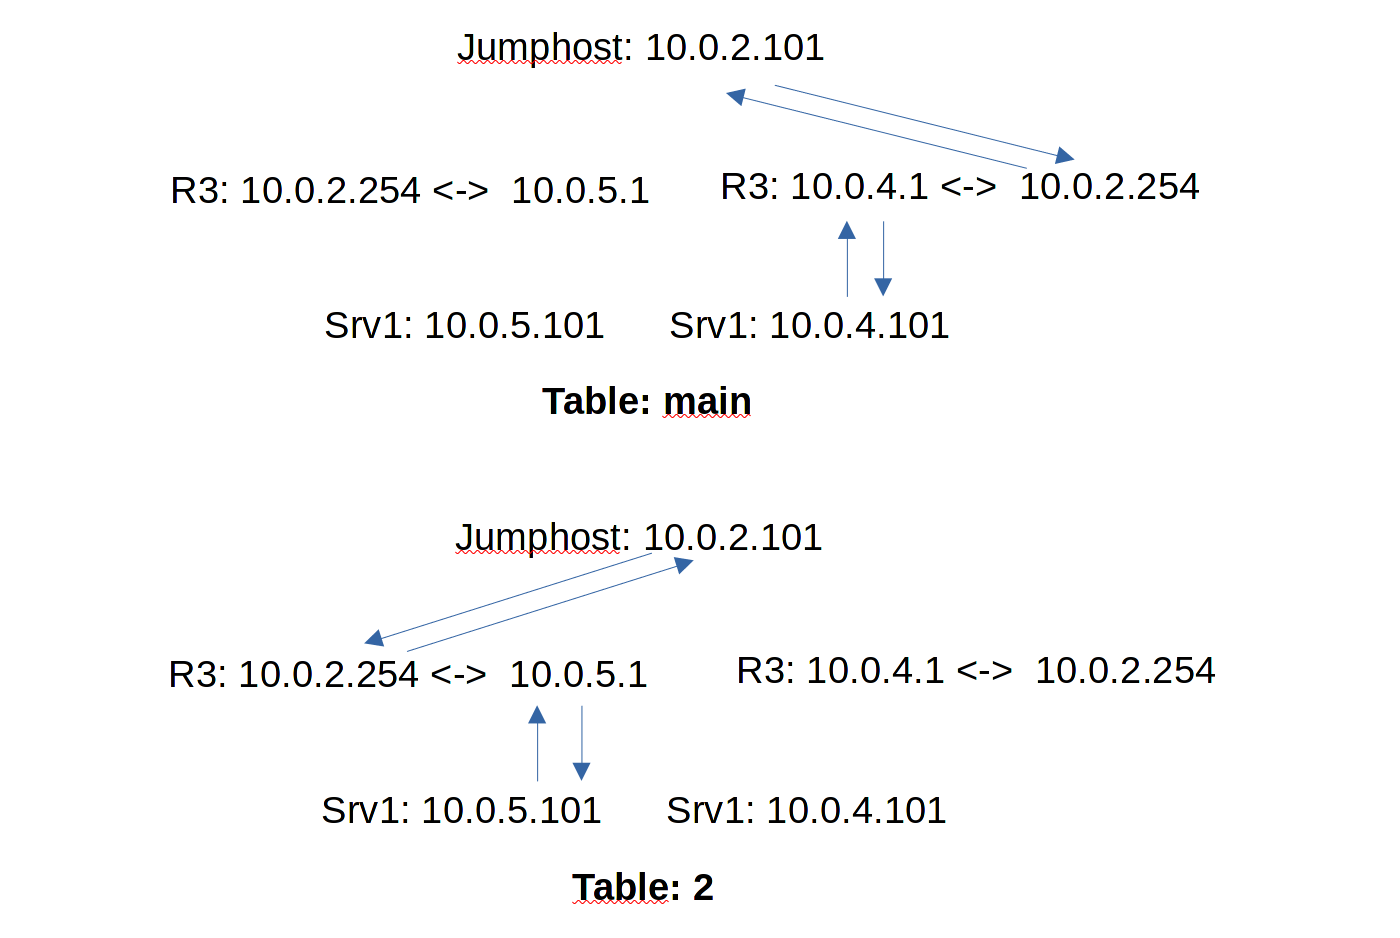
The result is the following picture: when a request comes to the interface with the address 4.101, the main routing table is used for the answer, in which the default gateway is the address of the router 4.1. But if the request comes to the address 5.101, then routing table 2 will be used, which has a return route through the address of the router 5.1.
Now that we’ve sorted out the routing, let’s get back to the firewall. And so, on the internal router, we must allow jumphost to connect via ssh to server1. This requires firewall policies.
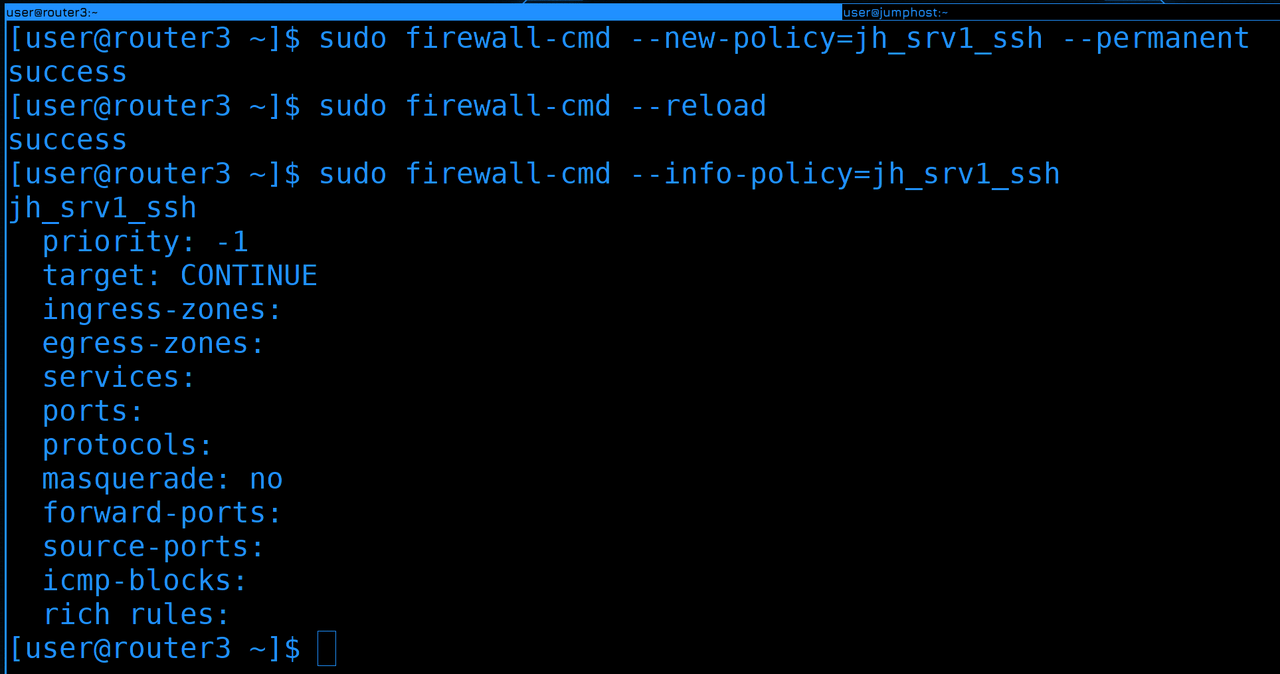
To begin with, we will create a new policy on router3:
sudo firewall-cmd --new-policy=jh_srv1_ssh --permanent
sudo firewall-cmd --reload
It should allow connection from jumphost to server1 with ssh. We will give this name to make it clearer.
After creation, the policy is almost empty:
sudo firewall-cmd --info-policy=jh_srv1_ssh
Politics is very similar to the zone. But if in the zone we specify the ports and services that can connect to us, then in the policy we specify the ports and services that we allow in packets passing from one zone to another. Therefore, there are two additional fields here – ingress-zone and egress-zone – an input zone and an output zone.

As you can see – now we need to add ingress and egress zones to this policy:
sudo firewall-cmd --policy=jh_srv1_ssh --add-ingress-zone=dmz --permanent
sudo firewall-cmd --policy=jh_srv1_ssh --add-egress-zone=management --permanent
sudo firewall-cmd --reload
Accordingly, the connection will be from the dmz zone, which means that the ingress zone is the dmz, and the packets will be sent to the management zone, which means that it is the egress zone. Let’s check the policy:
sudo firewall-cmd --info-policy=jh_srv1_ssh
As you can see, the zones have been registered.
But since there is no possibility to add source and destination addresses, we are left with two options. Or you will just have to register the service, which will lead to the fact that from any address from the dmz zone it will be possible to hack into the management zone via ssh. And we don’t want that.
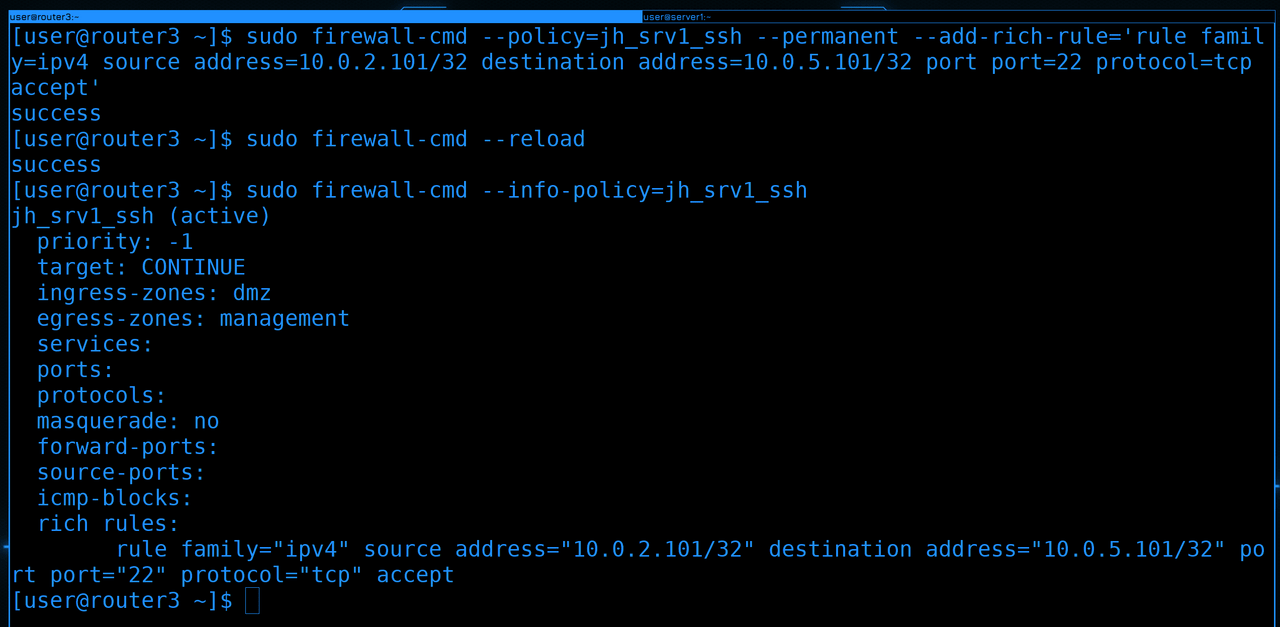
Or we will have to write a rich rule, which we will do.
sudo firewall-cmd --policy=jh_srv1_ssh --permanent --add-rich-rule='rule family=ipv4 source address=10.0.2.101/32 destination address=10.0.5.101/32 port port=22 protocol=tcp accept'
So here we are saying that we allow connections from address 10.0.2.101 to address 10.0.5.101 on port 22 and protocol tcp. And all this is applied to the policy from the dmz zone to management.
Let’s restart the firewall and check the policy:
sudo firewall-cmd --reload
sudo firewall-cmd --info-policy=jh_srv1_ssh
Yes, there is a rule. In my opinion, the policies here are made a little illogically. At a minimum, you need the ability to add source and destination addresses, and not mess with rich rules. But this is a relatively new feature in firewalld and it’s not like anyone but us uses firewalld as a network firewall. Therefore, you can close your eyes to it. Politicians have priorities on which the order of their verification depends, but we do not bother much with this, the course is not about that after all.
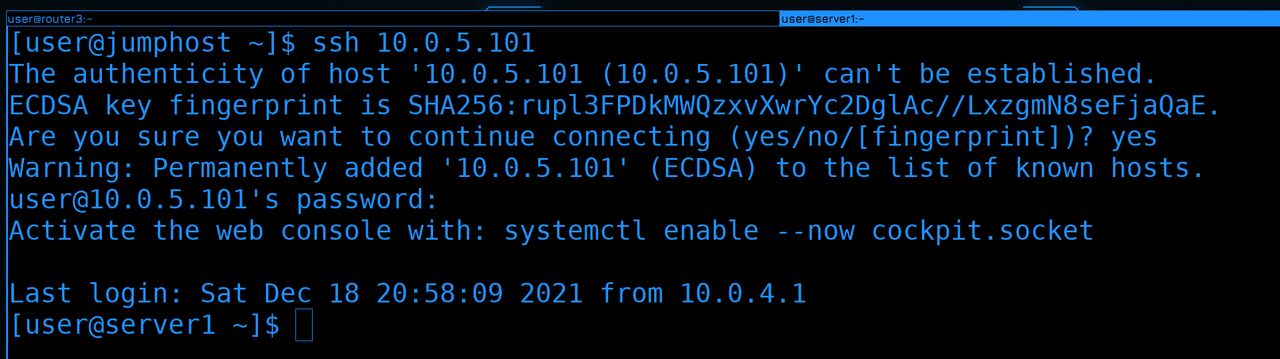
Let’s try to connect to server1 from jumphost:
ssh 10.0.5.101
And everything works.
Now we have the opportunity to get into the internal network by connecting from jumphost to server1. Essentially, server1 will now act as our second jumphost. Through it, there is an exit to five vlans, from where we can hack into the management of interfaces. For example, router3.

Now see some chain we can create in ssh connection. And yes, only jumphost is available from the Internet. But jumphost itself cannot connect anywhere, the only server available to it is server1. Server1 itself can see router3, since they are in the same management vlan. And from router3 we can connect to router1. The latter is actually not necessary. For router 1, you can use server 1 as a jump host, but then you will need to write a firewall policy on router 3 so that it allows connections from server 1 to router 1.
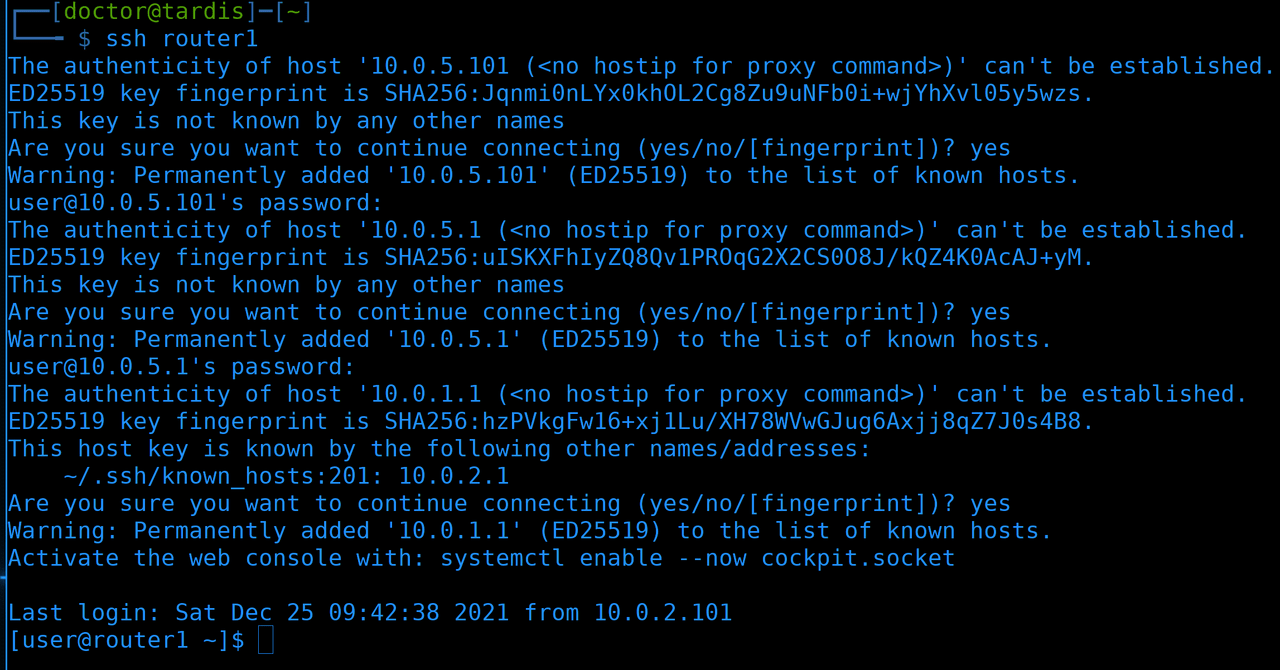
Let’s try to connect. When connecting for the first time, it will be necessary to save the keys from all intermediate hosts and enter all passwords from systems where we did not throw the keys.
We will no longer see these messages:
ssh router1
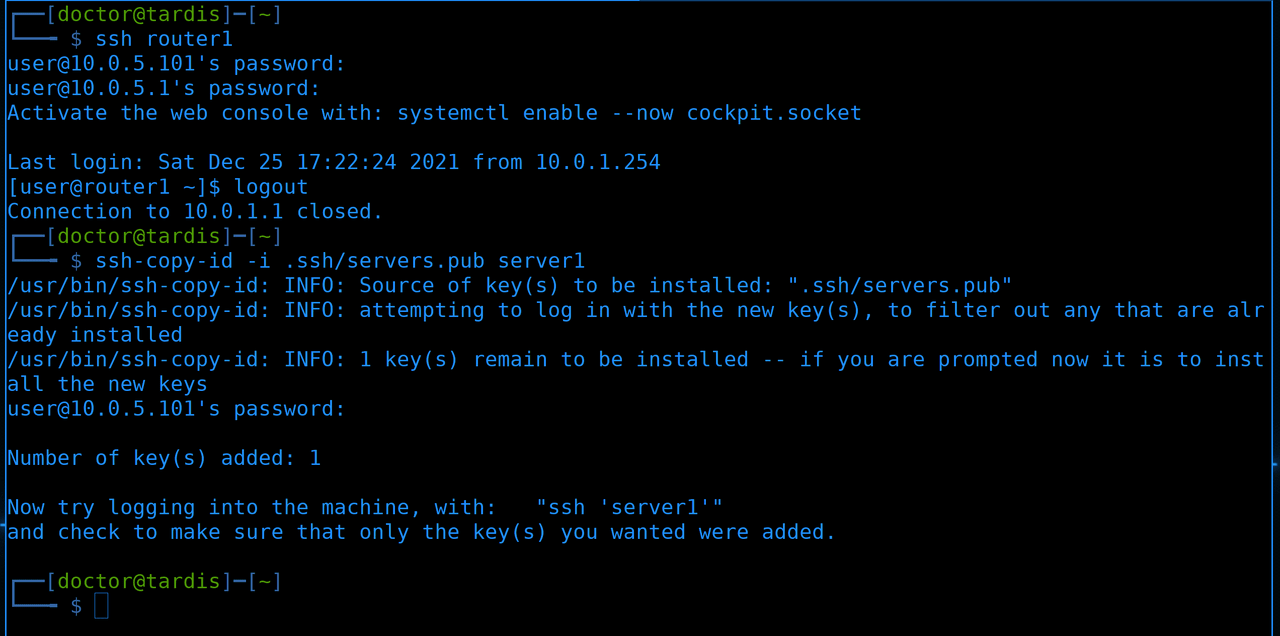
And we can throw keys at hosts that ask for passwords:
ssh-copy-id -i .ssh/servers.pub server1
ssh-copy-id -i .ssh/servers.pub router3
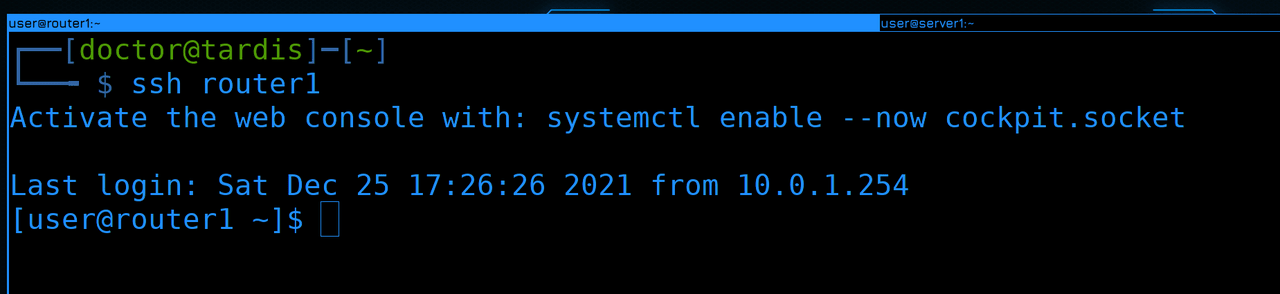
And now with a simple command:
ssh router1
we get to router 1 through 3 jumphosts. And in general, we can go to any host on the network.
In general, if you use router3 as a jumphost, you can get to any host. But since real routers aren’t very good as jump hosts, we’ll write firewall rules and use routing instead. Therefore, it will be a small task for you to write policies on it so that you can connect to user1 and router1 from server1.
Let’s summarize. Today, we analyzed routing tables and rules, as well as policies for firewalls. Although we have only written one policy so far, this was mainly done for future tasks. When we bring up different services in different zones, we will need to constantly climb into the firewall and write policies. And our network is almost ready – then you can concentrate on the services themselves.