20.03.2024
14 min
3278

It tells about the division of infrastructure into zones from the point of view of information security in GNU/Linux. Discusses the importance of separating systems accessible from the Internet into a separate zone called the DMZ (demilitarized zone) to reduce the risk of vulnerabilities spreading. Technical recommendations for setting up zones and using Linux tools for these purposes are provided.

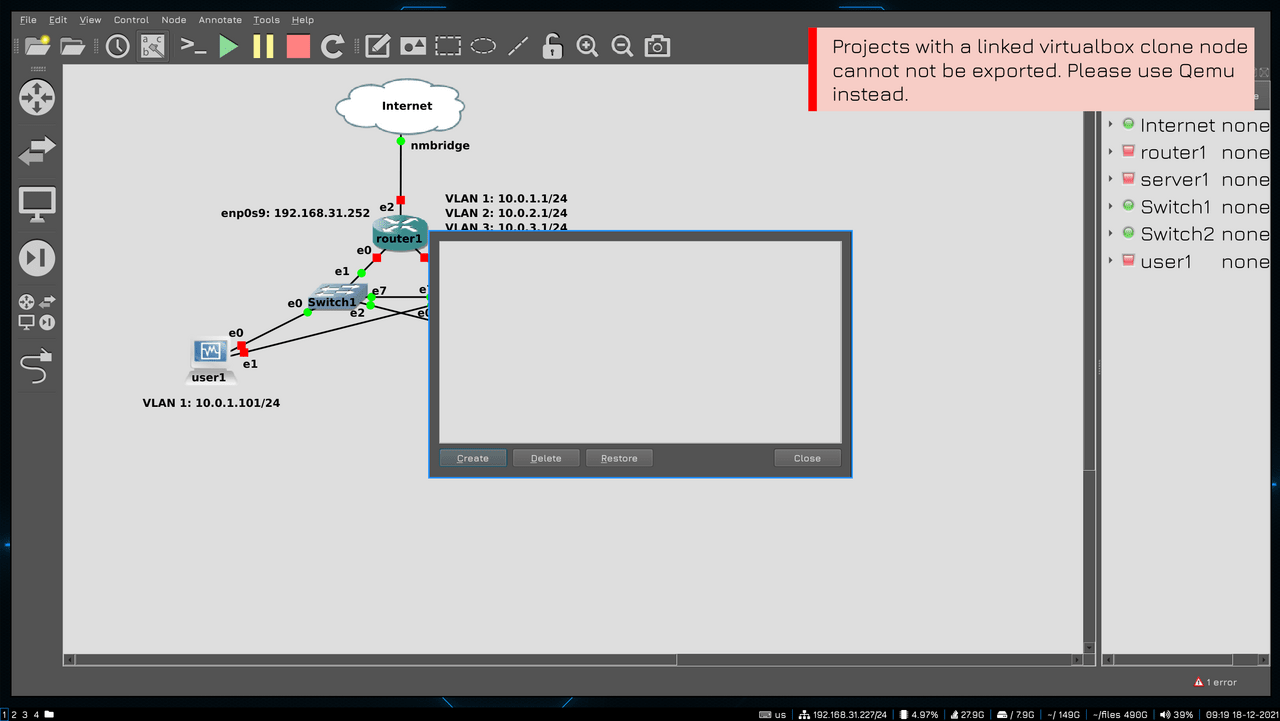
Before we start, it’s worth mentioning that I decided to use Qemu instead of VirtualBox. Not because Virtualbox is somehow bad, it’s just that GNS has a snapshot functionality, when it can save the state of the entire topology, including virtual ones. But it only works with Qemu. I need this functionality to record the course, but you don’t need it in principle, so you can continue to use the virtual box. I will not disassemble the installation of Qemu, you can handle it yourself.
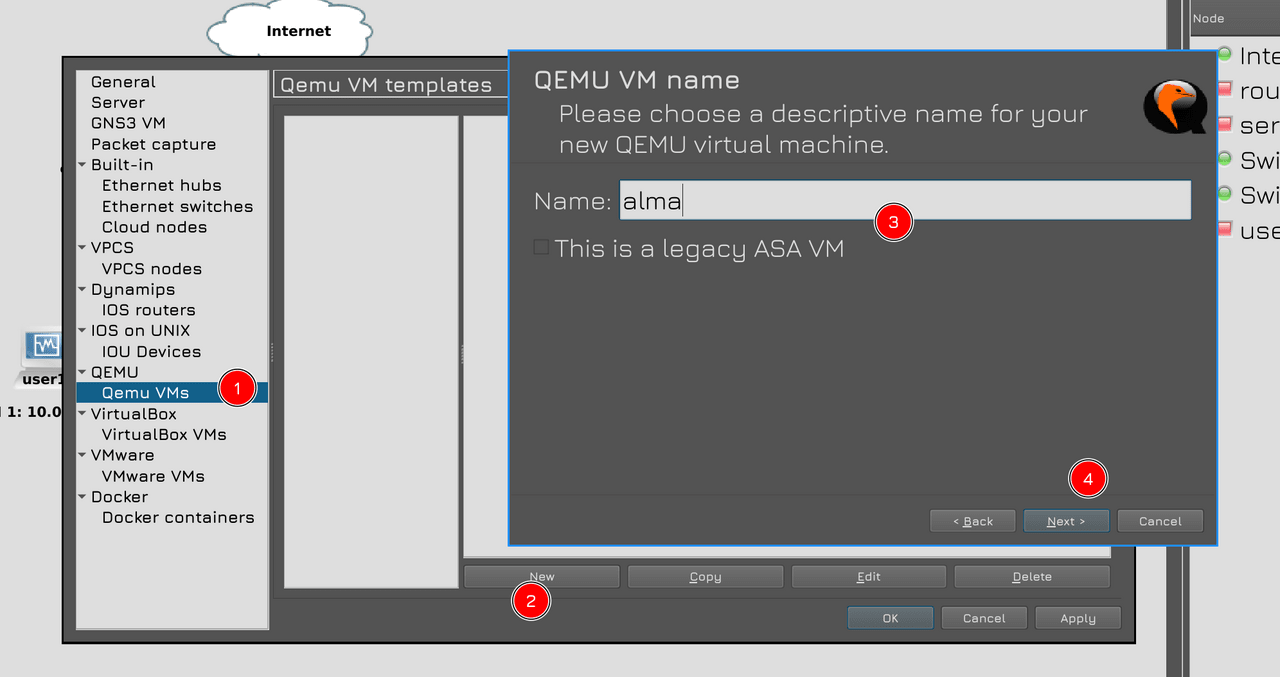
The virtual machines themselves must be created in GNS. This is done roughly the same way we linked VirtualBox and GNS: Edit – Preferences – Qemu VMs.

Previously, I converted the VDI disk image from VirtualBox to qcow2, which is needed for Qemu, and put it in the right directory.
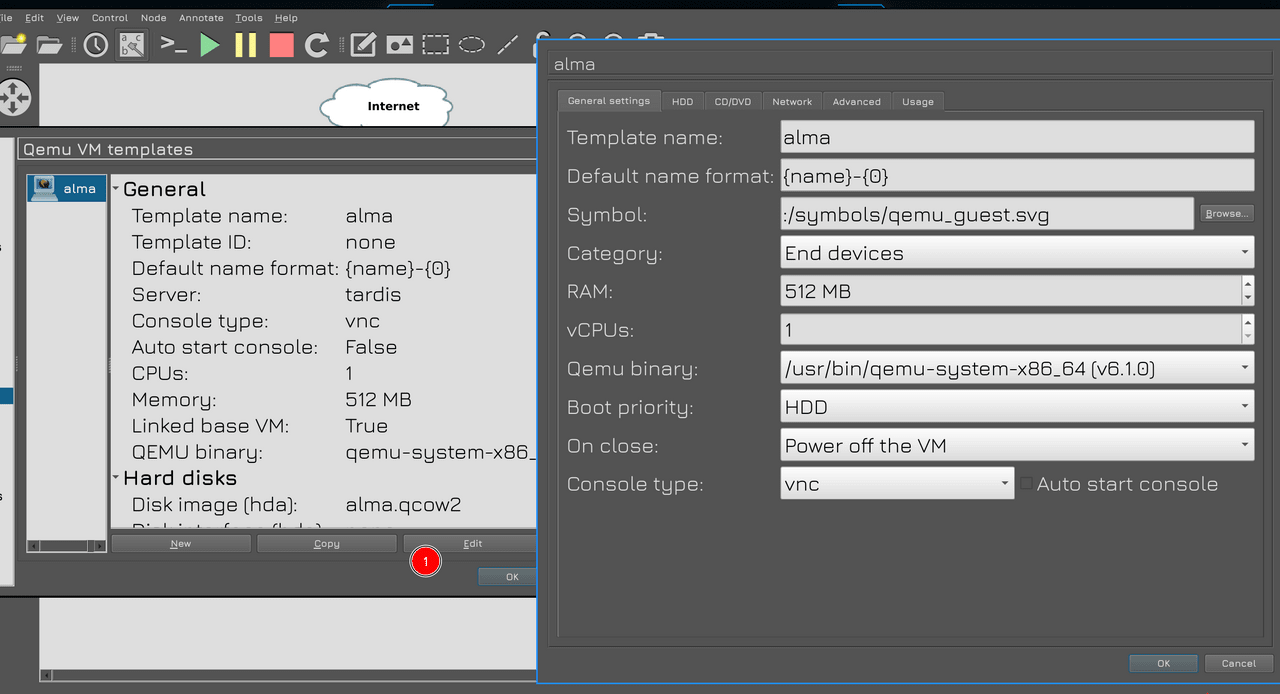
According to the settings of the virtual machine, I once again allocated only 512 megabytes of RAM. I will use vnc to connect to the console, this is all done through GNS, without the need to change anything in the virtual machine itself.
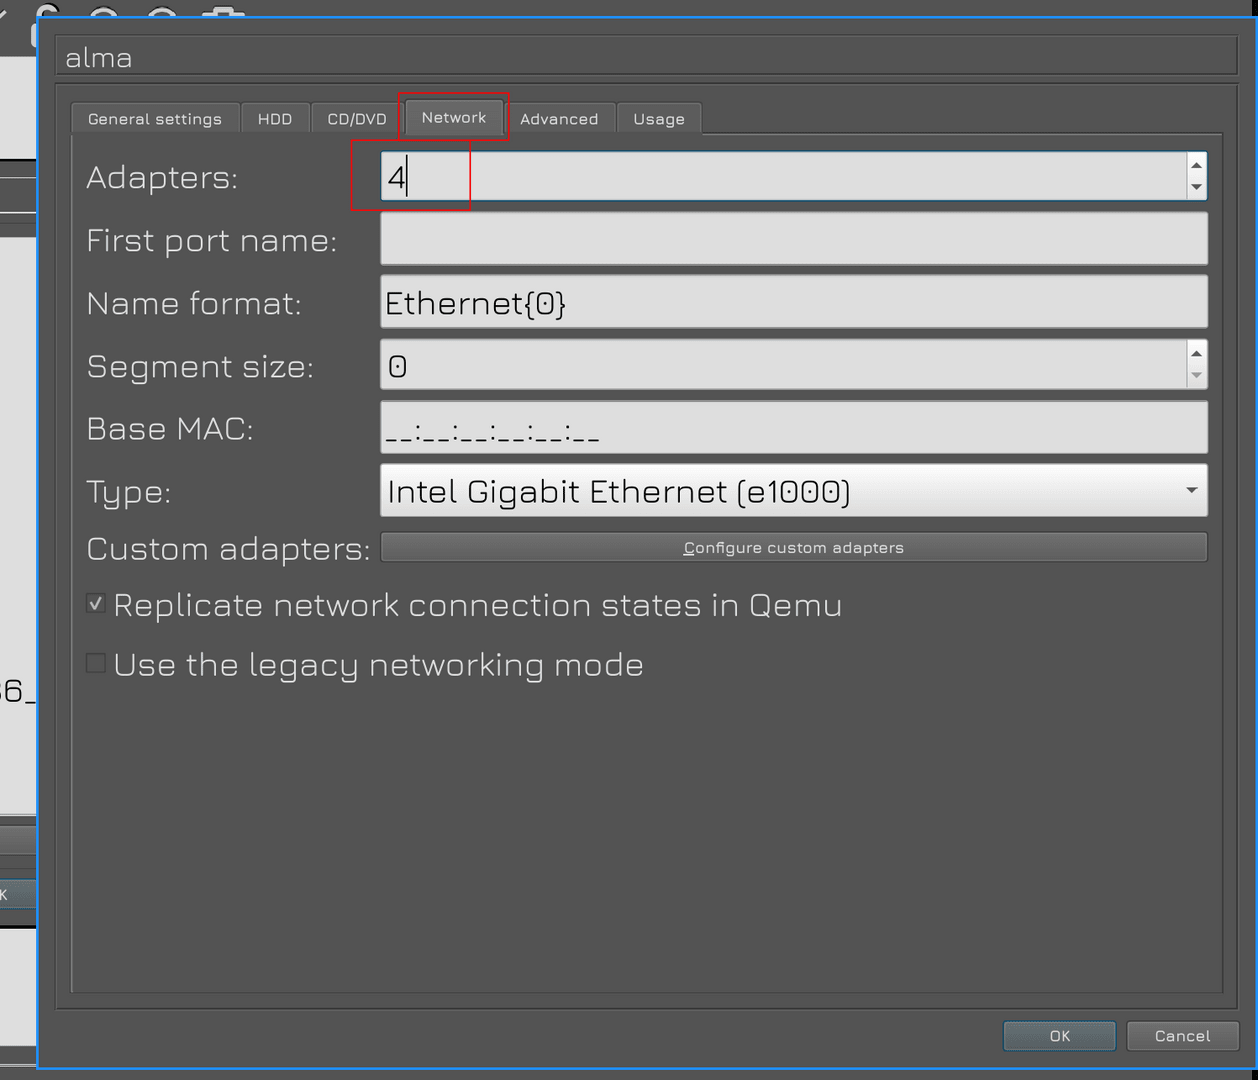
In the Network tab, he also allocated four network adapters to the virtual machine.
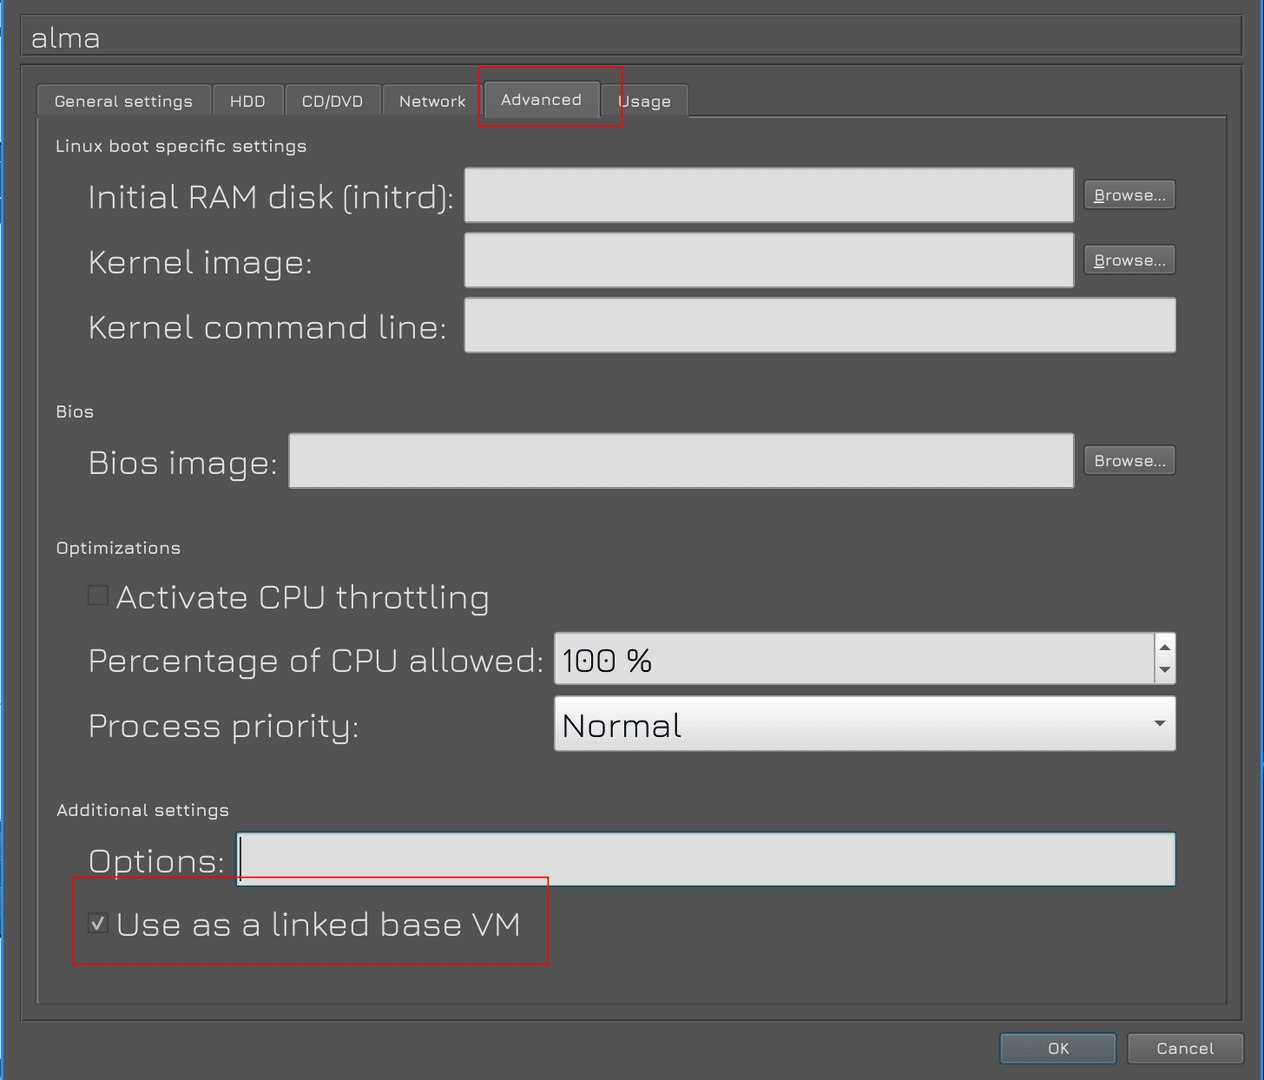
Well, in the Advanced tab, you need to make sure that the “Use as a linked base VM” checkmark is checked, so that we can create new virtual machines by simple drag and drop.
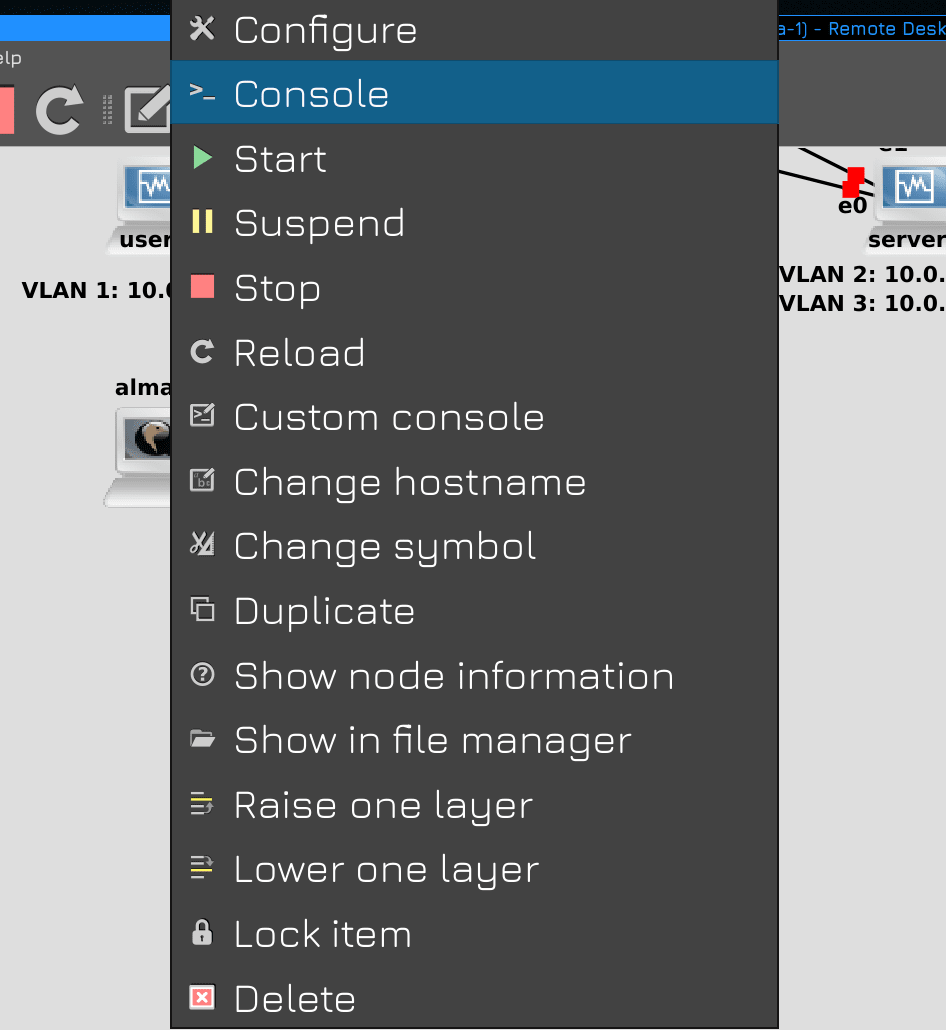
To connect to the virtual console, you need to right-click on it and select Console. For this, the system must have some kind of VNC client.
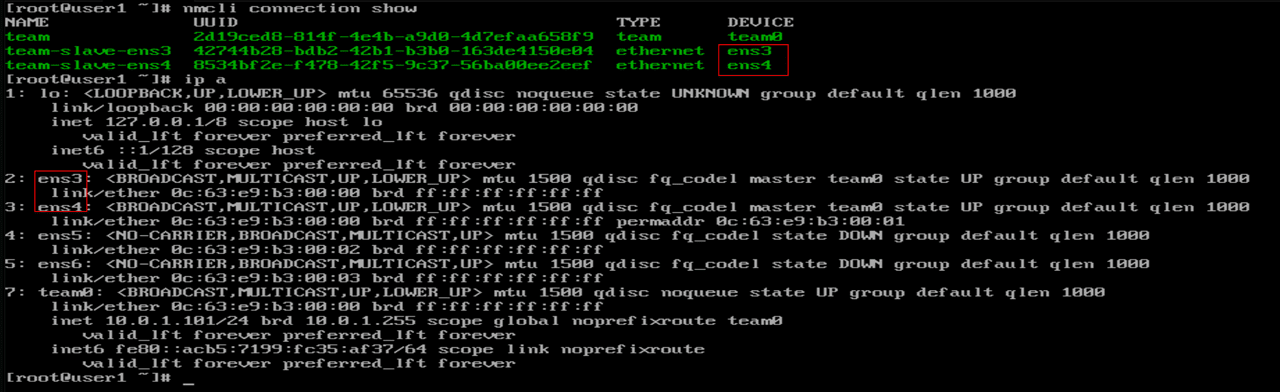
Well, keep in mind that the names of the network interfaces will be different here, but you can always find them out from the command output:
ip a
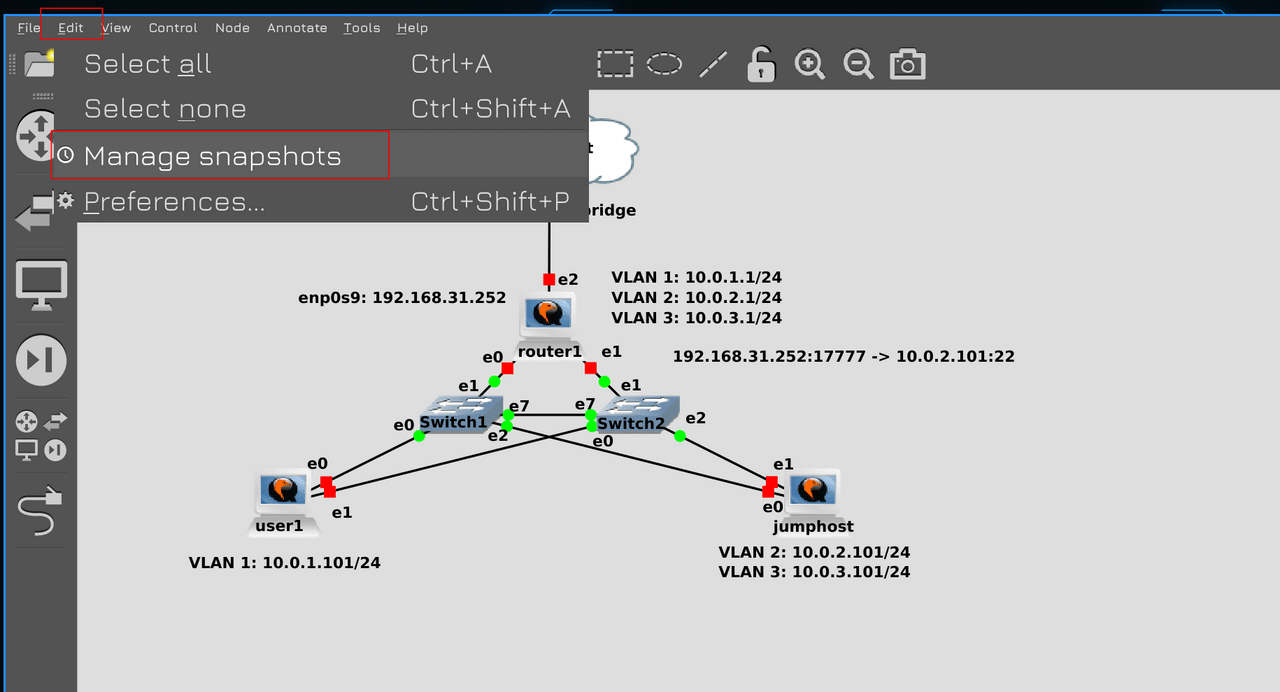
In general, I set everything up as it was. And with virtual machines turned off, you can now take snapshots of the entire topology. If for some reason you also decided to switch to Qemu and something did not work out for you, write, we will figure it out. That was a short introduction, now let’s move on to the topic itself.
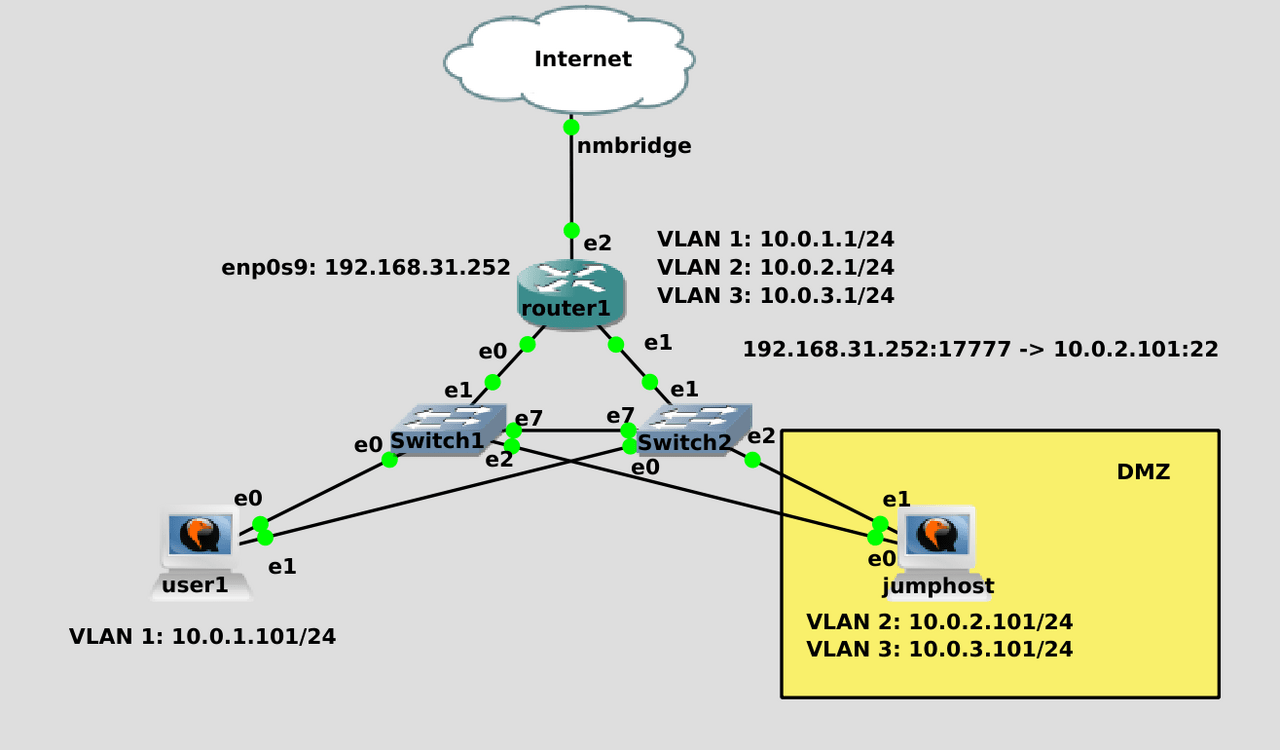
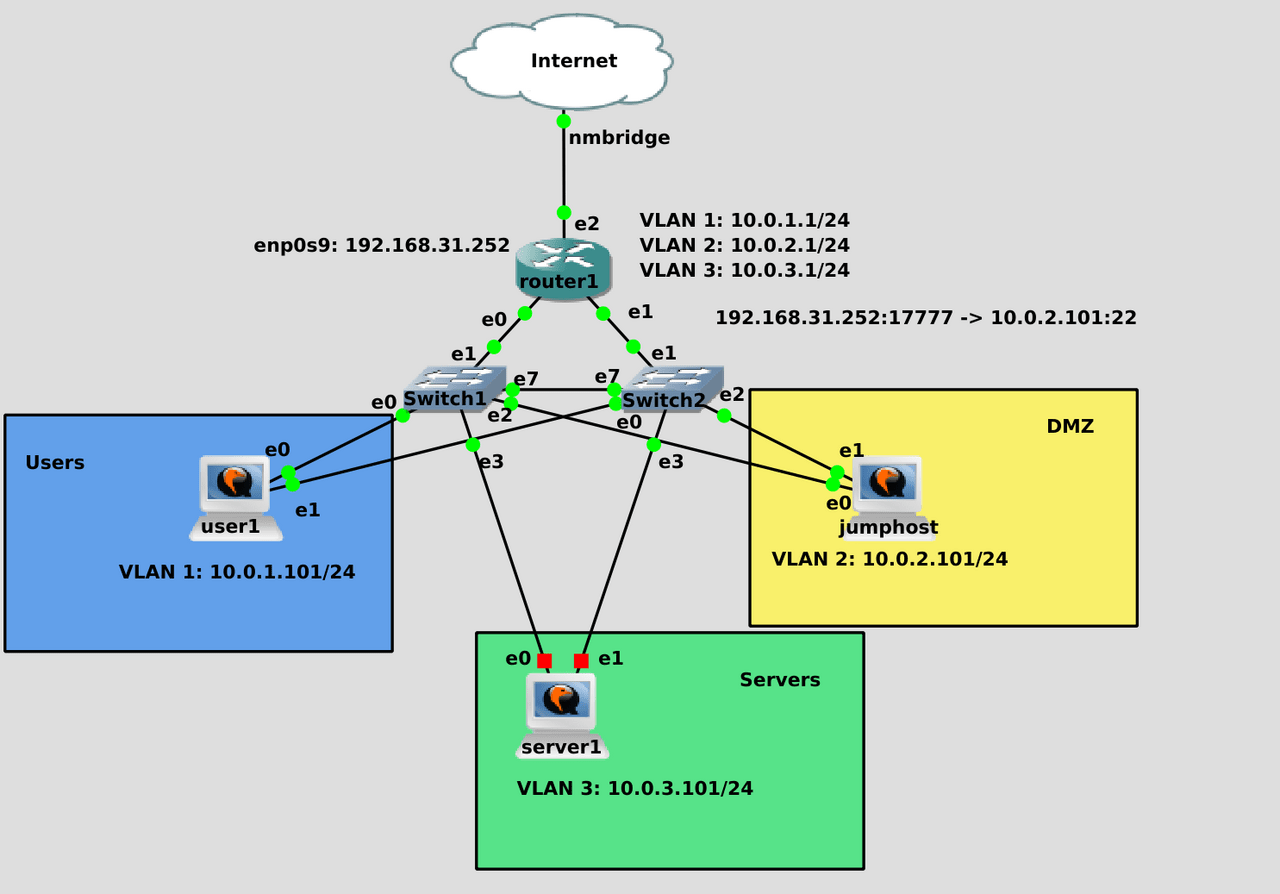
Last time we created jumphost, through which we can log in to internal machines from the Internet. We can get to the jumphost itself directly from the Internet, because we opened the port on the router. Due to the fact that it is not very safe, we took some security measures – used a non-standard port, disabled password authentication and forbade root from logging in. But imagine that SSH has some kind of vulnerability that no one knows about yet – a zero-day vulnerability. Conditionally, it allows you to enter the server even without knowing the login and password. And so some thieves found it and tried to hack our jumphost, through which they can get to our other servers. Under certain conditions, selinux could have saved us, but for some reason it did not happen. And so hackers got access to the jump host, scanned the network and saw all our servers, which they will hack further.
And from this idea – “we have already been hacked” – the information security system should be built. It is impossible to build a system that will be 100% safe – everything can be broken, the only question is how much time, effort and money will be spent on it. Information security systems cost a lot of money and everything rests on the principle – a protection system should not cost more than what it protects. The same goes for hacking. That is, roughly speaking, it makes no sense to buy a safe for a million dollars and keep 100 rubles in it. And it makes no sense to hire a team of professionals who have super tools to crack such a safe in order to get 100 rubles in the end.
Therefore, when building a defense system, on the one hand, you need to try to make it invulnerable, on the other hand, understand that this is impossible. Which means thinking about the next step – “we’ve already been hacked.” What’s next? It is necessary to mitigate the damage. In infobase it is called “mitigation”. If someone got into one server, make sure that he got into others from this server. If one system is hacked, make sure that it does not spread to others. An encryptor got into your network, encrypted some servers – you need to make sure that it does not affect others, so that it does not spread to other networks.
The harder you make it difficult for hackers to work, the more all kinds of obstacles you put in front of them – the more difficult it will be for them to get access to important data. And while they are messing with all this, maybe you will have time to notice something and react.
In general, going back to the jump host. It is available from the Internet and is one of the first contenders for hacking. And therefore, it must be somehow separated from other systems. We talked about isolation at the level of vlans and subnets, and from the point of view of information security, another concept is introduced – zones. We are already familiar with this concept thanks to the firewall – firewalld is our zone-based firewall. So, a zone is a larger logical division, one zone can consist of one flywheel with one subnet, and many lans and subnets.
For example, we can allocate a separate LAN with a separate subnet for each audience in the university. But from the point of view of the zones – all classrooms are in the same zone, because according to the level of access, the students of one zone of the classroom are no different from the students of another classroom. That is, zoning is basically access. Let’s say that students can access such servers – that means all students are in one zone, servers are in another – and we write rules that the “students” zone is allowed access to the “server for students” zone on port 80. In fact, more granular access is usually configured , they say, on these servers port 80, and on these on port 443, on these it is not possible at all, etc. In general, everything starts with zones, but is not limited to them.
So, from the point of view of security, systems that are accessible from the Internet are separated into one zone, which is called a DMZ – a demilitarized zone. Web servers, jump hosts and other less trusted systems are usually located here. The stronger we isolate this zone, the less access we give from this zone – the better. It is clear that a jump host is a jump host that we should be able to get to other servers from it.
But let’s say we can only allow the jumphost to connect to one server in the internal zone. And use this server as a second jumphost, which will already have access to other systems. This will reduce the attack area.
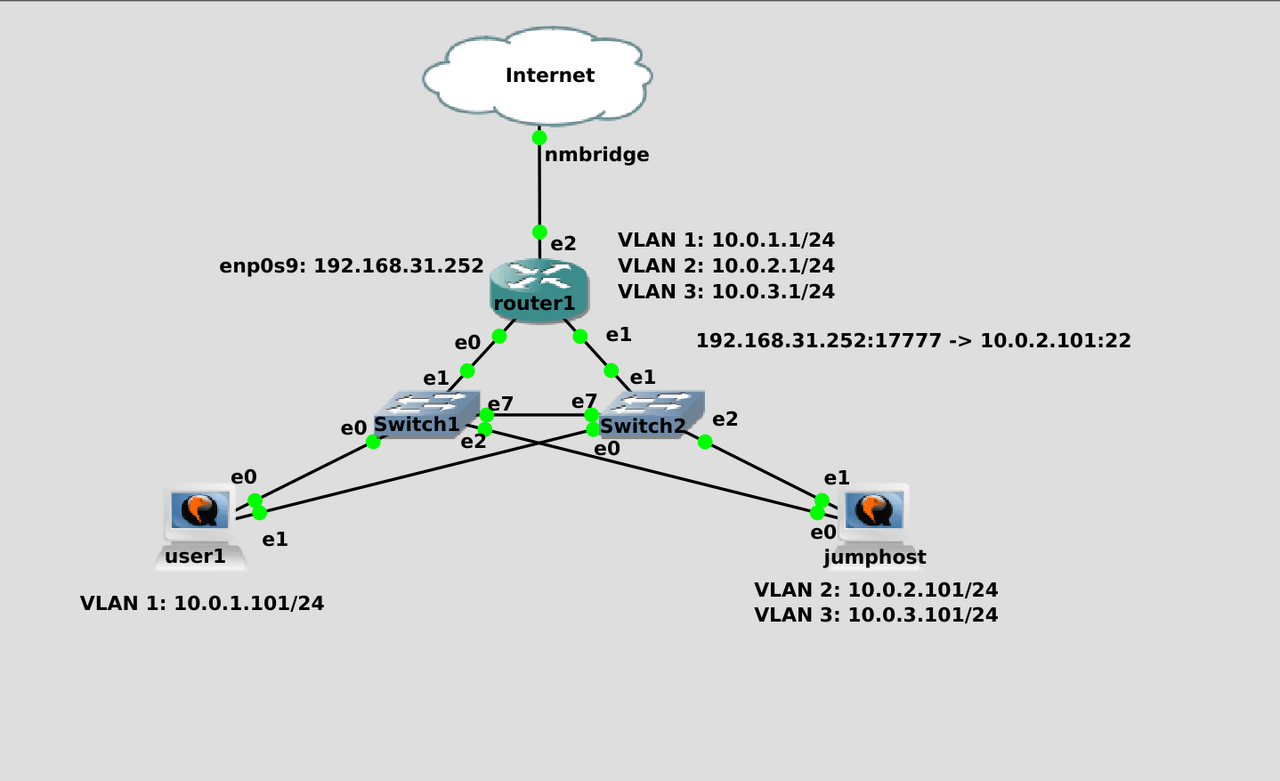
In our scheme, in addition to the jumphost, another device looks at the Internet – router1. Yes, we’ve secured it, you can’t get there from the internet, we can even block access from the jumphost and block pings. However, it is connected to the Internet, at least it can be disabled by a DDOS attack. And the chance of hacking, even though it is small, should never be ruled out. And if our router fails or starts slowing down, our entire network will be down, users will not be able to access the servers, and the servers will not be able to exchange data for work. The Internet is fine, but disruption of the internal operation of the network is a big problem in a medium-sized or large company.
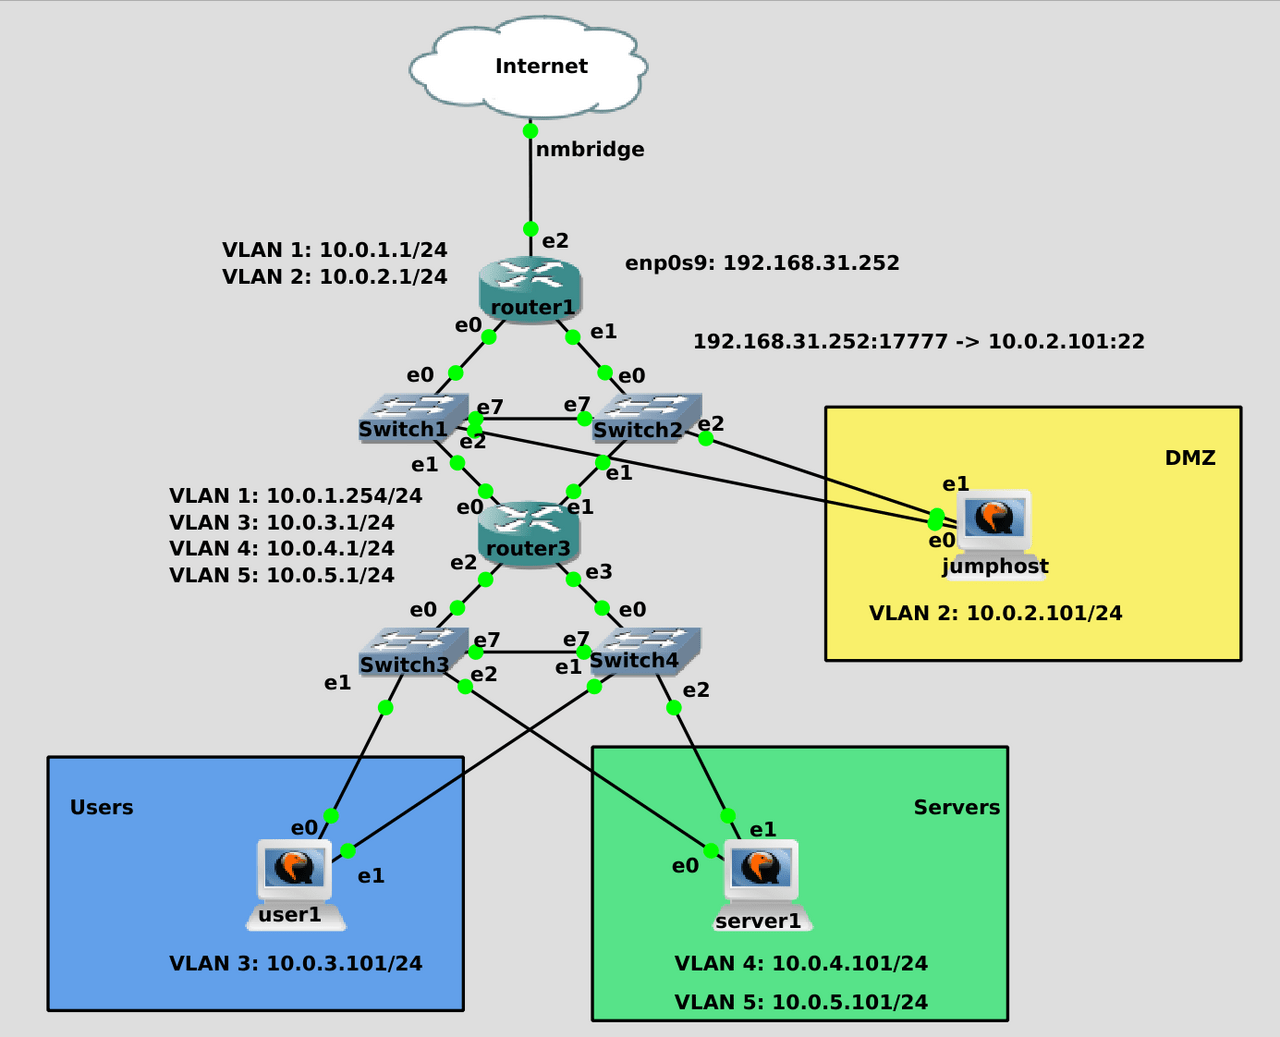
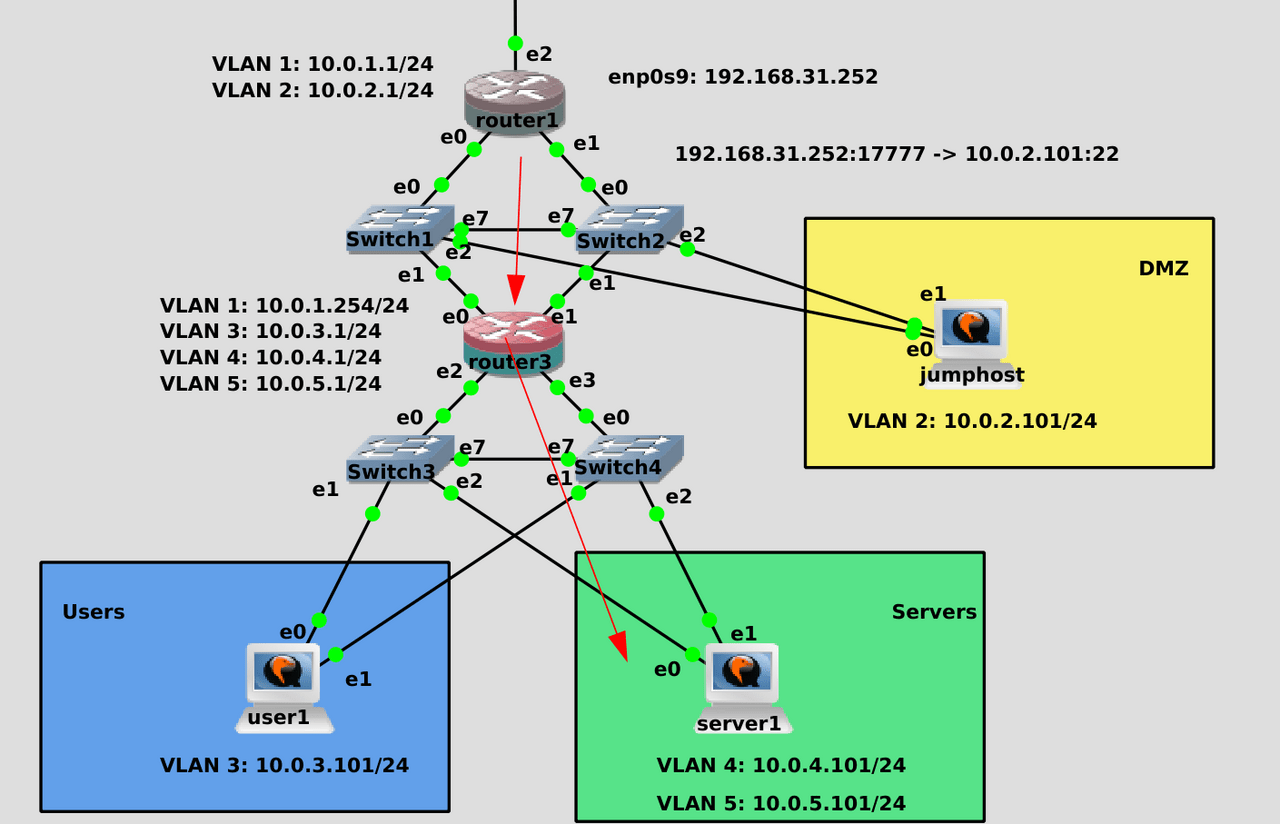
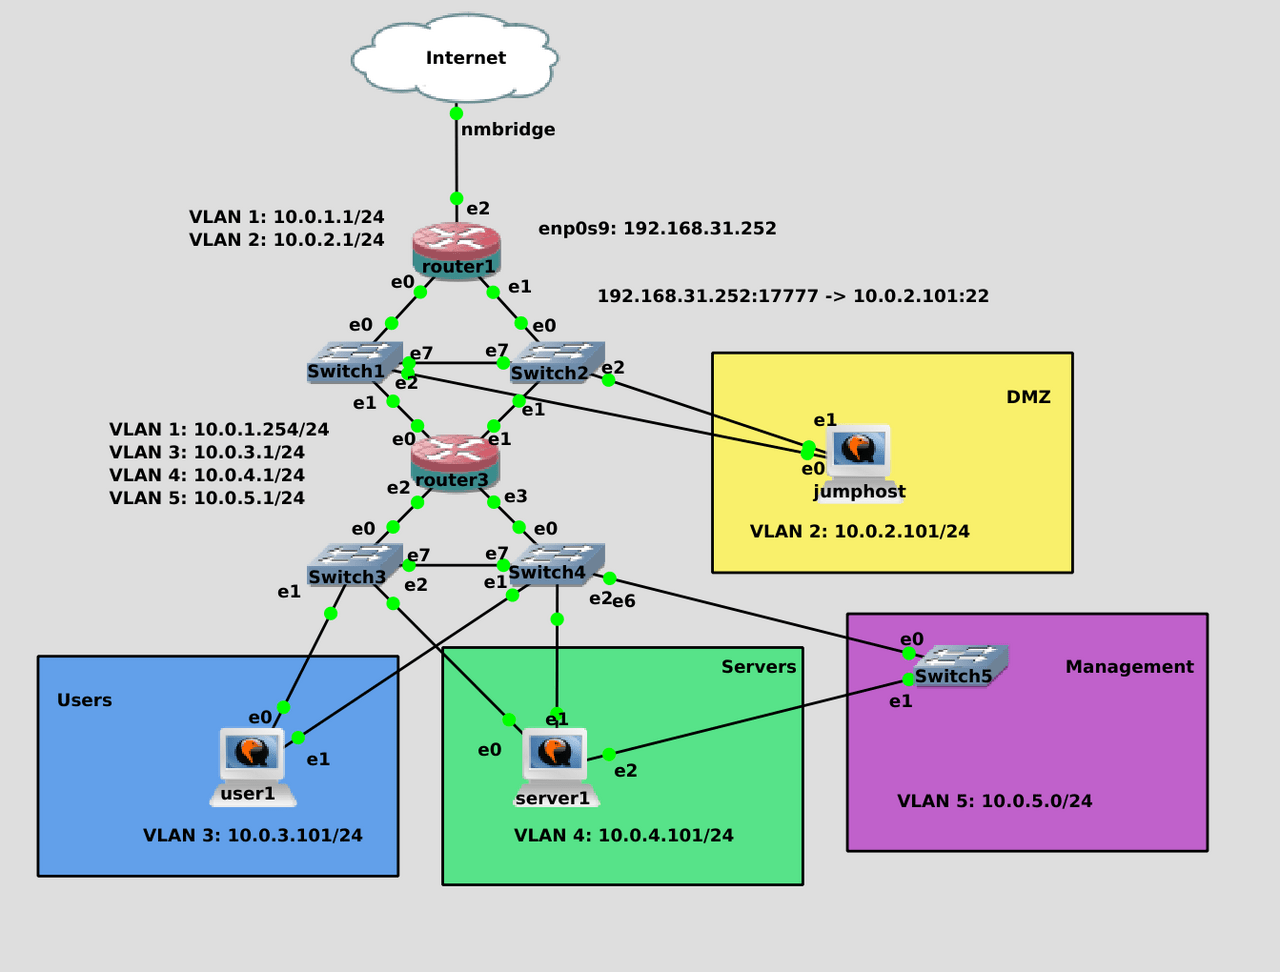
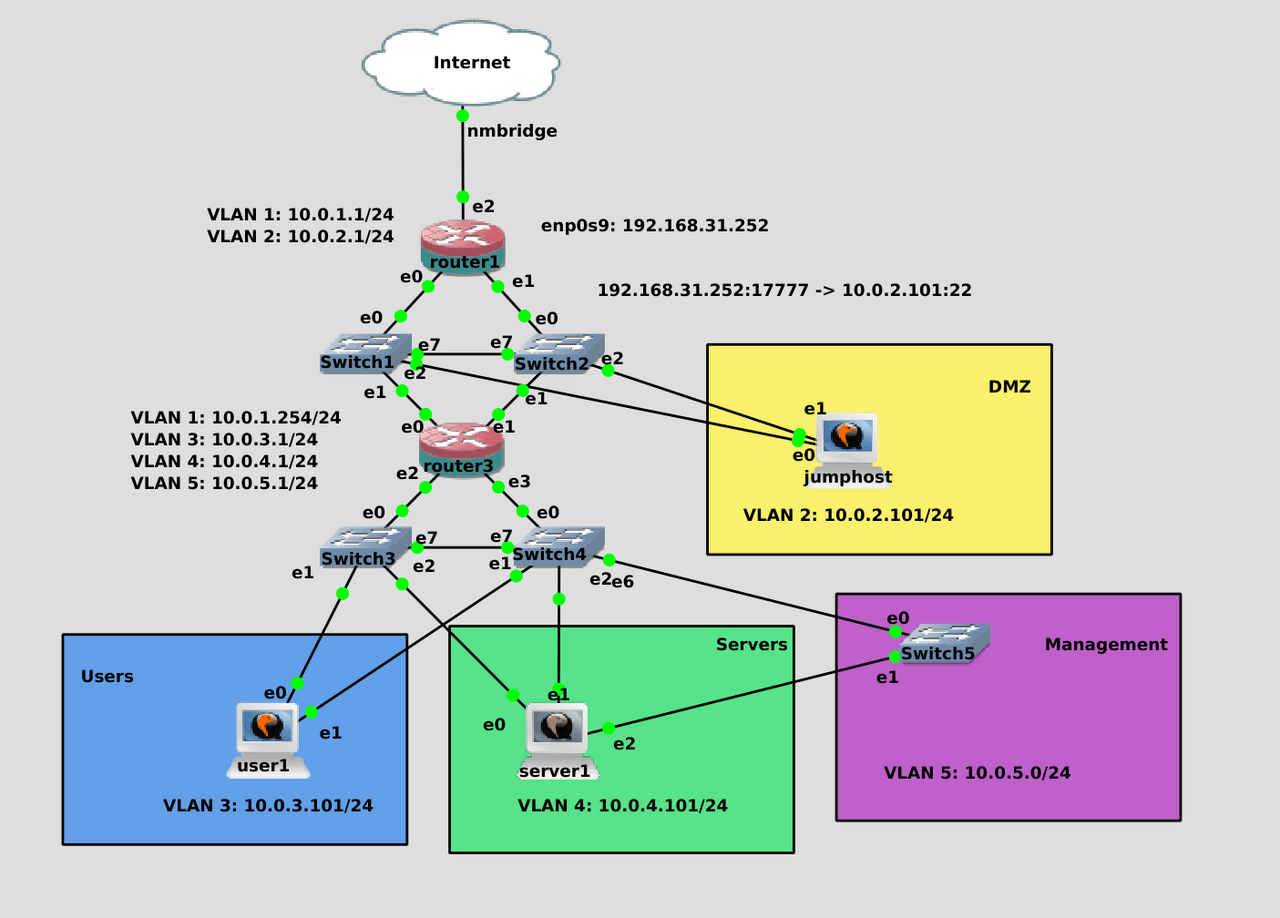
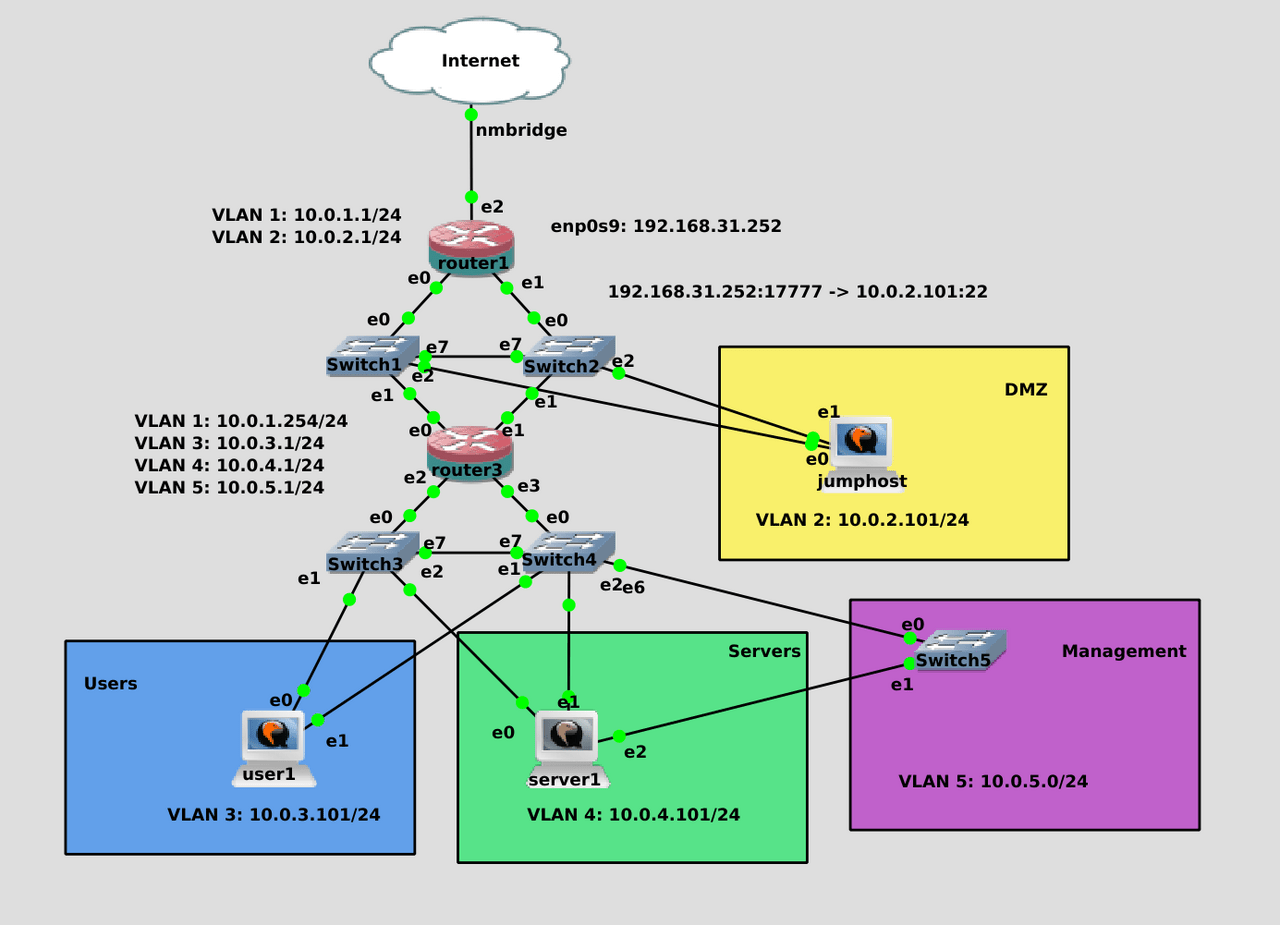
Therefore, the internal network is located on another router. Let’s change our network a bit. router1 will be our external router that looks at the Internet. It will open ports to various services that should be available on the Internet, for example, on jumphost. For now, we will separate the second vlan for the DMZ. The router also needs another vlan, such as vlan1, to communicate with the internal router. We will call it router3. It will already connect the internal network – users, internal servers, etc. On it, we need the first vlan to communicate with router1, as well as 3 and 4 vlans for users and servers, respectively. There may be additional zones in the future, but this is enough for now.
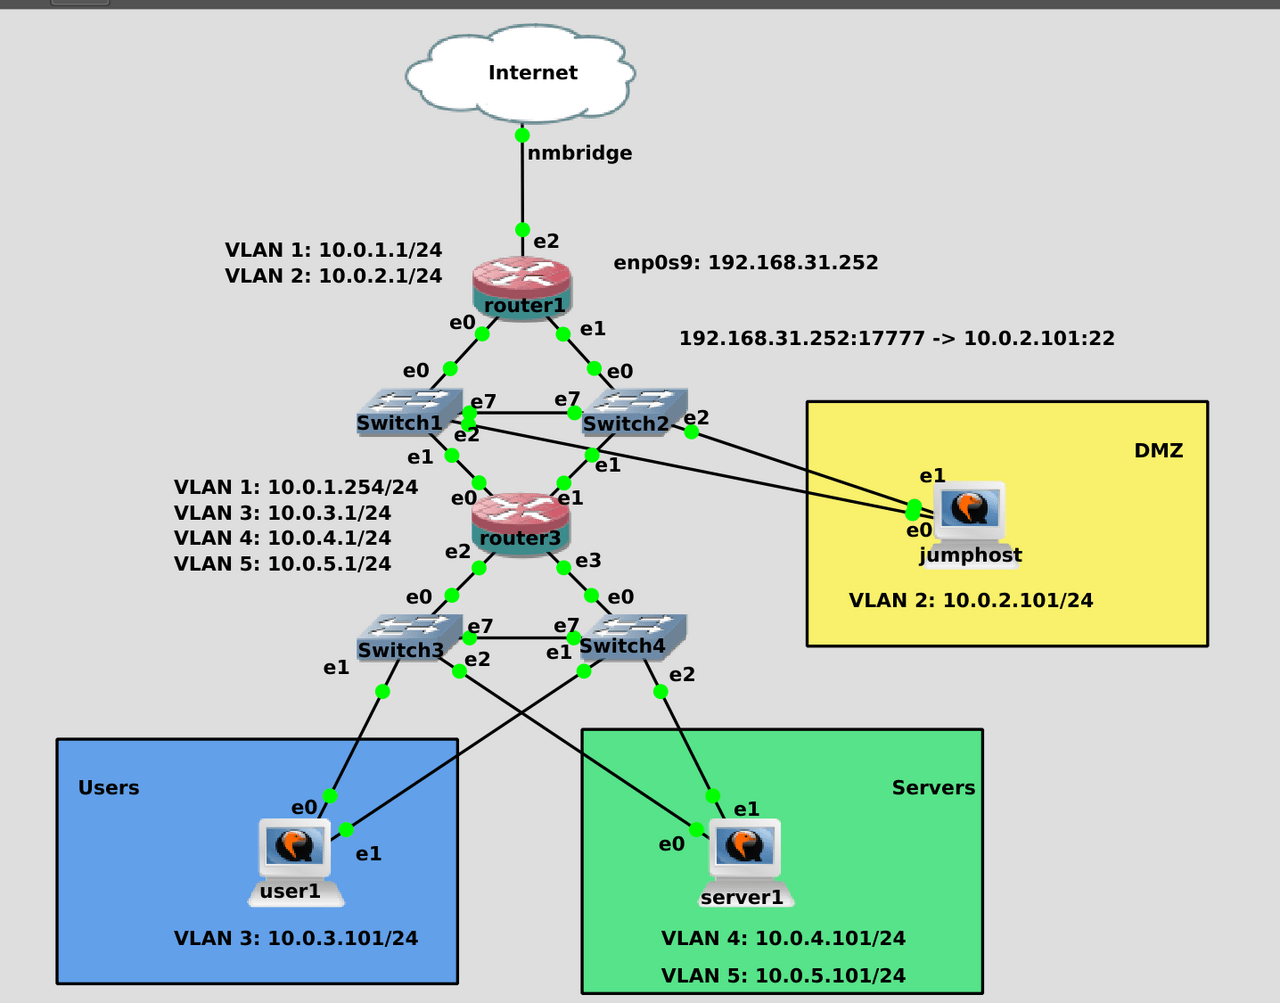
Since now our routers will not only connect subnets, but also divide the network into zones, i.e. to act as network firewalls, for authenticity we change the icon of routers. Since now only one vlan comes to jumphost and user1, we will configure untagged LANs on the switches in their direction, and we will use trunks only to routers and the server. I’ll skip the step of setting up the addresses and vlans because we’ve done it before and it’ll be a bit of a redo for you. However, routing can be difficult for beginners, so I’ll show it.
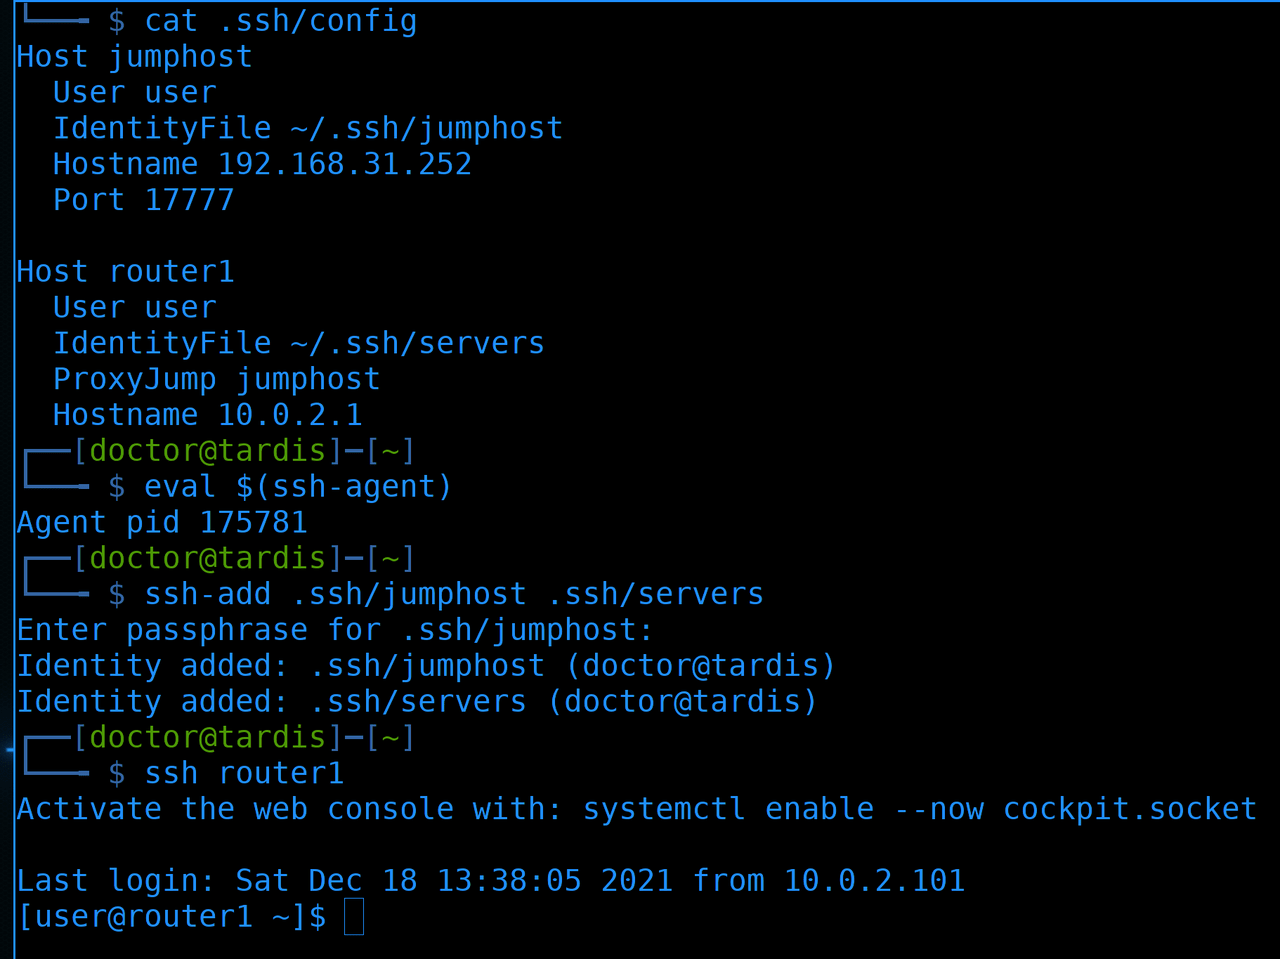
First, let’s connect to the internal network. We start the ssh agent:
eval $(ssh-agent)
And we add the keys:
ssh-add .ssh/jumphost .ssh/servers
Next, we connect to the router:
ssh router1
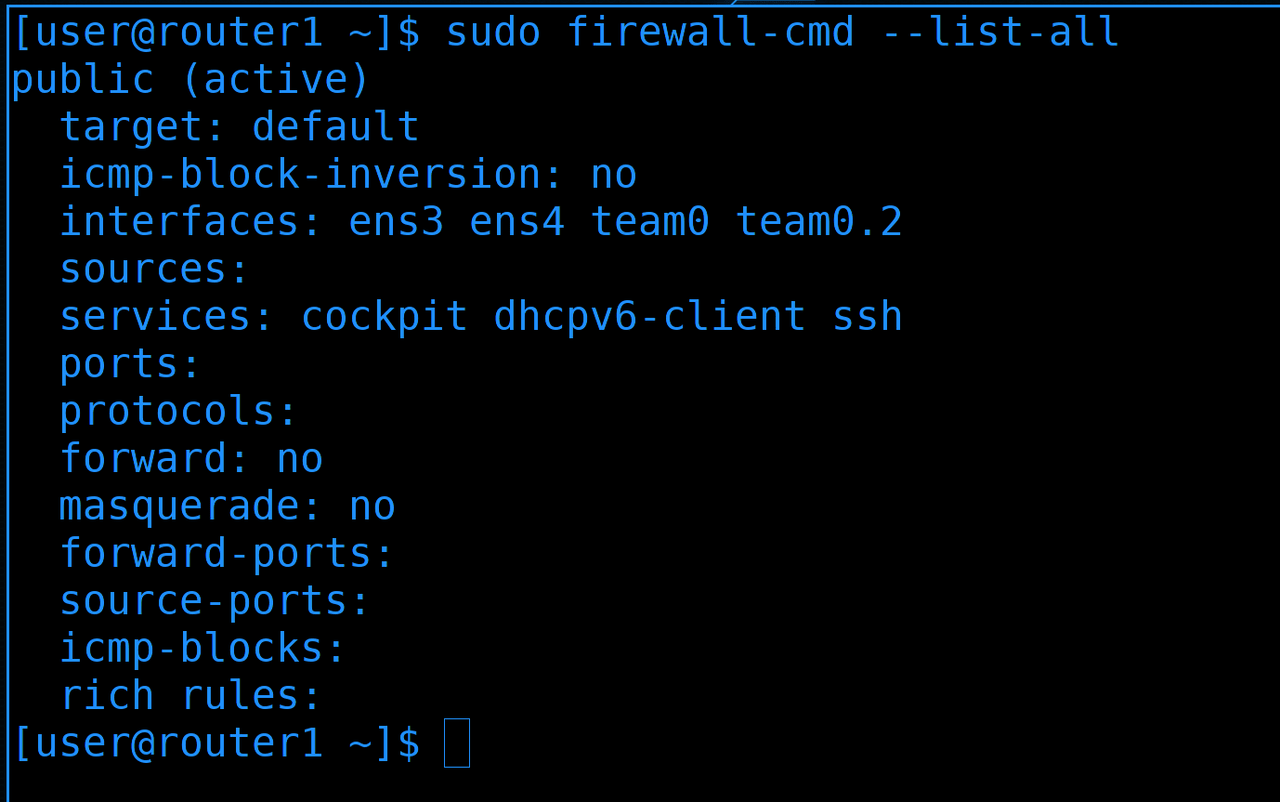
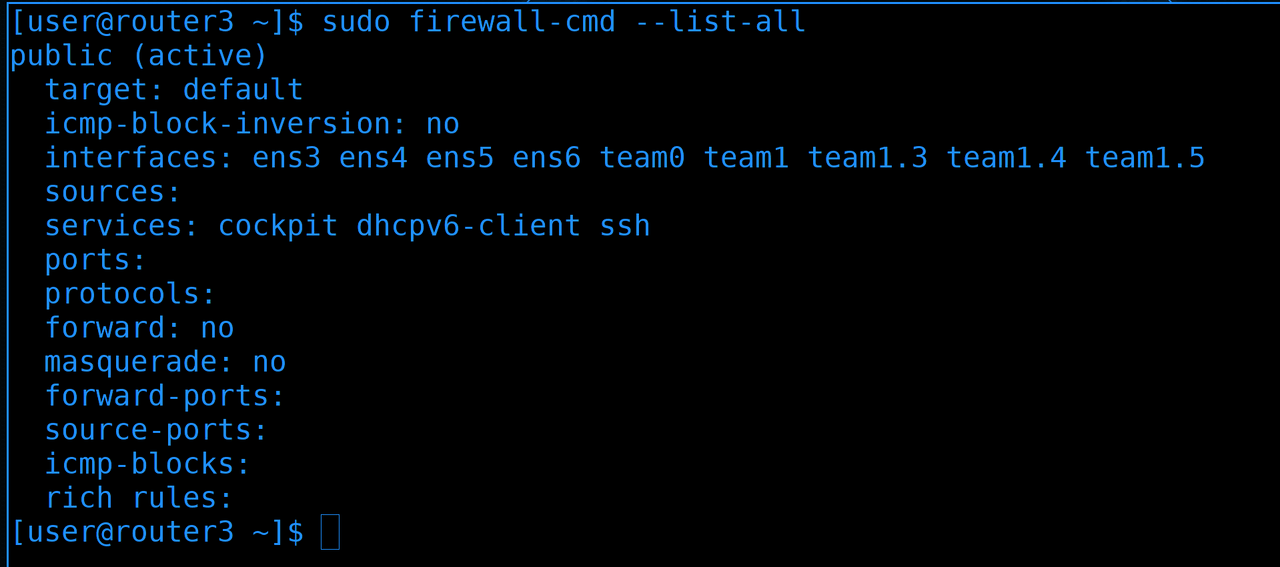
First, let’s look at the default zone on the firewall:
sudo firewall-cmd --list-all
Now we have interfaces that look at different authorities – team0 and team0.2 – are in the same zone.
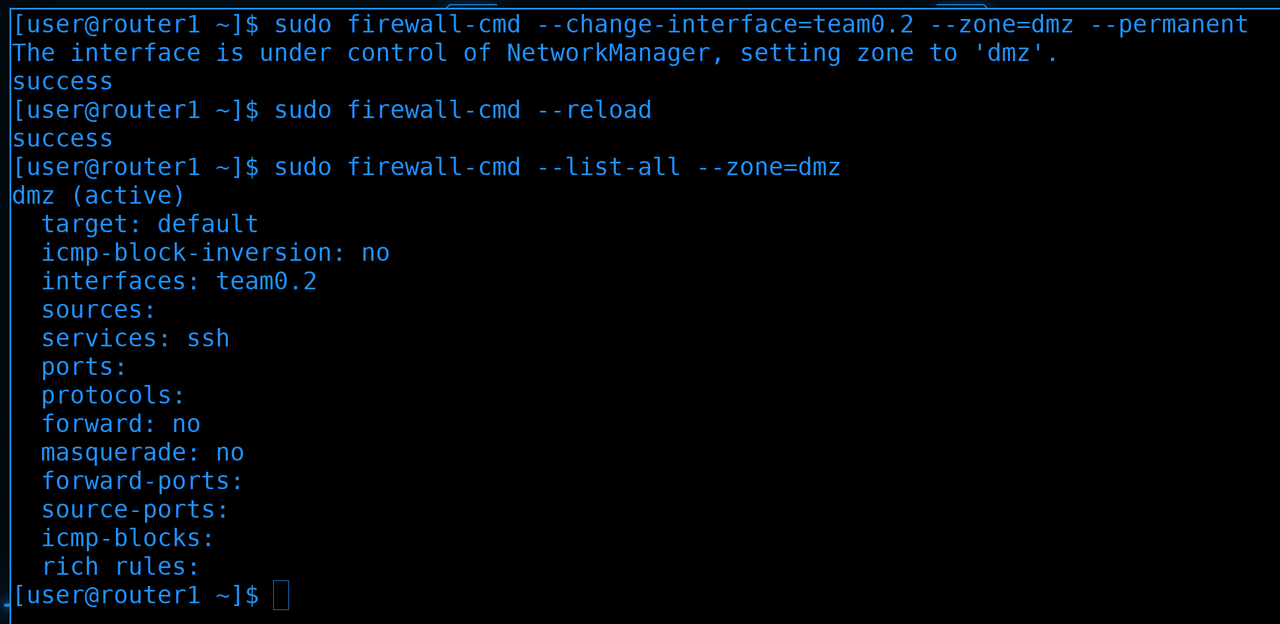
team0.2 is an interface that looks into the second LAN – and we have it for the DMZ. Therefore, it is worth moving this interface to another zone. There is already a zone with this name on the firewall, so let’s immediately move to this zone:
sudo firewall-cmd --change-interface=team0.2 --zone=dmz --permanent
sudo firewall-cmd --reload
sudo firewall-cmd --list-all --zone=dmz
The interface has moved to this zone, but as you can see, there is an ssh service.
This means that it will be possible to connect to the router via ssh from the DMZ zone. Since we don’t really trust the DMZ, it’s better to remove this option:
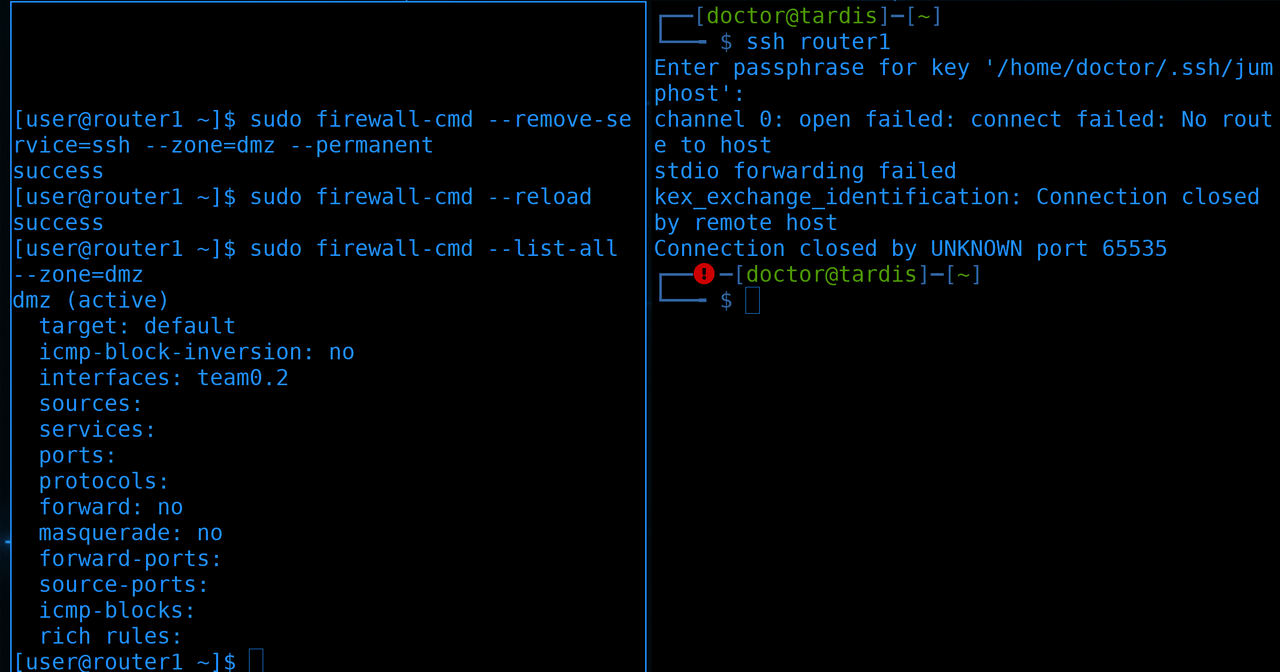
sudo firewall-cmd --remove-service=ssh --zone=dmz --permanent
sudo firewall-cmd --reload
sudo firewall-cmd --list-all --zone=dmz
This will not affect the current connection, but we will no longer be able to access the router from the jumphost.

Now let’s look at the routes:
ip ro sh
Router 1 knows about networks 1.0 and 2.0. And he sends everything unknown to the Internet through the provider. But behind router 3 we have 3 more networks – 3.0, 4.0 and 5.0. If a packet arrives from network 3.0 to router 1, then router 1 will send a response to its default gateway.
We are not satisfied with this, we want router 1 to contact router 3 for a response in networks 3, 4 and 5. And for this we need static routes. Conditionally, we must tell router1 that the network 10.0.4.0 is behind router3. The address of router3 for the first router is 10.0.1.254.
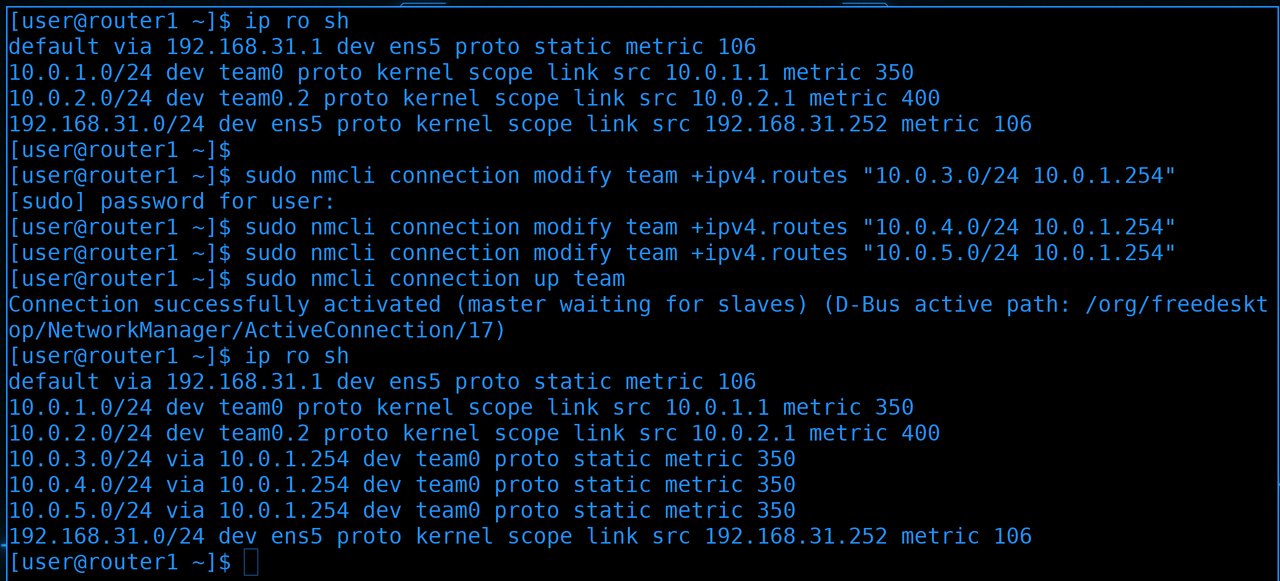
Therefore, we register static routes on router1:
sudo nmcli connection modify team +ipv4.routes "10.0.3.0/24 10.0.1.254"
sudo nmcli connection modify team +ipv4.routes "10.0.4.0/24 10.0.1.254"
sudo nmcli connection modify team +ipv4.routes "10.0.5.0/24 10.0.1.254"
We use nmcli to add a static route in which we write that networks 3.0, 4.0 and 5.0 are located at the address 10.0.1.254. After the changes, raise the interface so that it applies the settings:
nmcli con up team
Well, let’s check the routing table:
ip ro sh
Now we have additional routes. Without them, router1 would not be able to respond to the servers in these vlans, and therefore, at least, they would not have Internet.
As for router3:
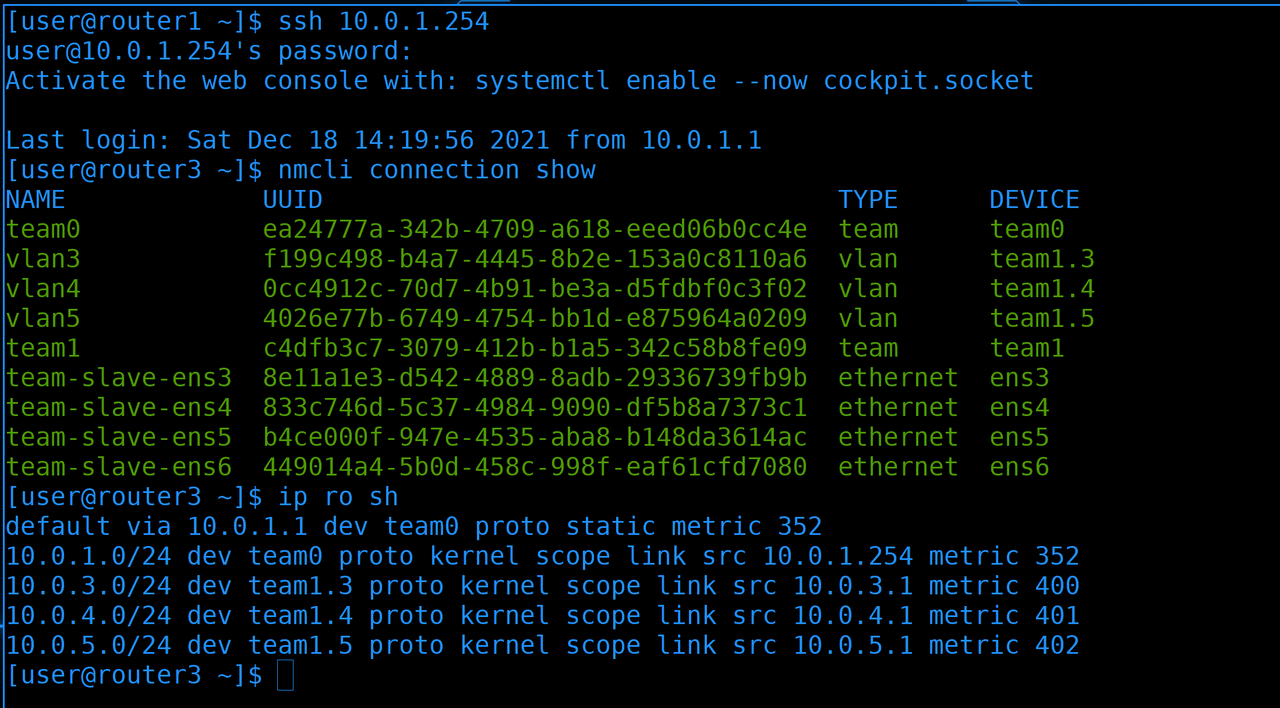
ssh 10.0.1.254
So here we have two timing interfaces for 2 slaves:
nmcli con sh
One interface – team0 – looks towards the first router, the second – team1 – looks into the internal network, where users and servers are. On the second timing interface, we create power 3, 4 and 5.
As for the routes:
ip ro sh
Everything is much simpler here. Here the default gateway is router1. And so the entire internal network is connected to this router, and if it does not know something – say, Internet addresses, then it will send it to the first router, which will already be on the Internet.
As for the division into zones, here we have 4 zones:
sudo firewall-cmd --list-all
First, team0 is looking towards the first router.
Secondly – powers 3, 4 and 5 – we will allocate a separate zone for each of them.
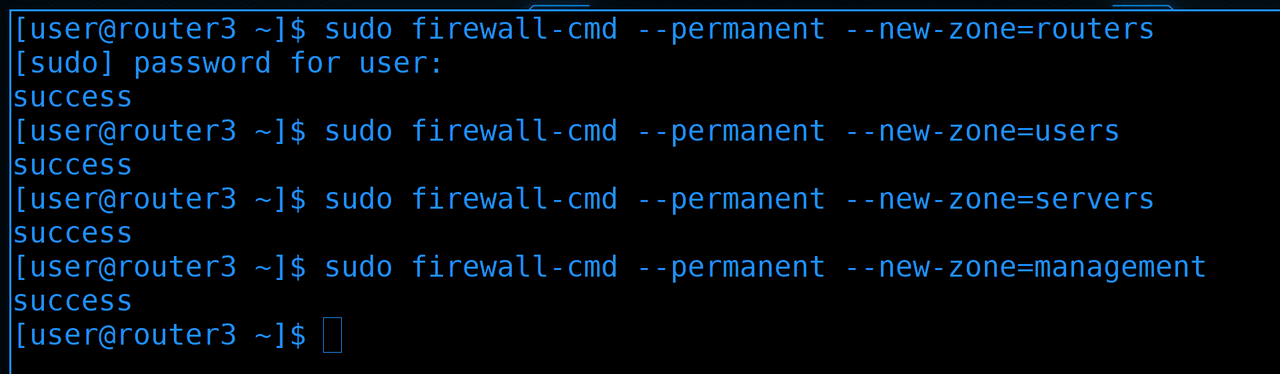
You could use template zones, but it’s better to create your own with more appropriate names:
sudo firewall-cmd --permanent --new-zone=routers
sudo firewall-cmd --permanent --new-zone=users
sudo firewall-cmd --permanent --new-zone=servers
sudo firewall-cmd --permanent --new-zone=management
routers – the zone between the first and third routers
users – zone for local users
servers – zone for servers
management – an area for managing servers. We will talk about it a little later.
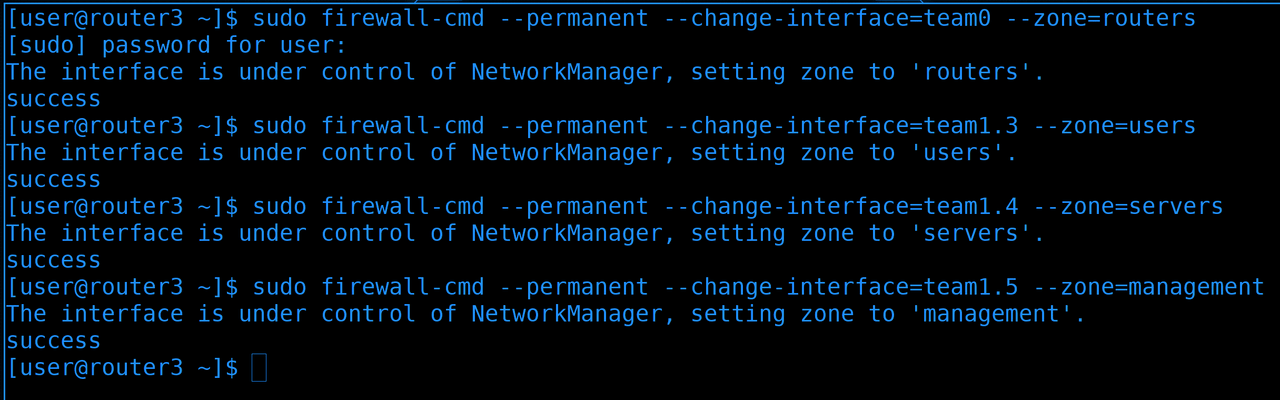
Next, we will move the interfaces to the appropriate zones:
sudo firewall-cmd --permanent --change-interface=team0 --zone=routers
sudo firewall-cmd --permanent --change-interface=team1.3 --zone=users
sudo firewall-cmd --permanent --change-interface=team1.4 --zone=servers
sudo firewall-cmd --permanent --change-interface=team1.5 --zone=management
team0 to the routers zone, team1.3 to the users zone, team1.4 to the servers zone and team1.5 to the management zone.
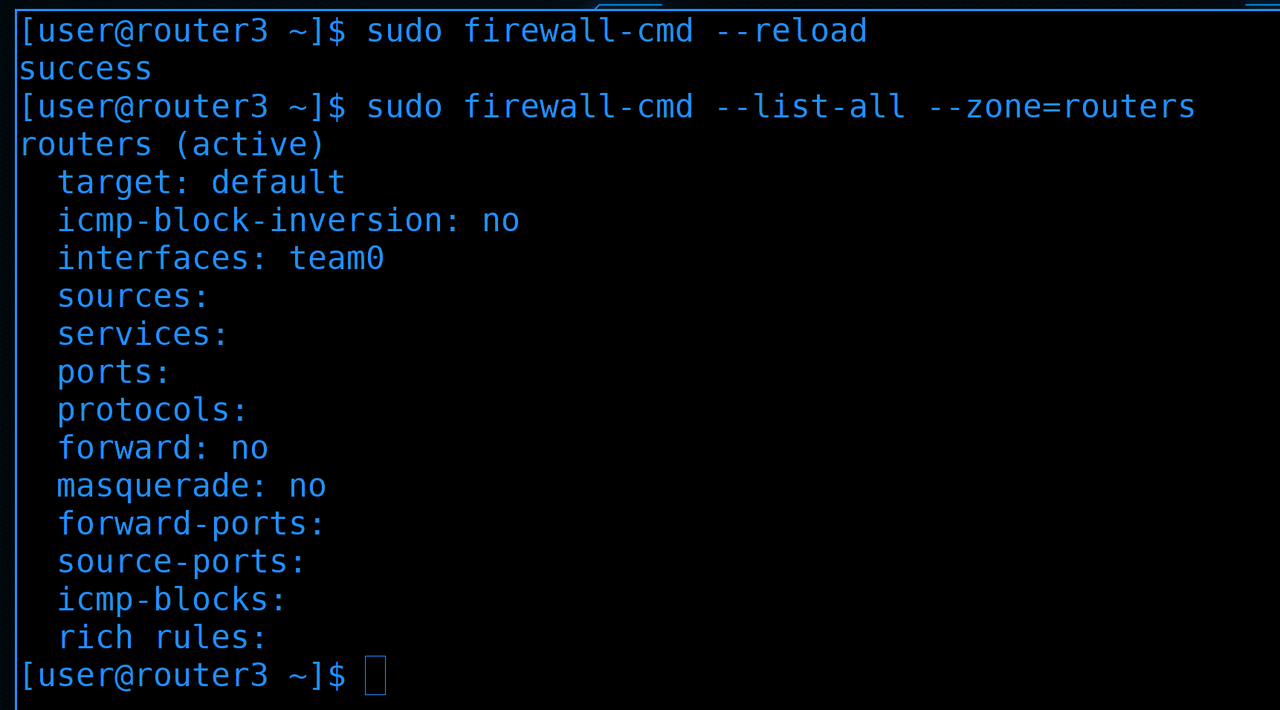
Then restart the firewall to apply the settings:
sudo firewall-cmd --reload
Well, we can check the settings:
sudo firewall-cmd --list-all --zone=routers
It seems that there is a zone, the interface is in the zone and, by default, there are no settings, no services in the zone. Therefore, no one from the zone will be able to hack into the router itself.
You ask – how can we then manage routers, if it is not possible to hack into them from anywhere? This is where the management vlan comes into play.
As we said, there is a large amount of different equipment in the local network – switches, routers, servers, storage devices, etc. Most of this equipment has a separate dedicated physical management port – management port. These ports are intended for administrators – they can be used to connect via the web interface or via ssh and perform any administrative tasks. This allows you to separate the control part of the data. Conditionally, if someone gets access to a virtual machine, he will not be able to reach the server through the network, through which you can access all virtual machines. On the one hand, all administrative access to various systems is transferred to one vlan – management vlan – which is a bit dubious from the point of view of security. But on the other hand, we know that this is the only way to the admin area – therefore, we do not let anyone extra into this area, except administrators.
Most often, the equipment has only 1 administrative port, which means you cannot connect it to two switches. But usually this is not a problem – even if the switch fails, it will not affect users – at most admins will lose access to management. Plus, often all these connections are kept on a separate switch – management switch. According to the diagram, I should have connected router3 separately to this switch, the switch separately, the server separately – but our switches are stupid, and I have no ports left on the router. Therefore, I will connect router3 through 5 vlans, and I will connect server1 through a separate adapter, as it should be. We will not connect Router1 and jumphost to the switch management, as we have the least trust in them.
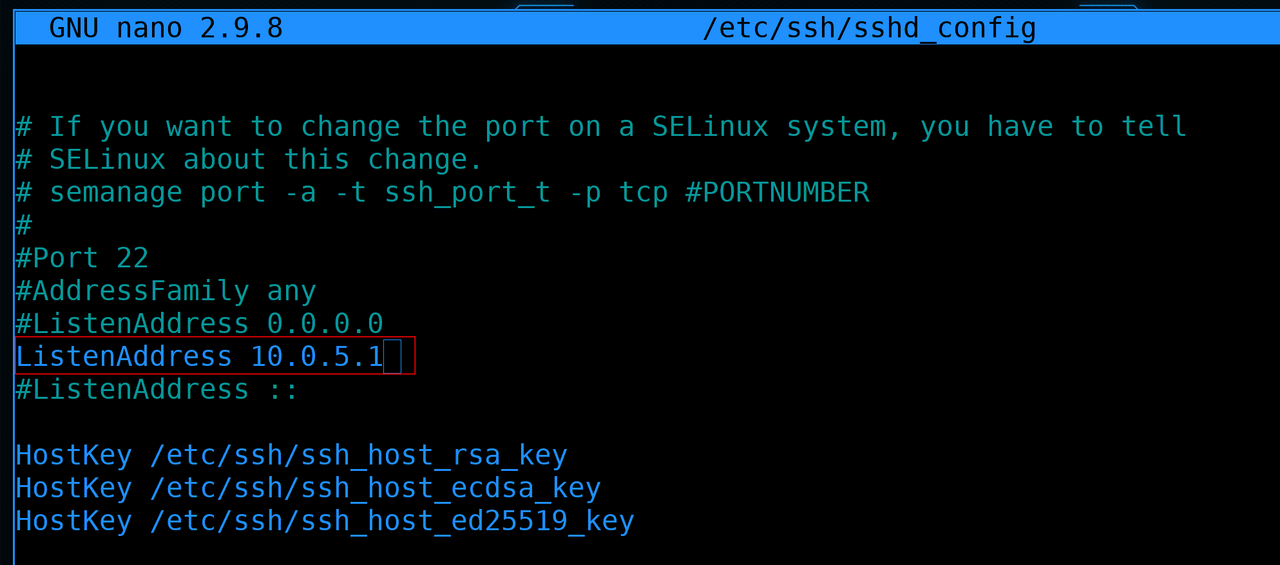
For example, we have 4 addresses in 4 networks on router3. And we want it to be managed only from network management. To do this, in the sshd settings – /etc/ssh/sshd_config – set as ListenAddress only the address from the Management authority:
...
ListenAddress 10.0.5.1
...
And restart sshd:
sudo systemctl restart sshd

To check, we can hack ourselves. At address 4.1:
ssh 10.0.4.1
immediately see the error. And at address 5.1:
ssh 10.0.5.1
you can understand that the connection is working.

Do not forget to enable the ssh service in the management zone:
sudo firewall-cmd --zone=management --add-servic=ssh --permanent
sudo firewall-cmd --reload
sudo firewall-cmd --list-all --zone=management
Well, restart the firewall. It is a good idea to remove ssh from other zones, but still there are no active interfaces with IP addresses in other zones. And where there is, ssh is not allowed.
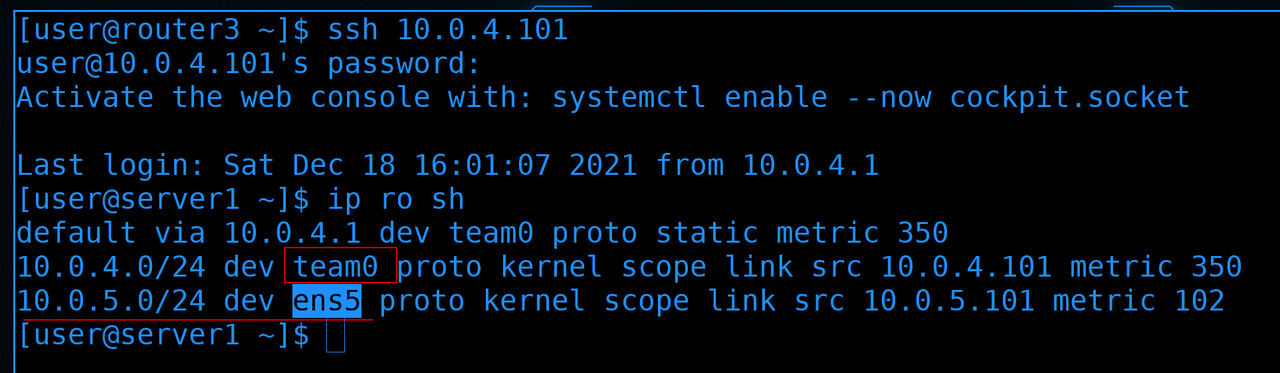
Now we hack to server1:
ssh 10.0.4.101
Here we have a timing interface for 4 vlans:
ip ro sh
And also 5 LAN, connected separately through the ens5 interface.
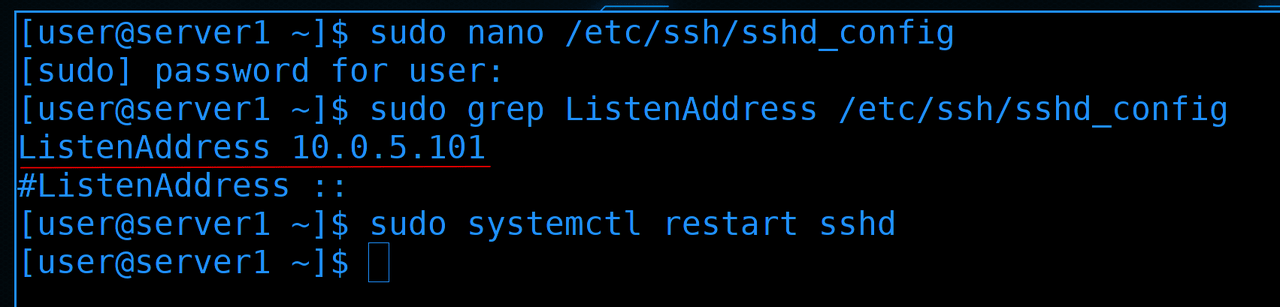
Let’s replace ListenAddress with the address from vlan5 here in sshd:
...
ListenAddress 10.0.5.101
...
and restart sshd:
sudo systemctl restart sshd
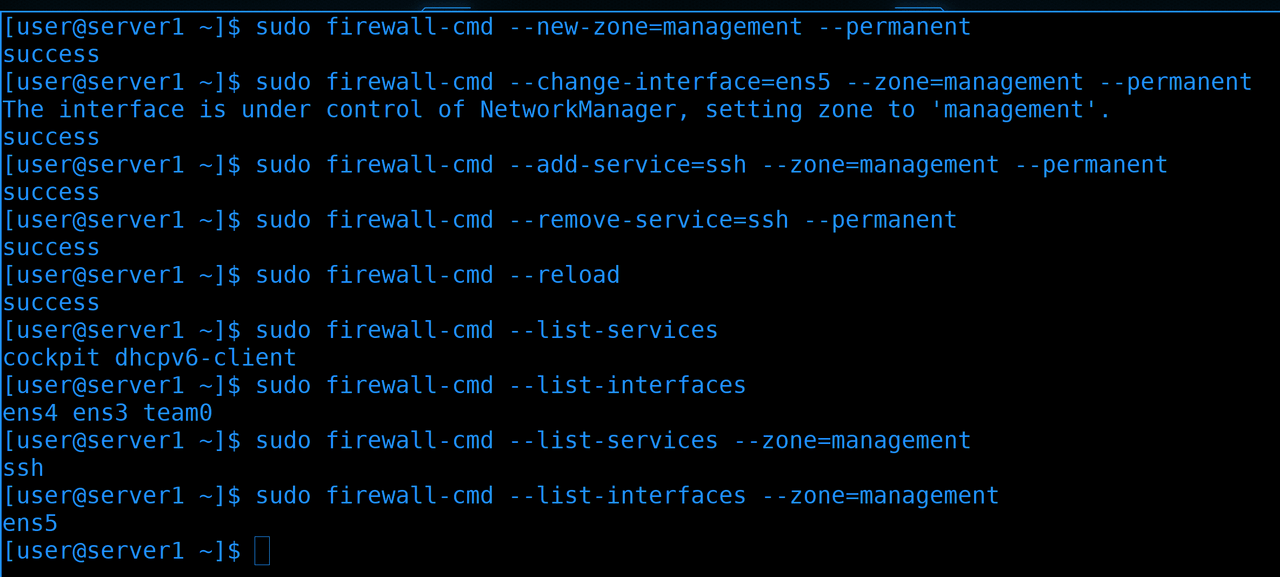
Well, let’s make changes to the firewall. First, let’s create a new management zone, move the interface there and allow ssh there:
sudo firewall-cmd --new-zone=management --permanent
sudo firewall-cmd --change-interface=ens5 --zone=management --permanent
sudo firewall-cmd --add-service=ssh --zone=management --permanent
In this, from the default zone, that is. with public, remove ssh and restart the firewall:
sudo firewall-cmd --remove-service=ssh --permanent
sudo firewall-cmd --reload
sudo firewall-cmd --list-services
sudo firewall-cmd --list-interfaces
sudo firewall-cmd --list-services --zone=management
sudo firewall-cmd --list-interfaces --zone=management
What we are doing now at the virtual level does not make sense. But just imagine that this is a physical server, it has data on some physical ports, and through the dedicated one – management – we manage. And the fact that we transferred ssh to a separate interface and configured access to it with a firewall is only a convention. But even from this convention, something useful can be learned – at least we learn to work with zones.
And so we divided our network into zones. Some small things remain, conditionally, to remove unnecessary services and interfaces from zones on routers and end devices.
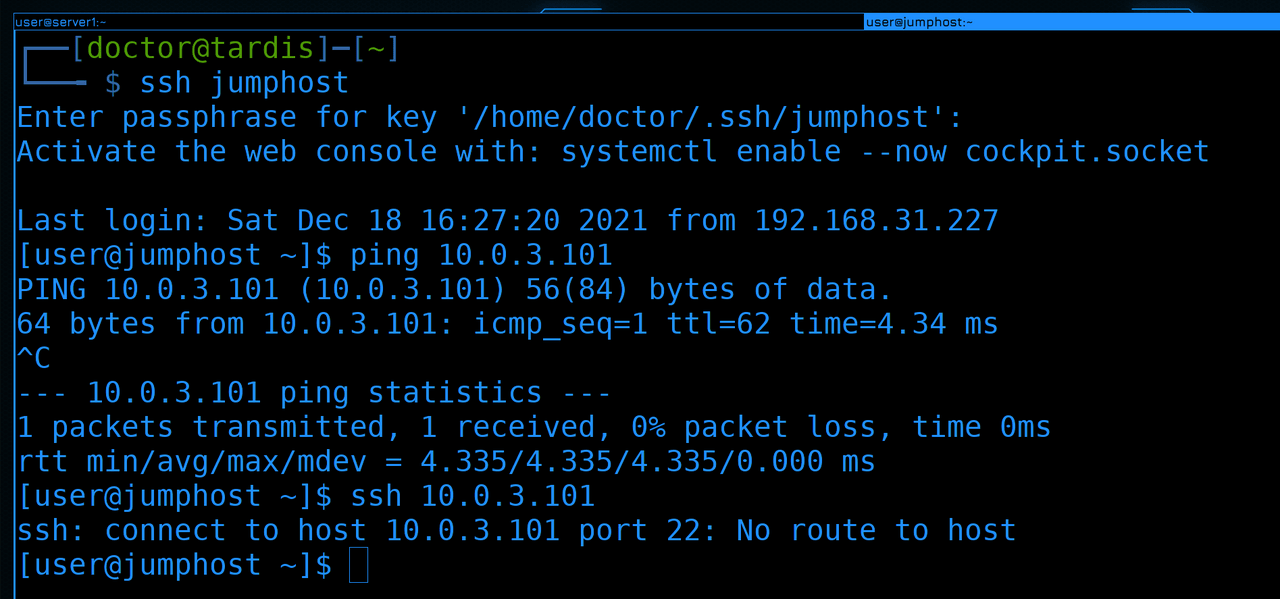
All our connections are now holding due to firewall changes not affecting current ssh sessions. If we try to connect again:
ssh jumphost
although ping will work:
ping 10.0.3.101
but ssh and any other connections will not work:
ssh 10.0.3.101
Simply because the network firewall blocks traffic between zones.
And here’s how to granularly allow traffic between zones and how to get to server1 via ssh from jumphost – we’ll talk next time. There was already a lot of information, the scheme became more complex, but there is nothing terrible in it. Try to build such a network, everything should ping each other, except for the address 5.101. Why so – we will analyze it next time.
Let’s summarize. Today we talked about security, touched on the need for internal and external firewalls, divided our network into zones, created a DMZ and added several LANs and subnets.