
20.03.2024
14 min
3280

Describes the configuration of link aggregation, also known as link aggregation, to improve the network infrastructure. Considers configuring NIC command and bonding for servers, as well as etherchannel, portchannel, or LAG for switches. The benefits of increasing fault tolerance and throughput through techniques such as LACP are detailed, noting the need for managed switches to be properly configured.

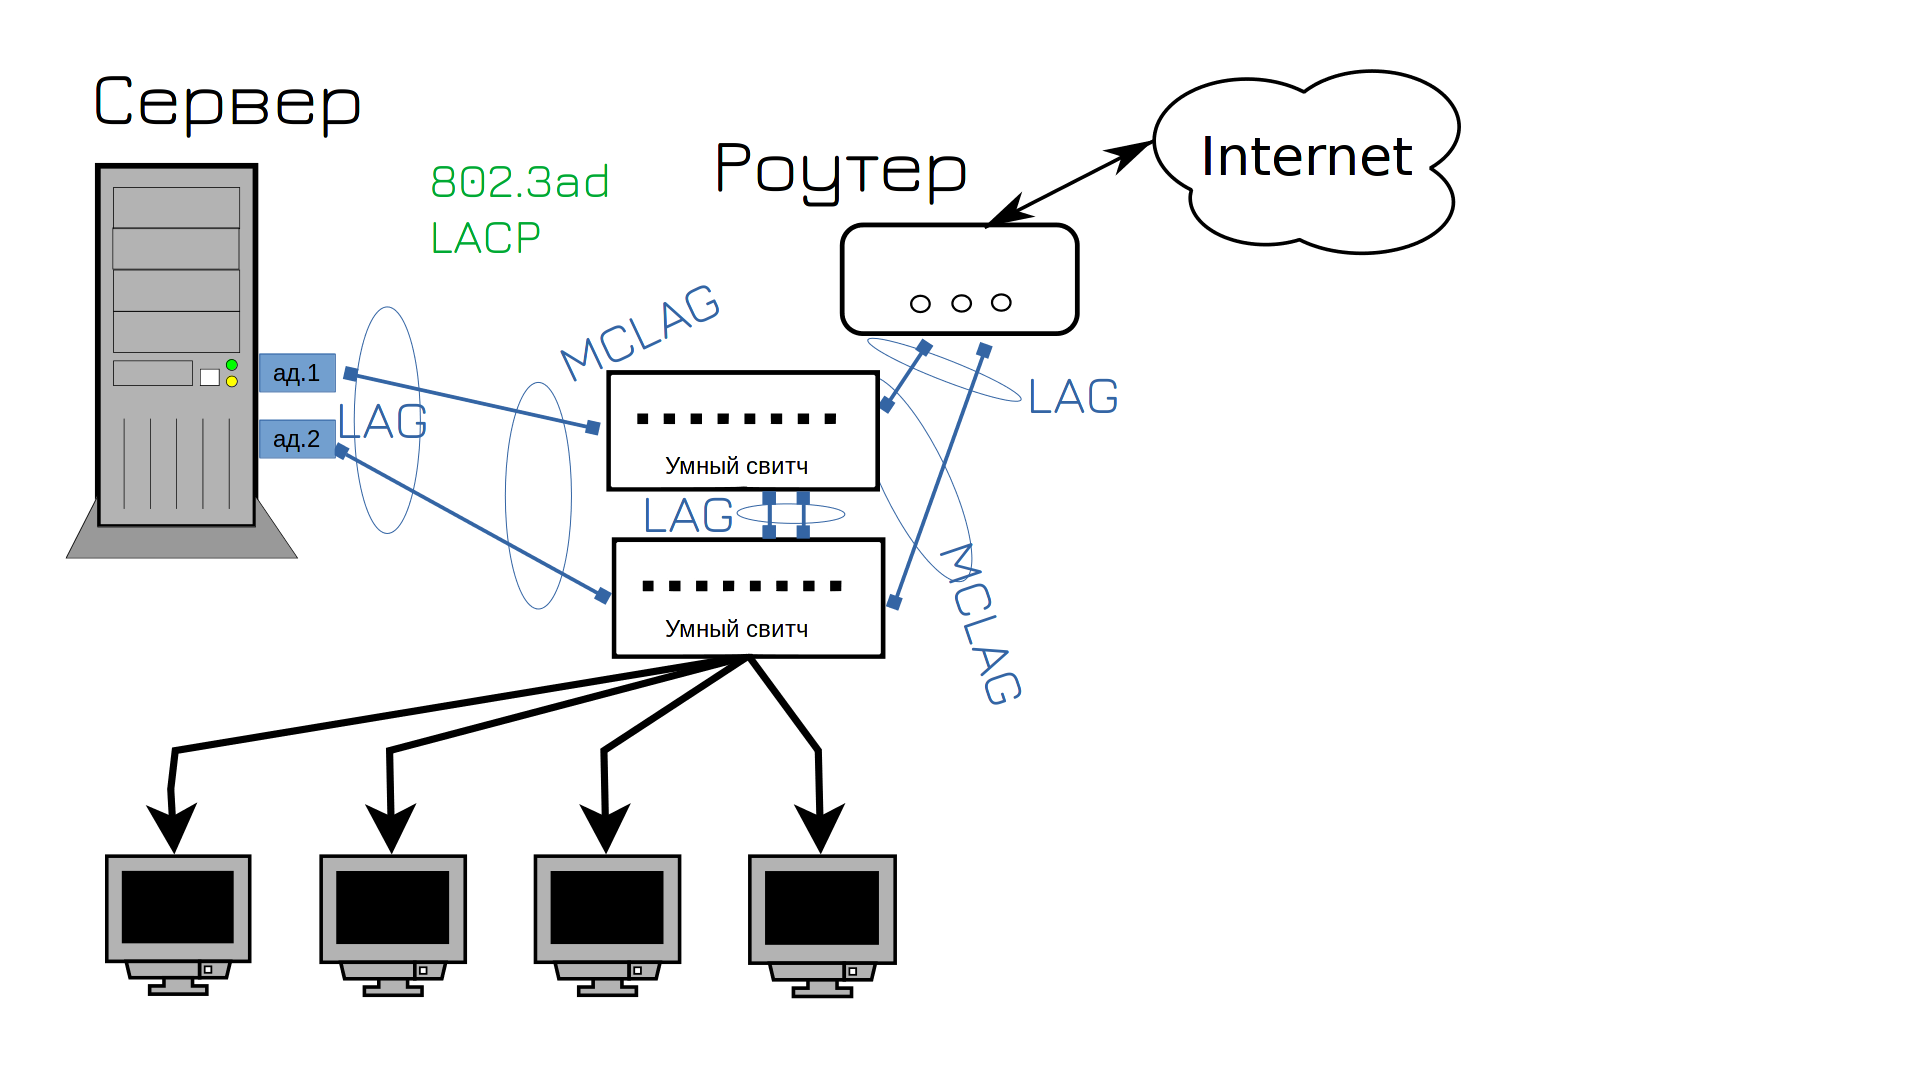
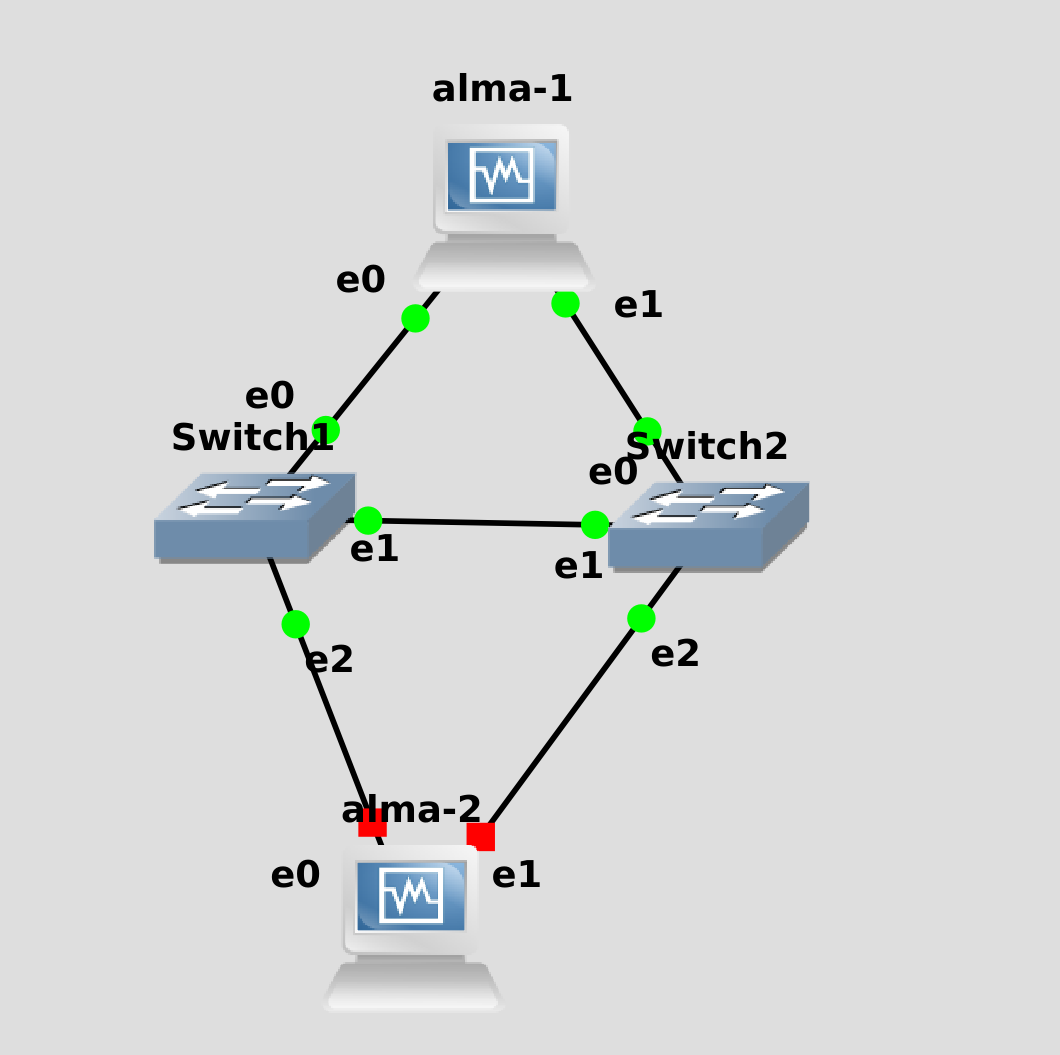
Another task that the administrator faces from the point of view of interaction with the world is the configuration of channel aggregation, i.e. combining several ports. We talked about it in the first topic, they say that you need to use two network adapters and two switches. In fact, it is possible to have more ports and wires, at least 4, at least 8. But, as a rule, it is either two or four.
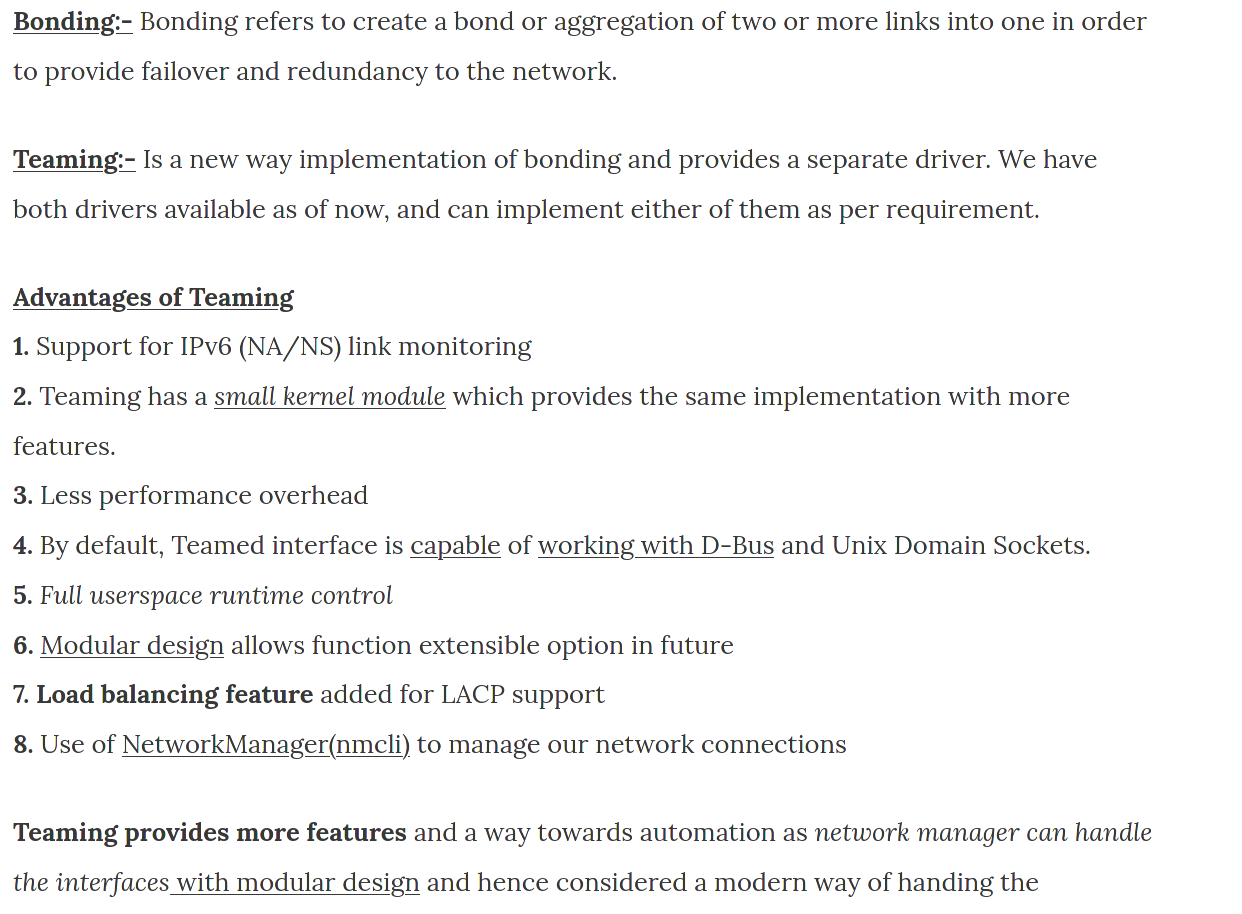
Aggregation of channels is called differently – the concepts of NIC teaming, bonding are usually attributed to servers, and etherchannel, portchannel, lag, etc. to scrolls. But usually everyone means the same thing. True, there are two modules in Linux, previously there was only bonding, but then a new and more advanced option was added – timing.
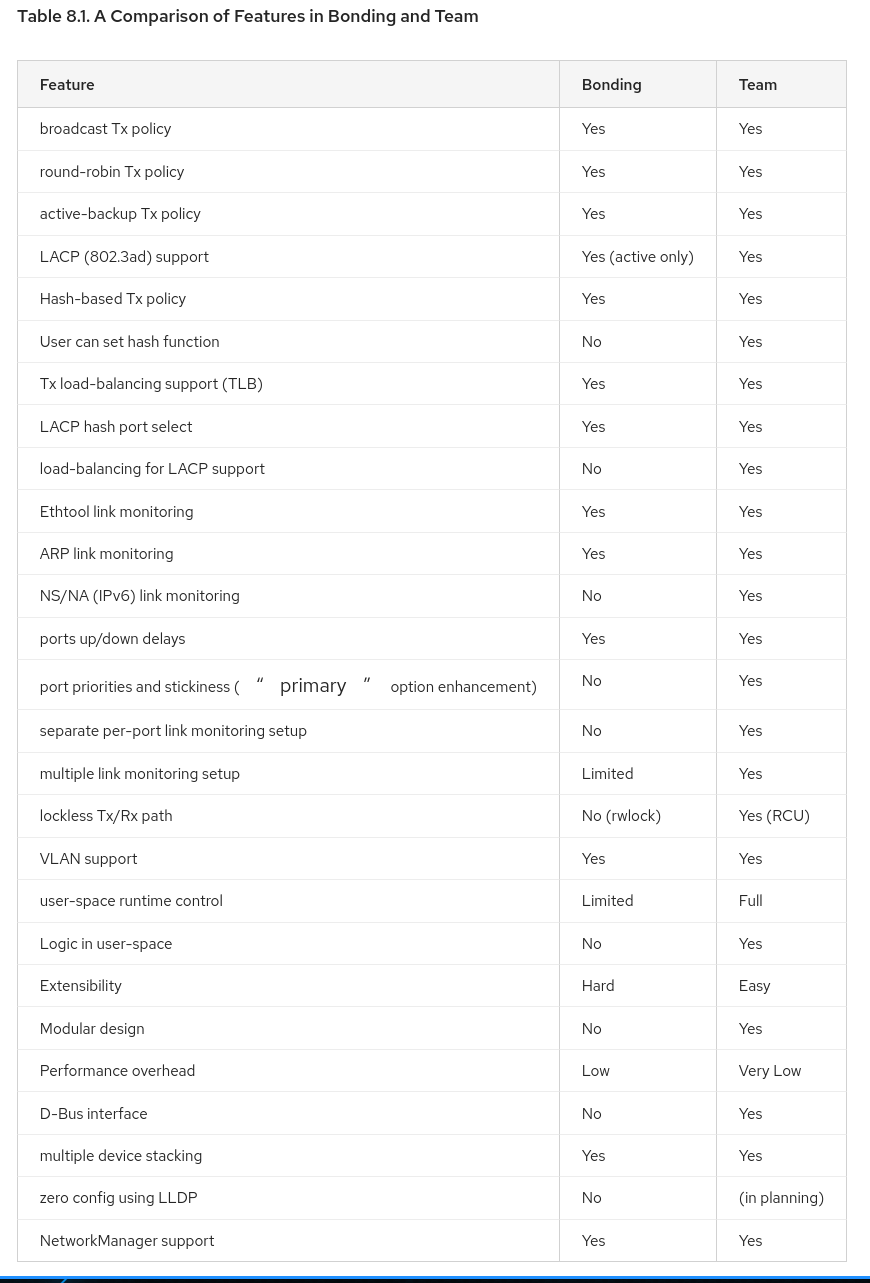
As a result, you’re faced with both teaming and teaming during setup, both do the same thing, and only teaming is better.
The delay gives 2 advantages at once – firstly, it increases resistance to failures, and secondly, it increases bandwidth. By the way, in the 2nd case, port aggregation does not allow this, but only a specific implementation – LACP. At the same time, do not confuse speed with bandwidth. For a single connection, the maximum speed remains the speed of a single channel. So, conventionally, if you download 1 file, the speed will reach a gigabit, and if you have several files, they will be distributed over the port, which will be about 2 gigabit in total. You cannot run LACP between ports with different speeds.
LACP must be configured on both sides. Both the server and the switch. And you can’t set it up with a dumb whistle – so LACP needs a managed packet. But usually this is not a problem – the server is connected to a dumb switch, except for a sad company.
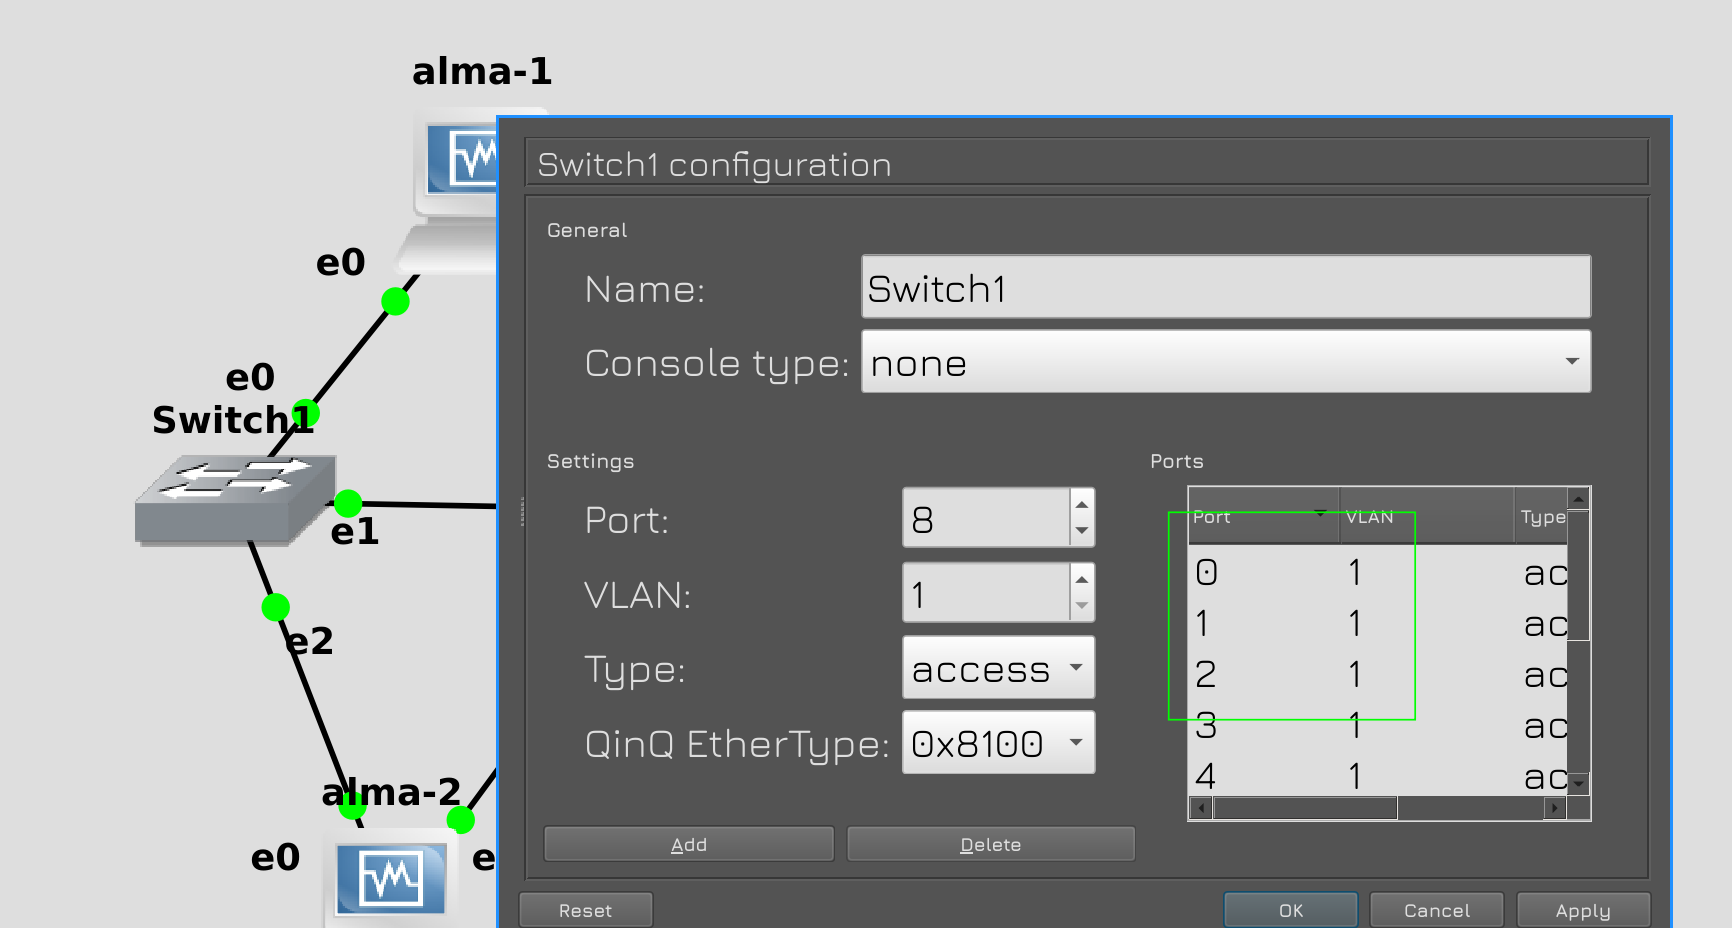
But this is exactly the situation we found – the switch proposed by GNS is almost stupid. On the one hand, they have VLAN Configuration – and this cannot be done with unmanaged scrolling. On the other hand, that’s all they can do. Maybe you and I will install other switches with GNS on Linux in the future, but for now we’ll be happy with these.

Therefore, in our scheme, instead of LACP, we will use “activebackup” – in this case, only one of the two connections will work. But for the example, we will configure LACP between two hosts, just for clarity.
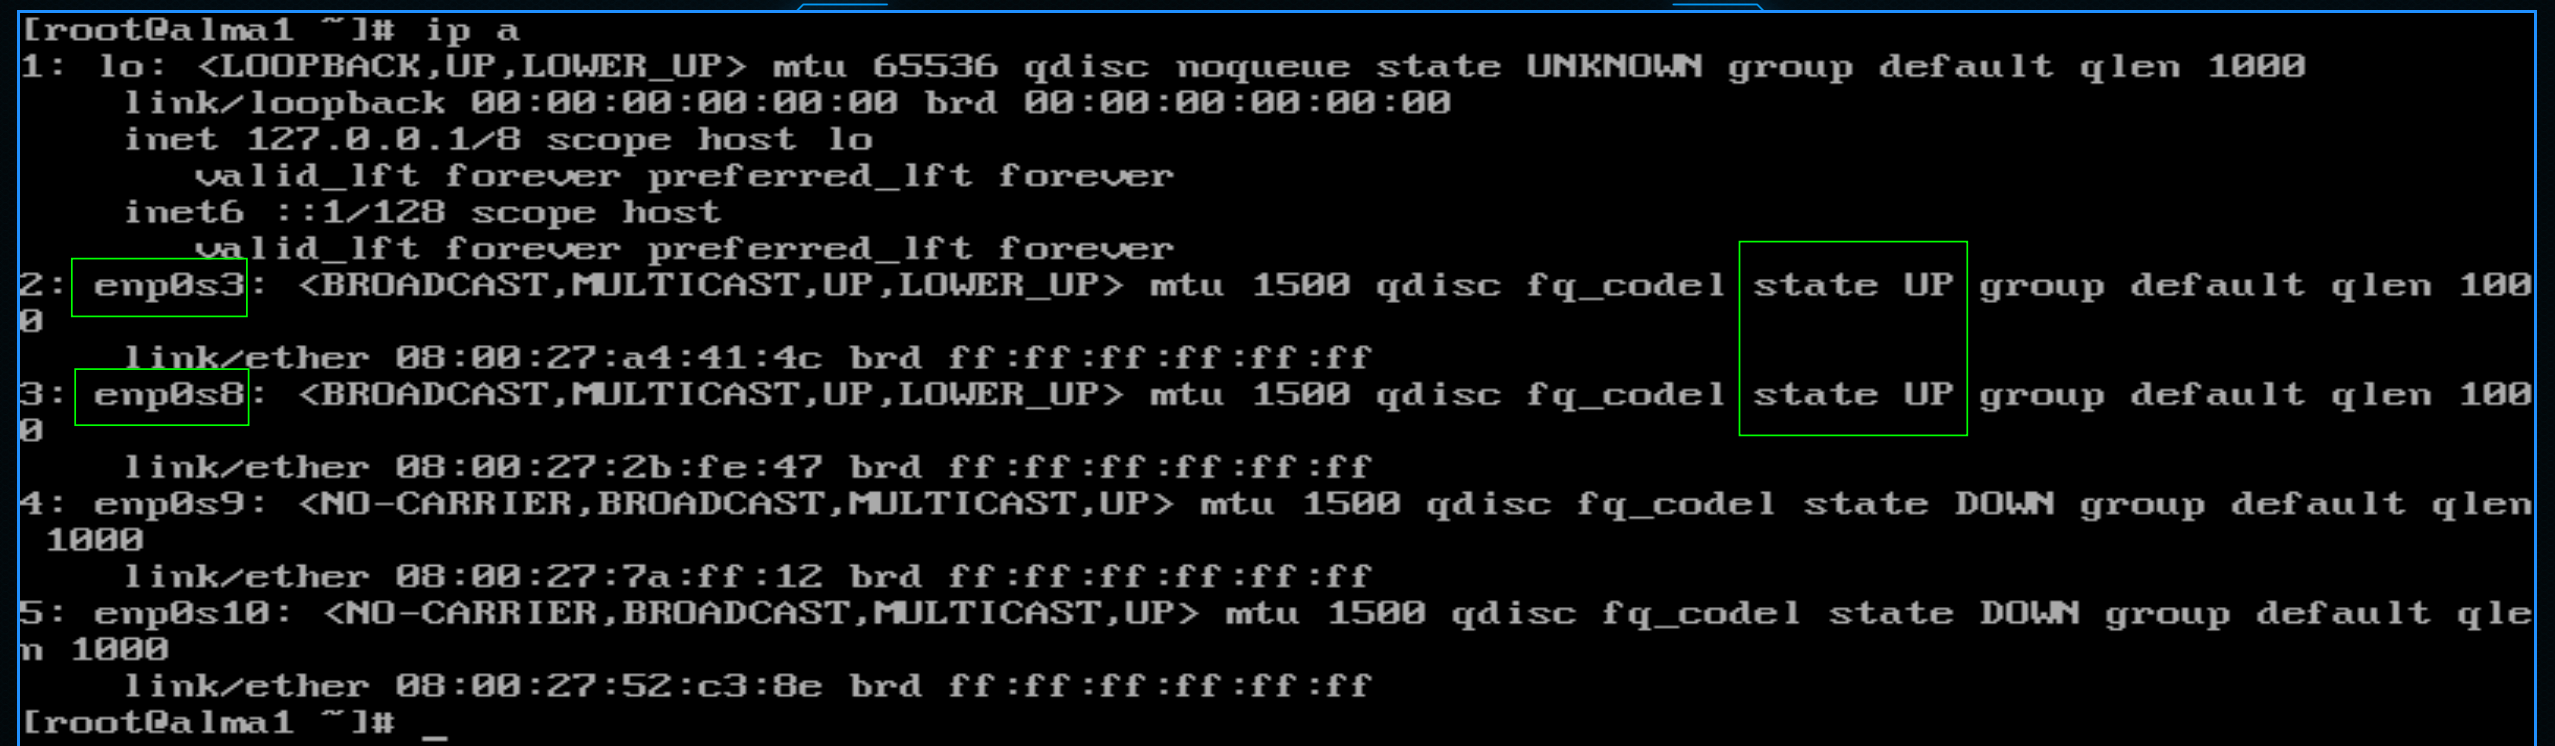
First, let’s run alma1. We will have to use the console again, but soon we will switch to the convenient ssh. Let’s look at the list of active interfaces:
ip a
Since we connected 0 and 1 adapters in GNS, the first two interfaces in the system will be in UP – enp0s3 and enp0s8. Using them, we will need to create one logical interface.

Today, instead of nmtui, we will use nmcli – the command version of this utility. It will be a little clearer. Remember, when entering nmtui, we saw a list of network profiles in edit connection? In the command line, you can see them with the command:
nmcli connection show
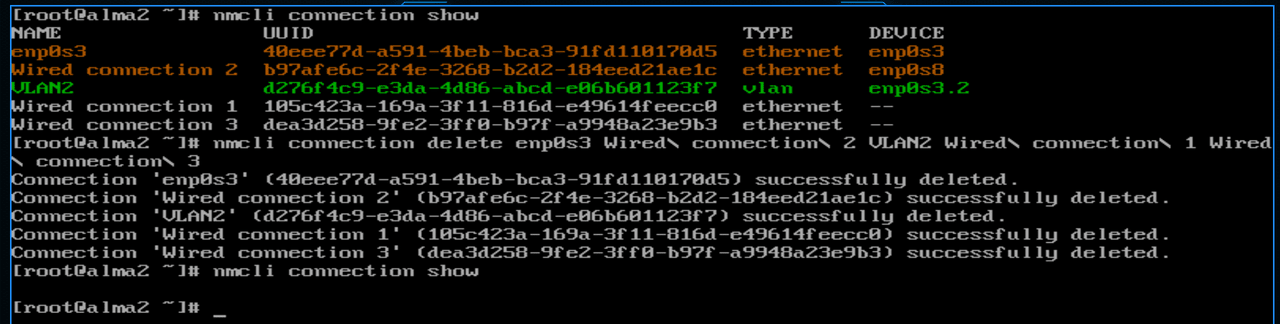
By default, the Network manager has created profiles for active interfaces – and they can be recognized by the Device column. We will need to create a new profile in which we will use these devices. And so that the profiles do not conflict with each other, these should be deleted. You can even delete all 4.

To do this, use the delete option and specify all profiles through an omission:
nmcli connection delete enp0s3 Wired\ connection\ 1 Wired\ connection\ 2 Wired\ connection\ 3
nmcli con sh
As you can see, now there are no profiles left.

Now you need to create a new profile. For this, we use the add option:
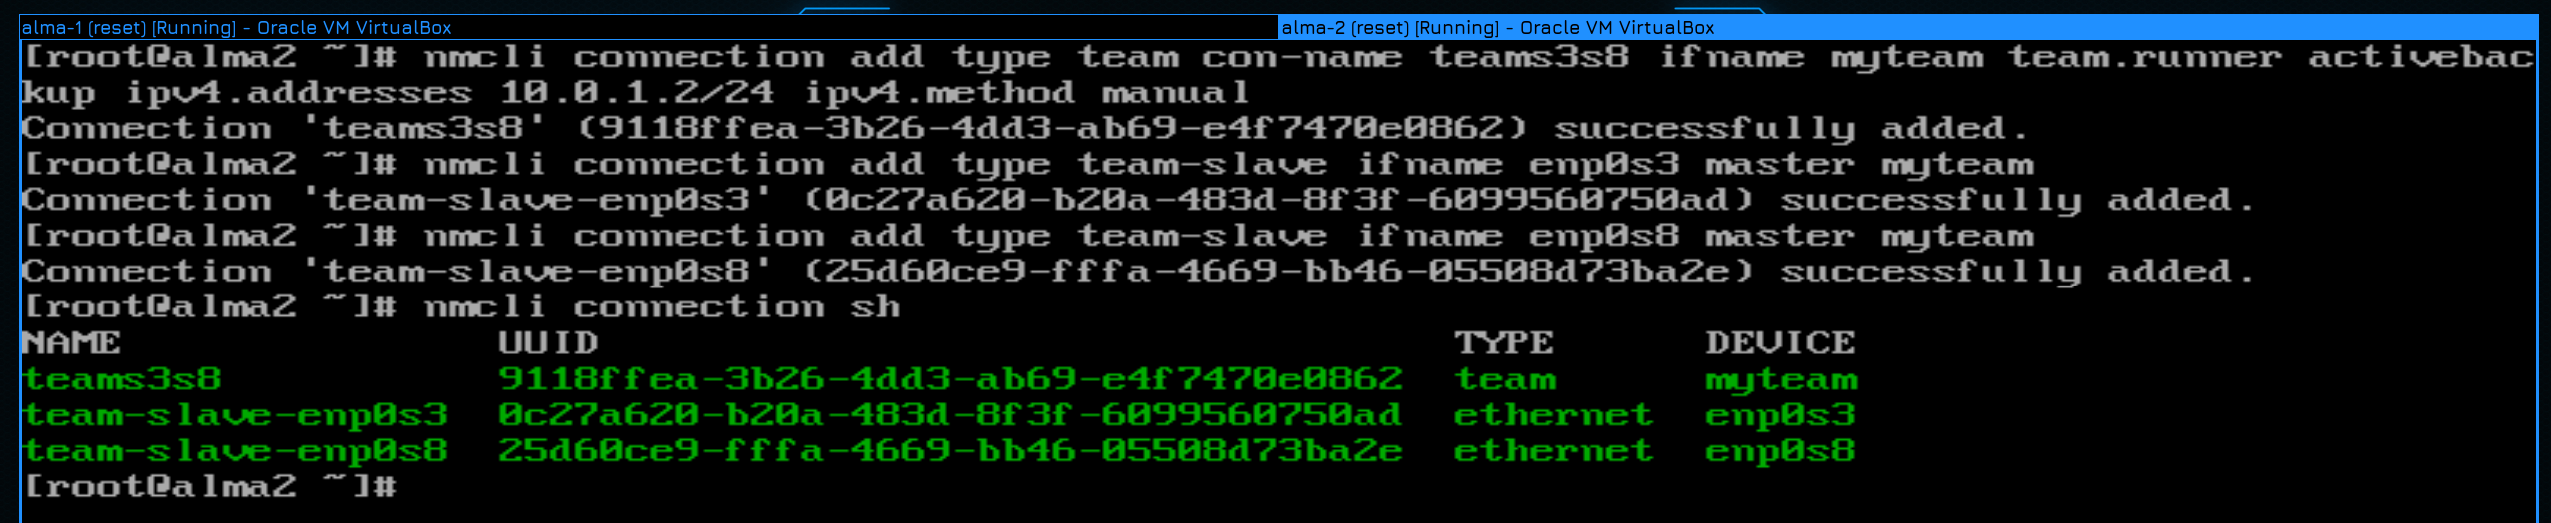
nmcli connection add type team con-name teams3s8 ifname myteam
When creating it, you must specify the type of interface. Remember that you selected the Vlan when creating the Vlan in the list. And here we choose a team. Then use the con-name option to specify the profile name. Let it be teams3s8. Now remember that when you created the VLAN, you specified the device. We create a logical interface and you can call it whatever you like. Let’s call it myteam. Now let’s see what happened:.
nmcli con sh

Now you need to bind enp0s3 and enp0s8 to this timing interface. To do this, you need to create two new profiles with the team-slave type:
nmcli con add type team-slave ifname enp0s3 master myteam
nmcli con add type team-slave ifname enp0s8 master myteam
In them, we indicate the names of the interfaces that will be part of the port group – ifname enp0s3 and enp0s8. Also, after master, specify the name of the common interface – myteam.
Let’s check again what happened:
nmcli con sh
As you can see, there are now 3 profiles. Now everything about IP addresses and other things must be configured on the master interface, i.e. on the teams3s8 profile.

Let’s start with the runner. This is actually a mechanism for how multiple interfaces will work together. The same lacp or activebackup. There are other runners, but they are specific and not used as often. In our situation, you need to choose an active backup. And so, in the teams3s8 profile, we change the runner to the desired one:
nmcli con modify teams3s8 team.runner activebackup

And finally, let’s write the IP address in this profile:
nmcli con mod teams3s8 ipv4.addresses 10.0.1.1/24 ipv4.method manual
We must also specify the method of obtaining IP-manual. Remember when we changed nmtui Automatic to manual? Same. To see the various settings of the interface, you can view it using the show option:
nmcli con show teams3s8
We seem to have everything set up, but we need a second host to test. Let’s connect alma2 to this network and configure the same network on it.
First, let’s look at the list of all profiles and delete them:
nmcli con show
nmcli con del enp0s3 Wired\ connection\ 2 VLAN2 Wired\ connection\ 1 Wired\ connection\ 3
nmcli con sh
Then you can create a timing interface with all the necessary parameters in one line:
nmcli con add type team con-name teams3s8 ifname myteam team.runner activebackup ipv4.addresses 10.0.1.2/24 ipv4.method manual
Well, let’s add slave interfaces to this master:
nmcli con add type team-slave ifname enp0s3 master myteam
nmcli con add type team-slave ifname enp0s8 master myteam
And let’s see what happened:
nmcli con show

It remains to raise the profile on both hosts so that the settings are applied:
nmcli con up teams3s8
Make sure that the interface appears and has an IP address:
ip a show myteam
And let’s return the switch settings to their original settings, i.e. remove VLAN and trunk interface.
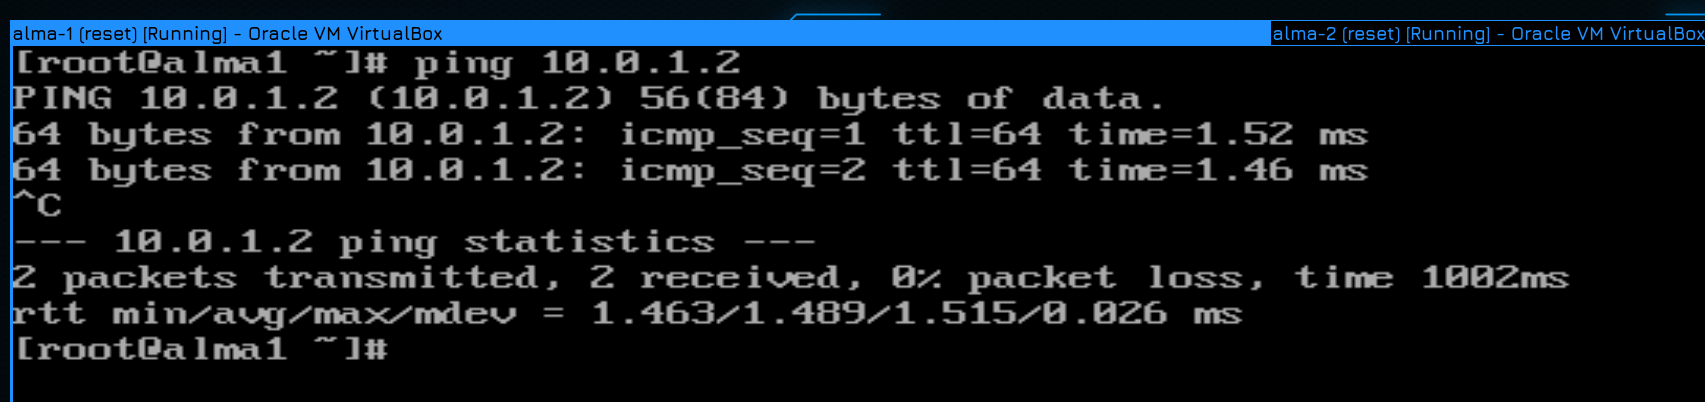
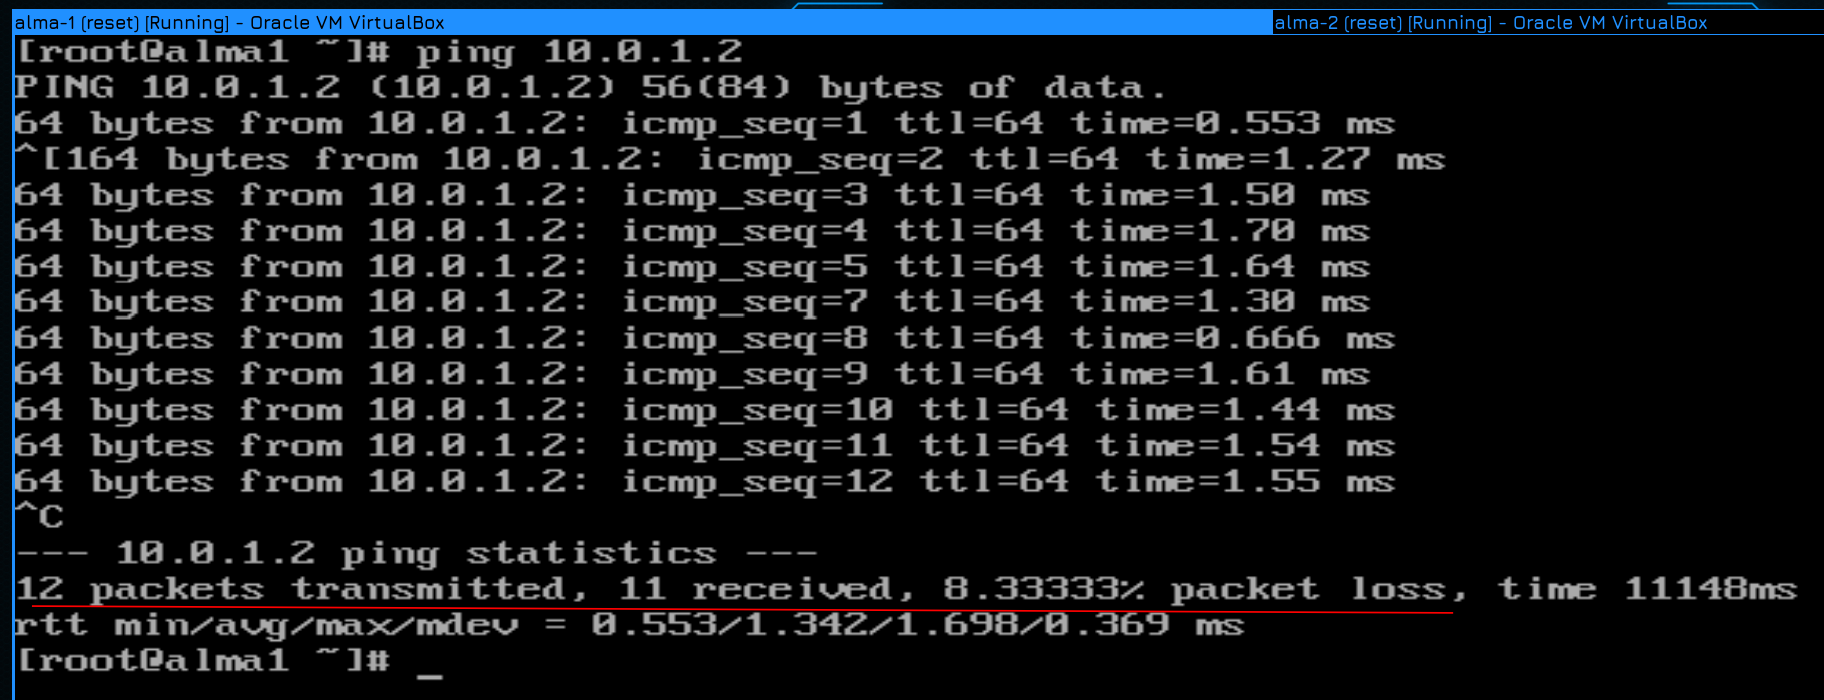
Now let’s try to ping Alma 2 from the first host:
ping 10.0.1.2
Everything is pinged, so there is a connection.
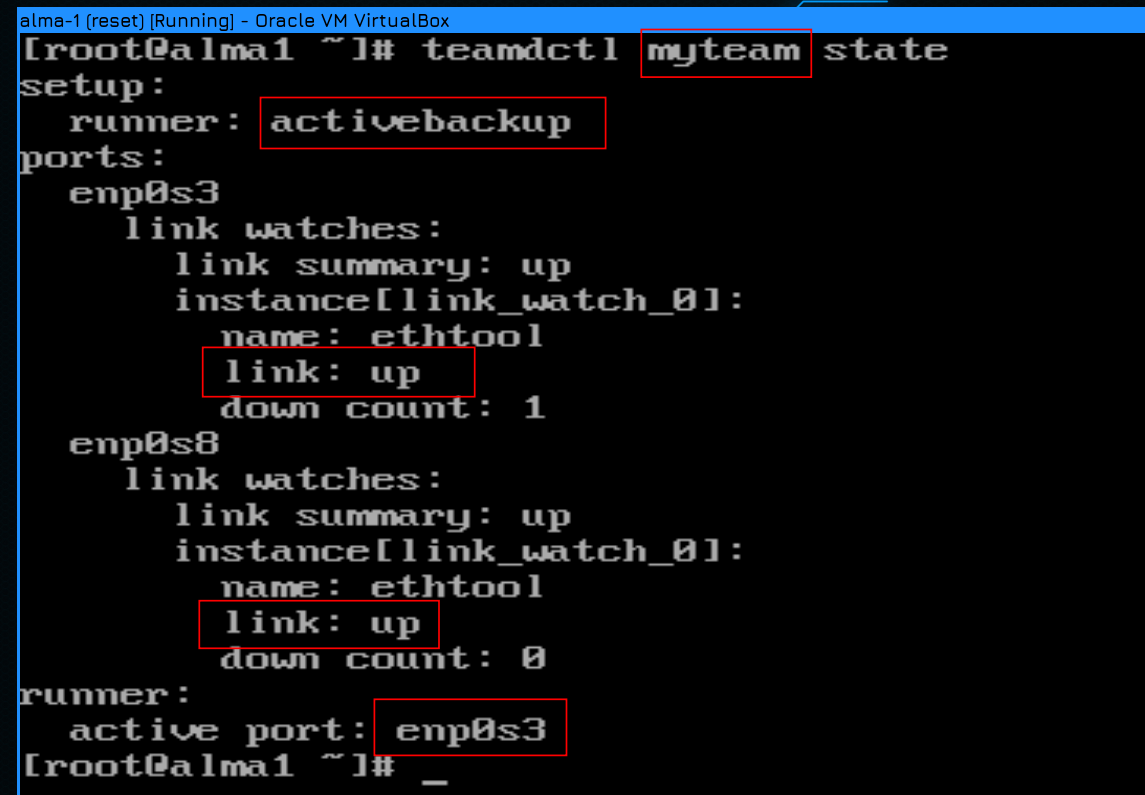
We said that only one interface works with activebackup. With the help of the teamdctl utility, we can view information about the timing interface:
teamdctl myteam state
The utility should specify the interface name instead of the profile name. Here you can see that activebackup is used as a runner for this interface, both interfaces are inside the API, and enp0s3 is Active. In the second Alma, the situation is the same. The active interface is enp0s3.
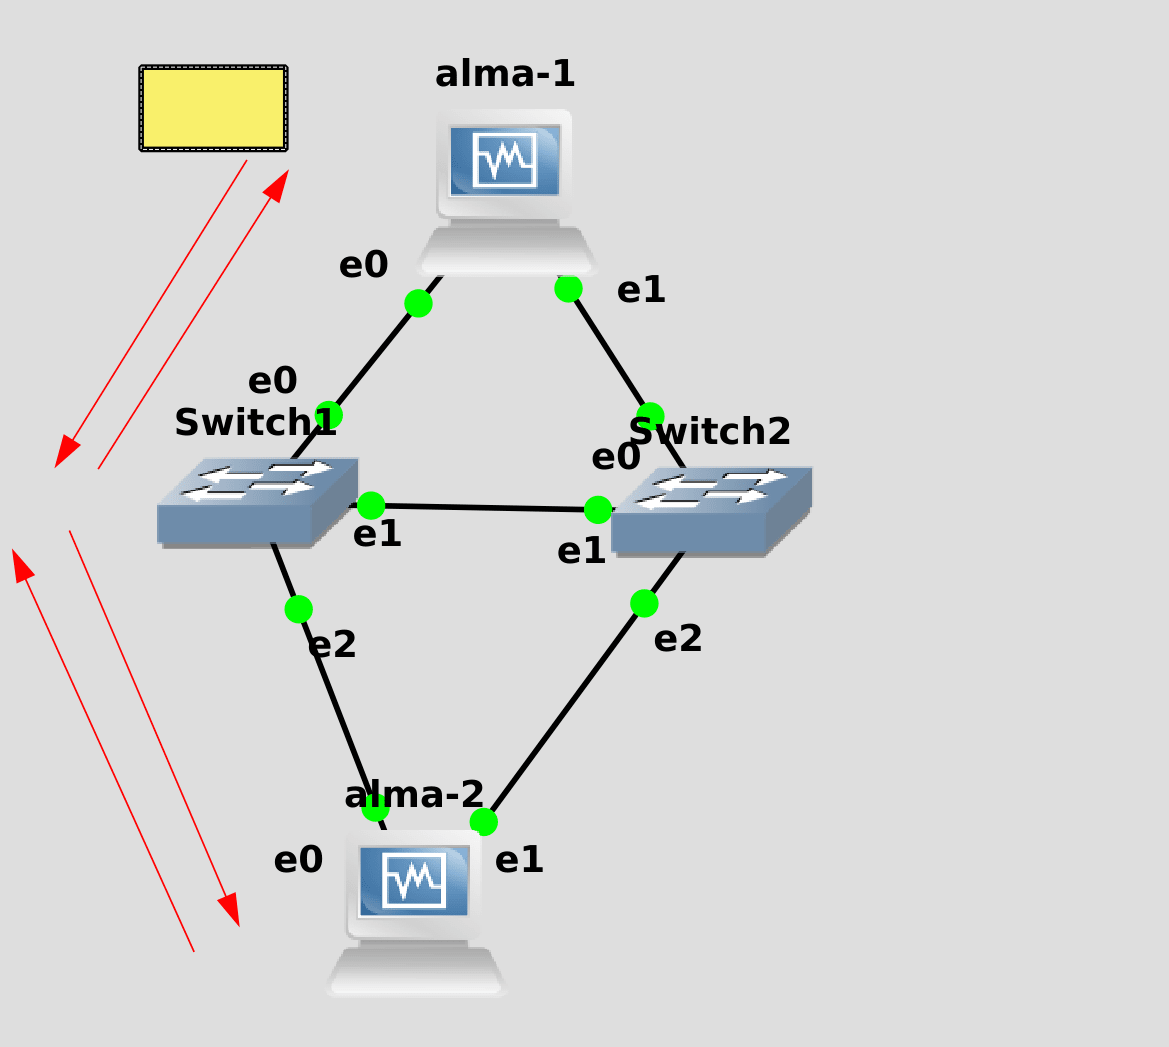
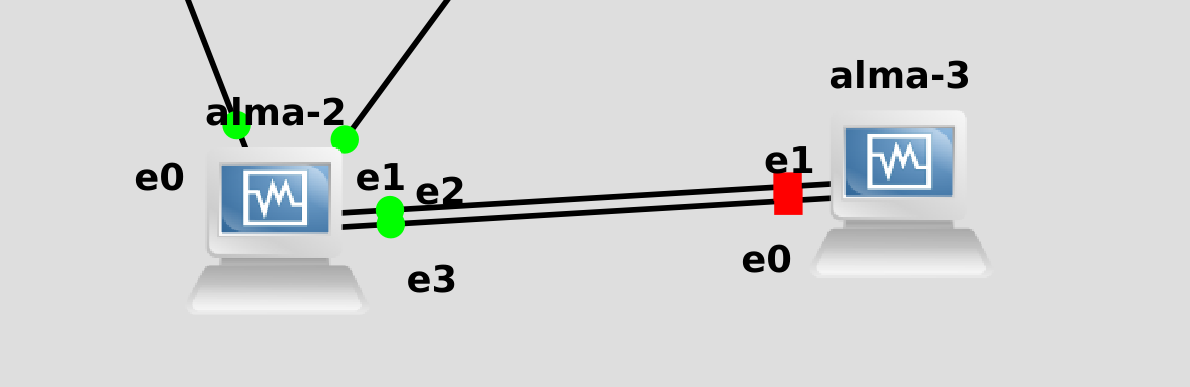
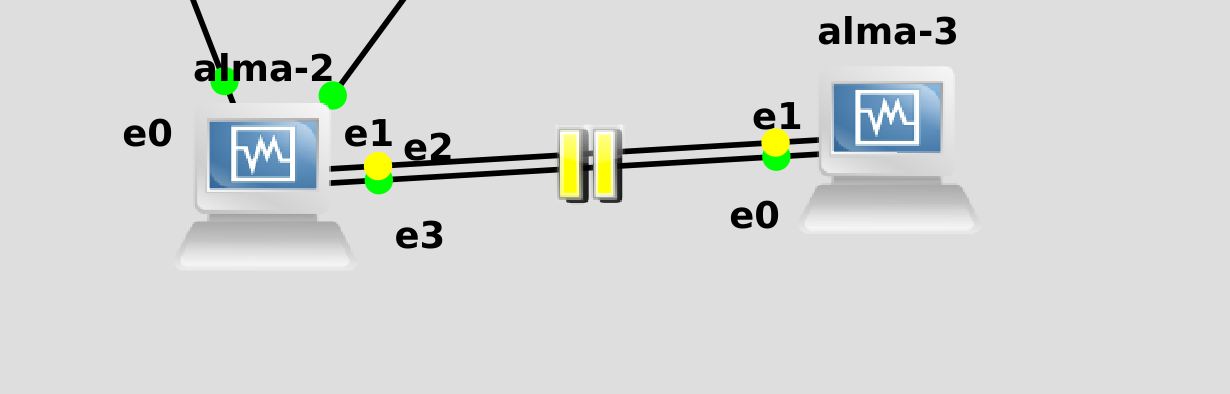
We remember that the interface enp0s3 is e0 in GNS. Both hosts go to switch 1 through these interfaces, i.e. now everything goes through switch 1.
For clarity, let’s “spoil” the wire leading from alma 1 to the first light in GNS. But first, let’s ping host 2 to see how the network behaves.
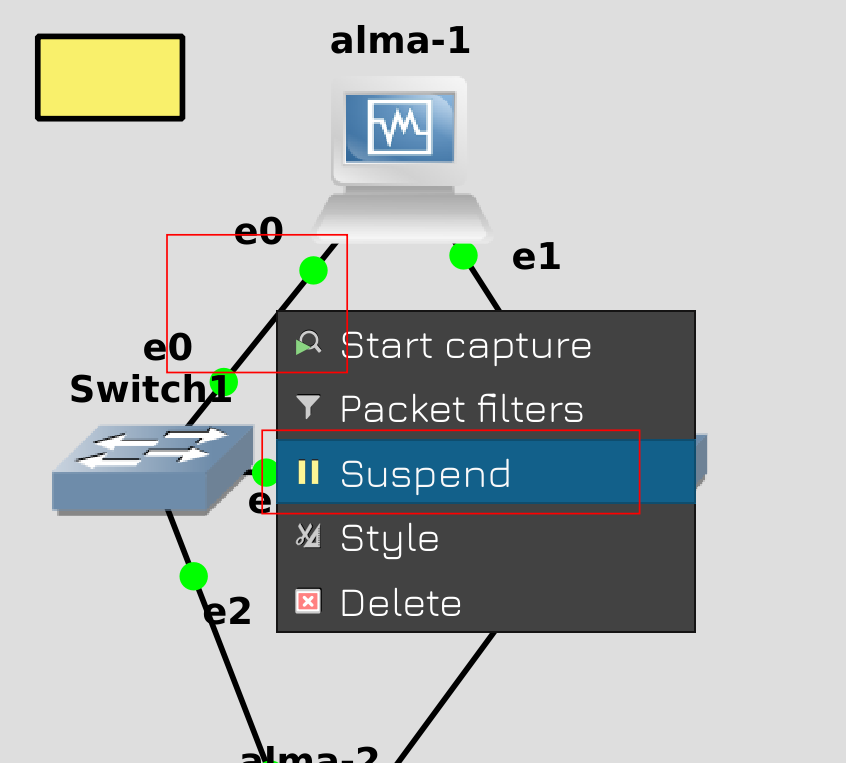
Then right-click on the cable and click Suspend.
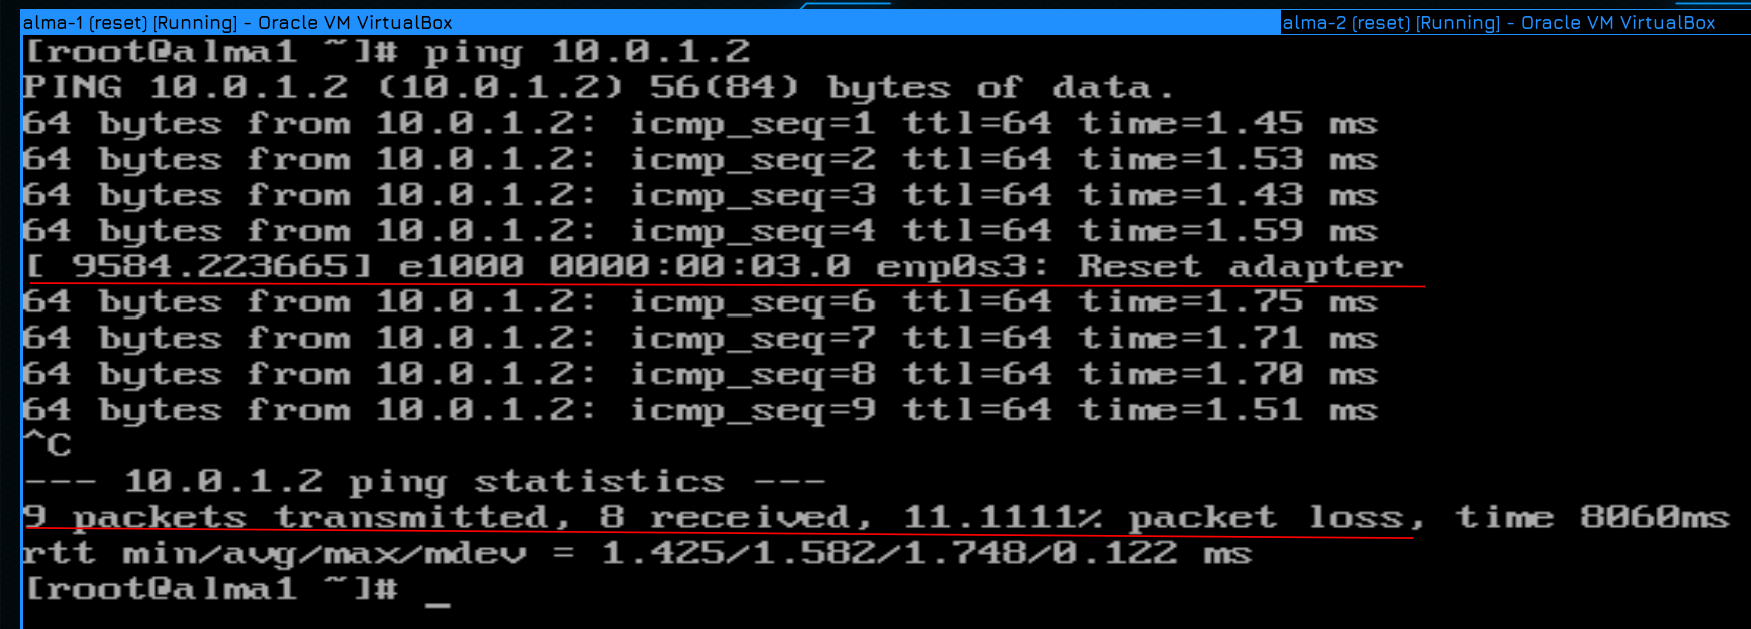
Back to Alma 1. As you can see, an error occurred while pinging the enp0s3 adapter and the ping continued. After the ping stopped, the result shows that there was packet loss, but it was small, only 1ping. In most cases, the loss of some packets does not matter, and the entire network is arranged in such a way that lost packets still arrive.
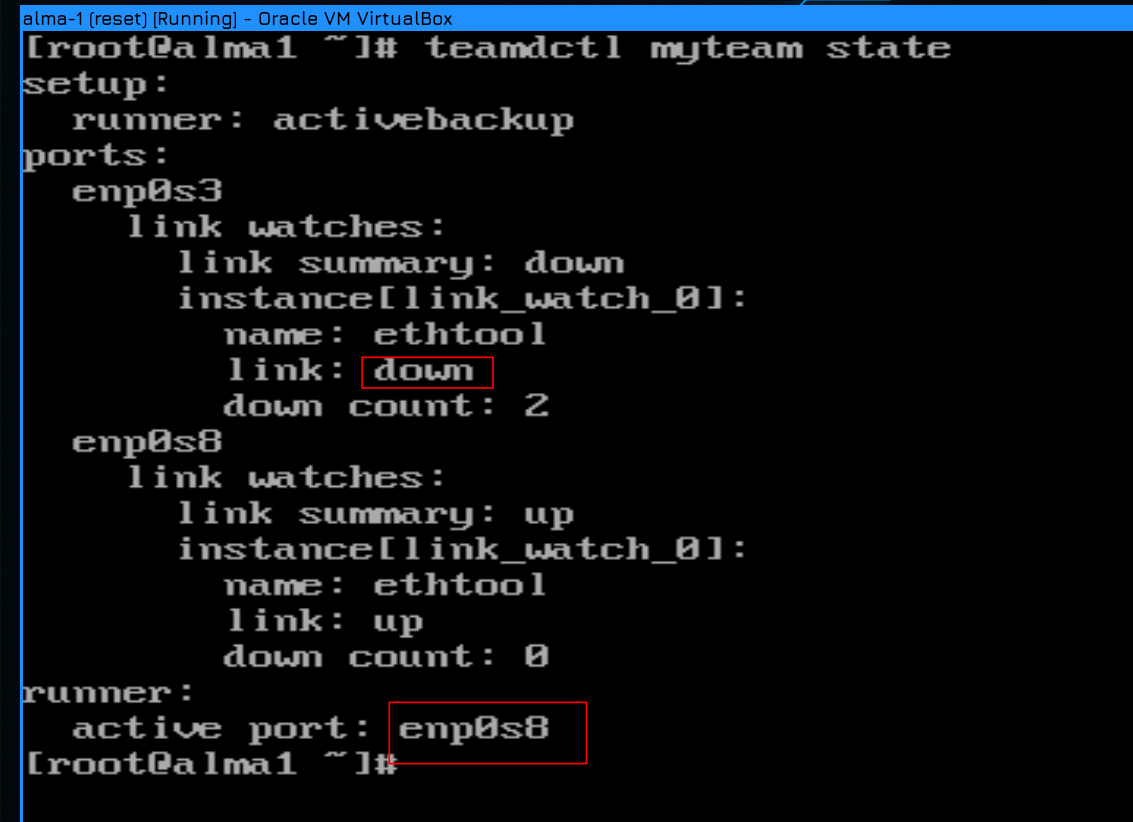
If you look again at the output of the teamdctl command, you can see that enp0s3 is now unavailable and enp0s8 has become active instead.
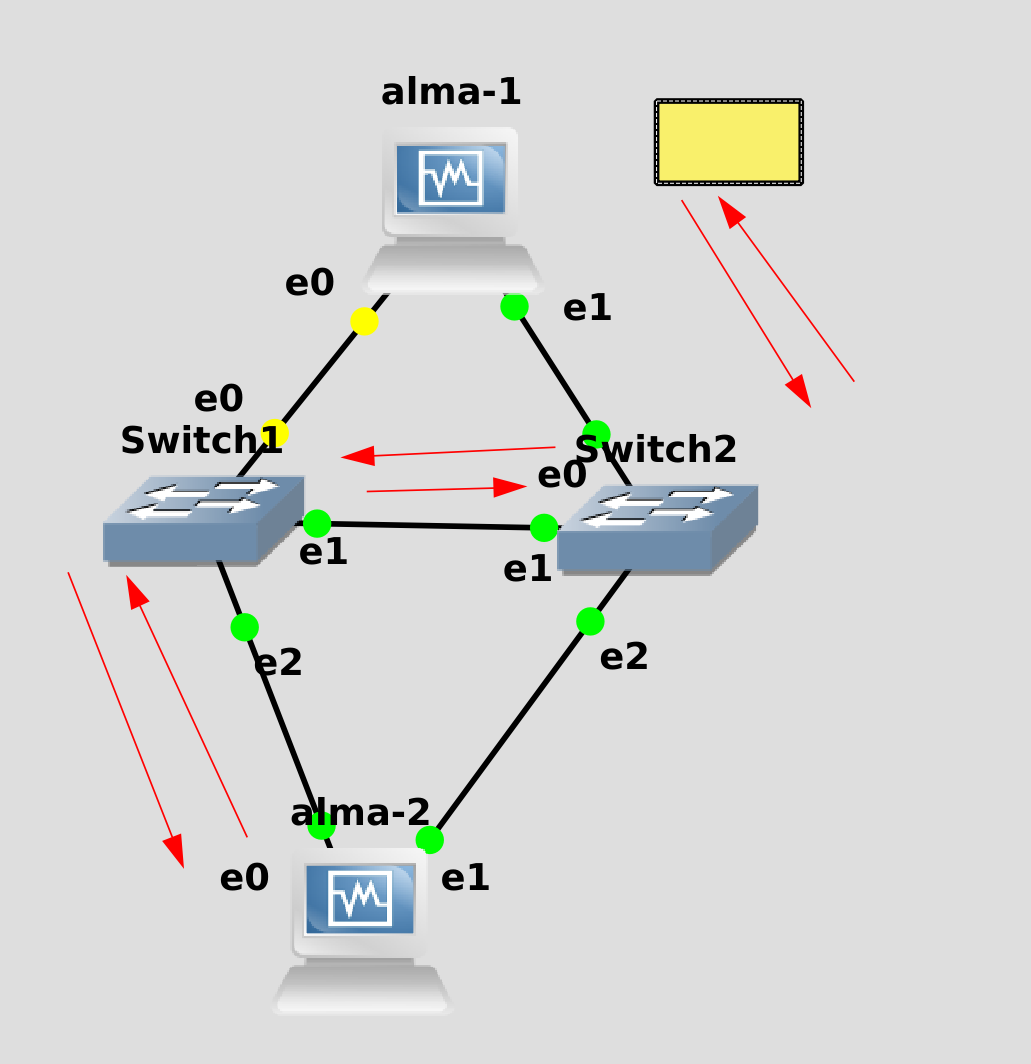
Alma 1 now only sees Switch 2. But alma2, like on the active interface e0, only references Switch 1. As a result, a packet from Alma 1 only travels first to Switch 2, then to Switch 1, then to Alma 2.
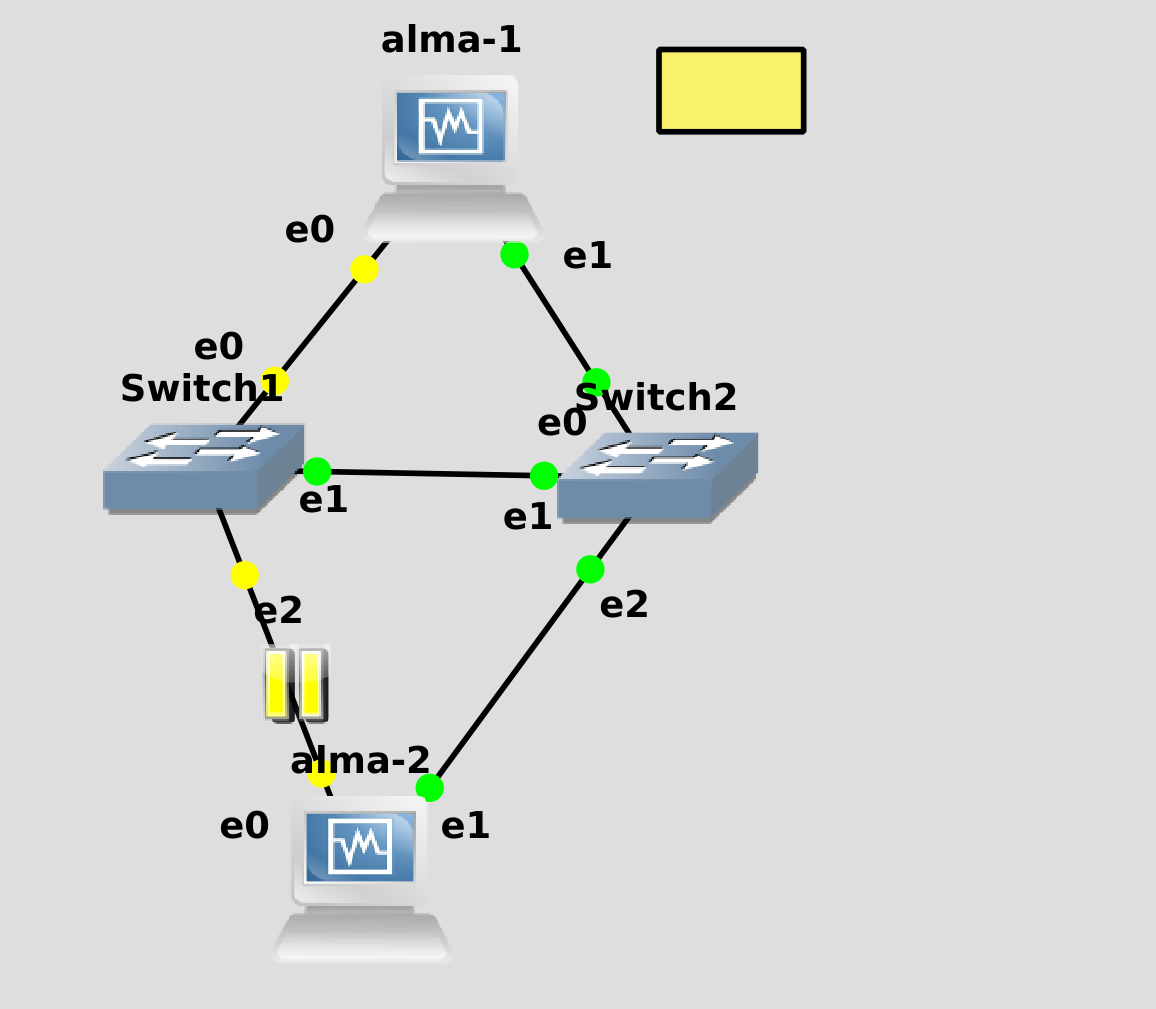
Let’s run the ping again, but now cut the cable that goes from the second alma to the first switch. And again we lost one package. Now only the second switch remains for communication between hosts.
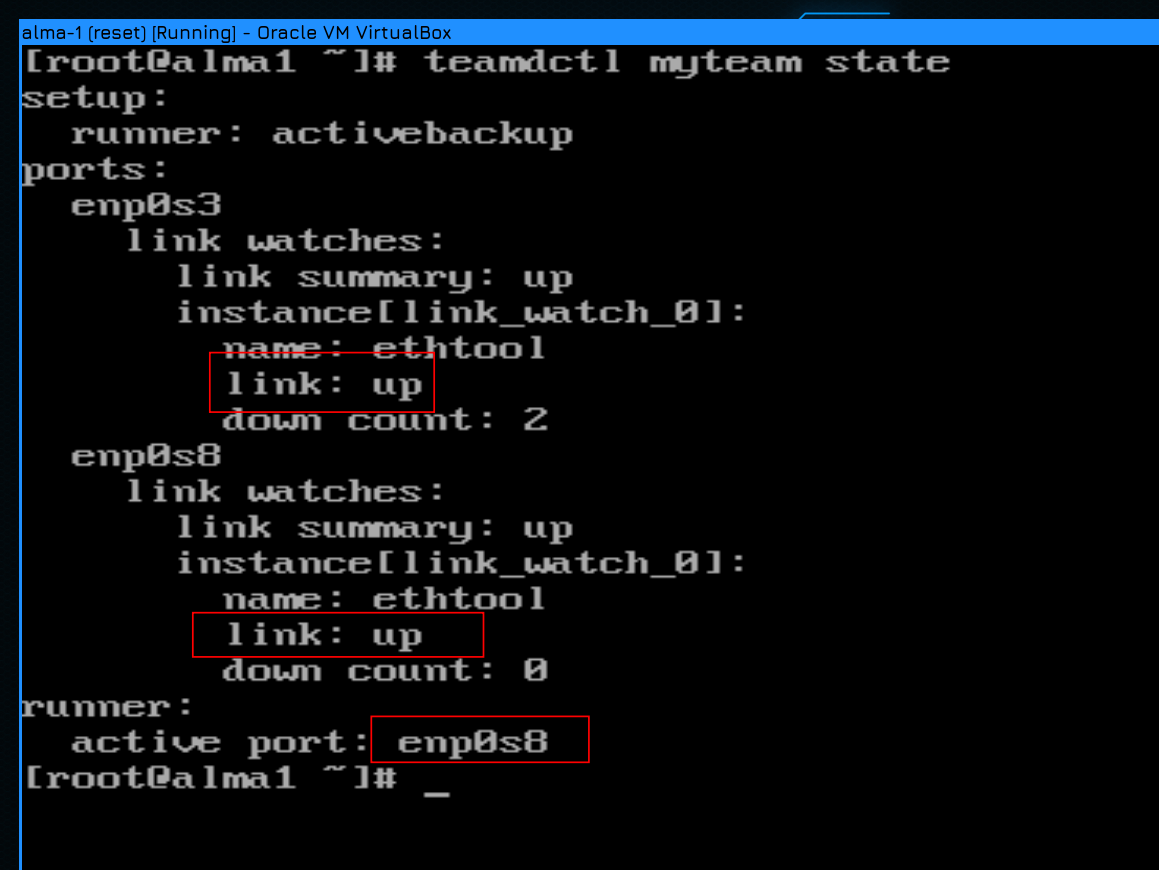
Well, after restoring both wires, teamdctl shows that both links are available.
Now let’s configure LACP. As you can imagine, except for the command, there is no difference at all in Settings.Runner Options. So to make changes, connect alma2 to two timin g interfaces at once.activebackup looks at the packet and LACP looks at the third alma.
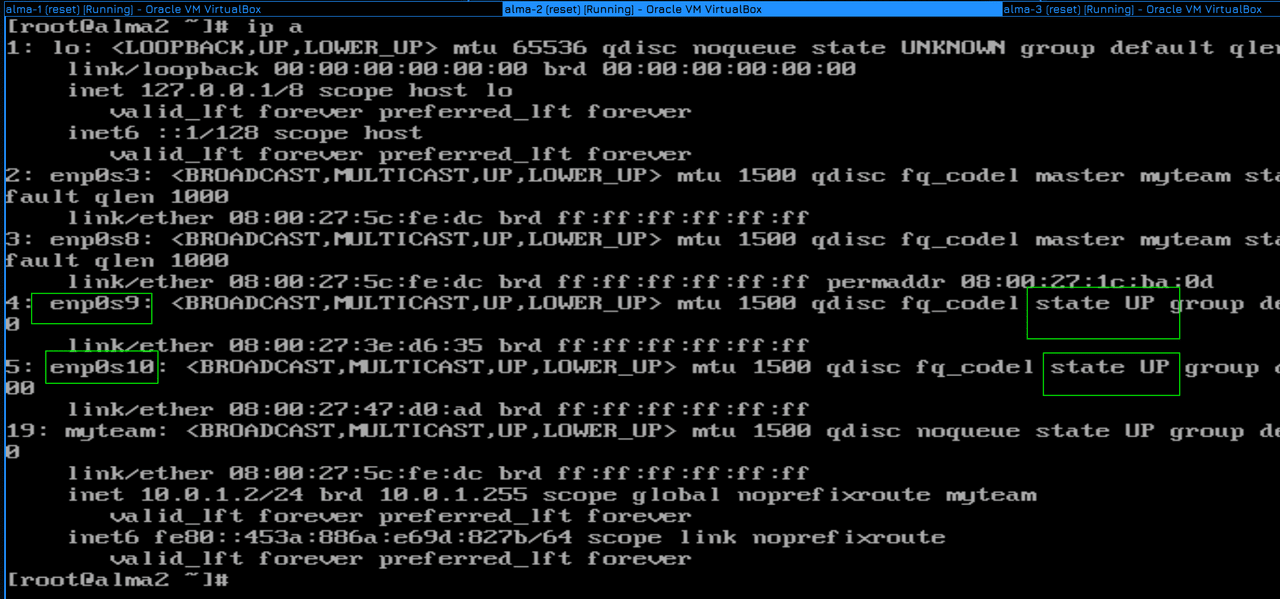
After connecting to alma2, we see:
ip a
that interfaces enp0s9 and enp0s10 are up.
And then the same commands for creating the timing of the interface and slaves:
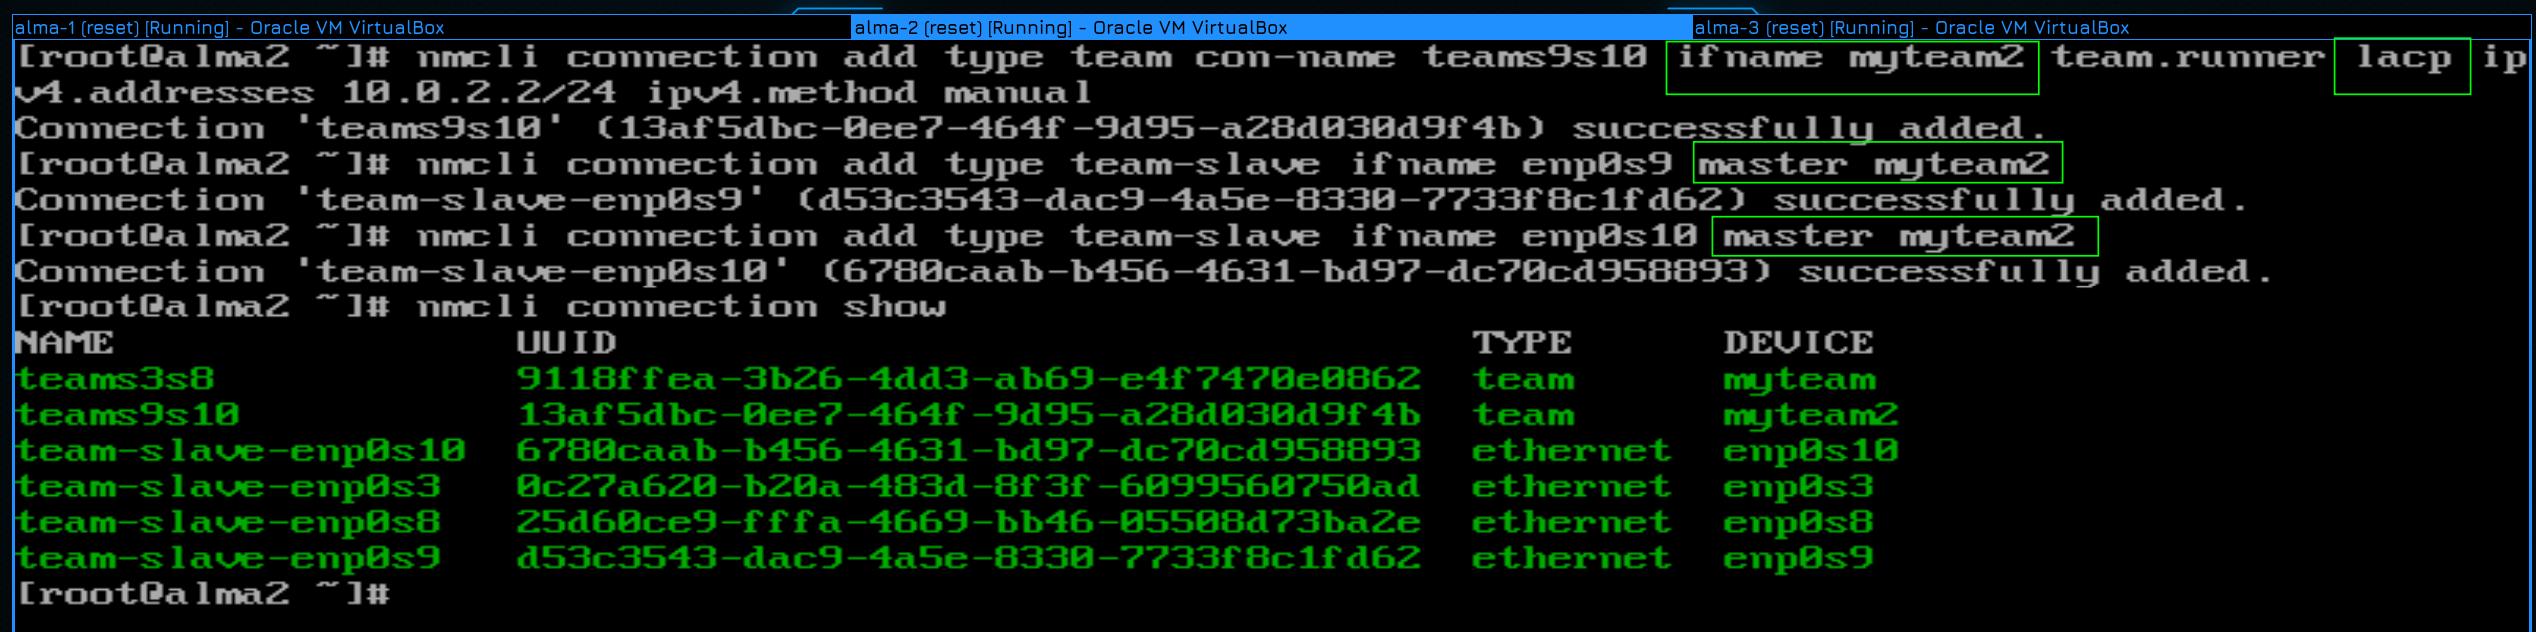
nmcli con add type team con-name teams9s10 ifname myteam2 team.runner lacp ipv4.addresses 10.0.2.2/24 ipv4.method manual
nmcli con add type team-slave ifname enp0s9 master myteam2
nmcli con add type team-slave ifname enp0s10 master myteam2
nmcli con show
Specify runner lacp and another IP address if you did not specify another name-myteam2 for the interface name. Also, on the slave, specify myteam2 as the host. My names myteam and myteam2 are definitely not the best. In a real environment, this is usually called team 0, team 1, etc. but for clarity we have used the following names so that you can distinguish between the name of the network manager profile and the name of the interface.
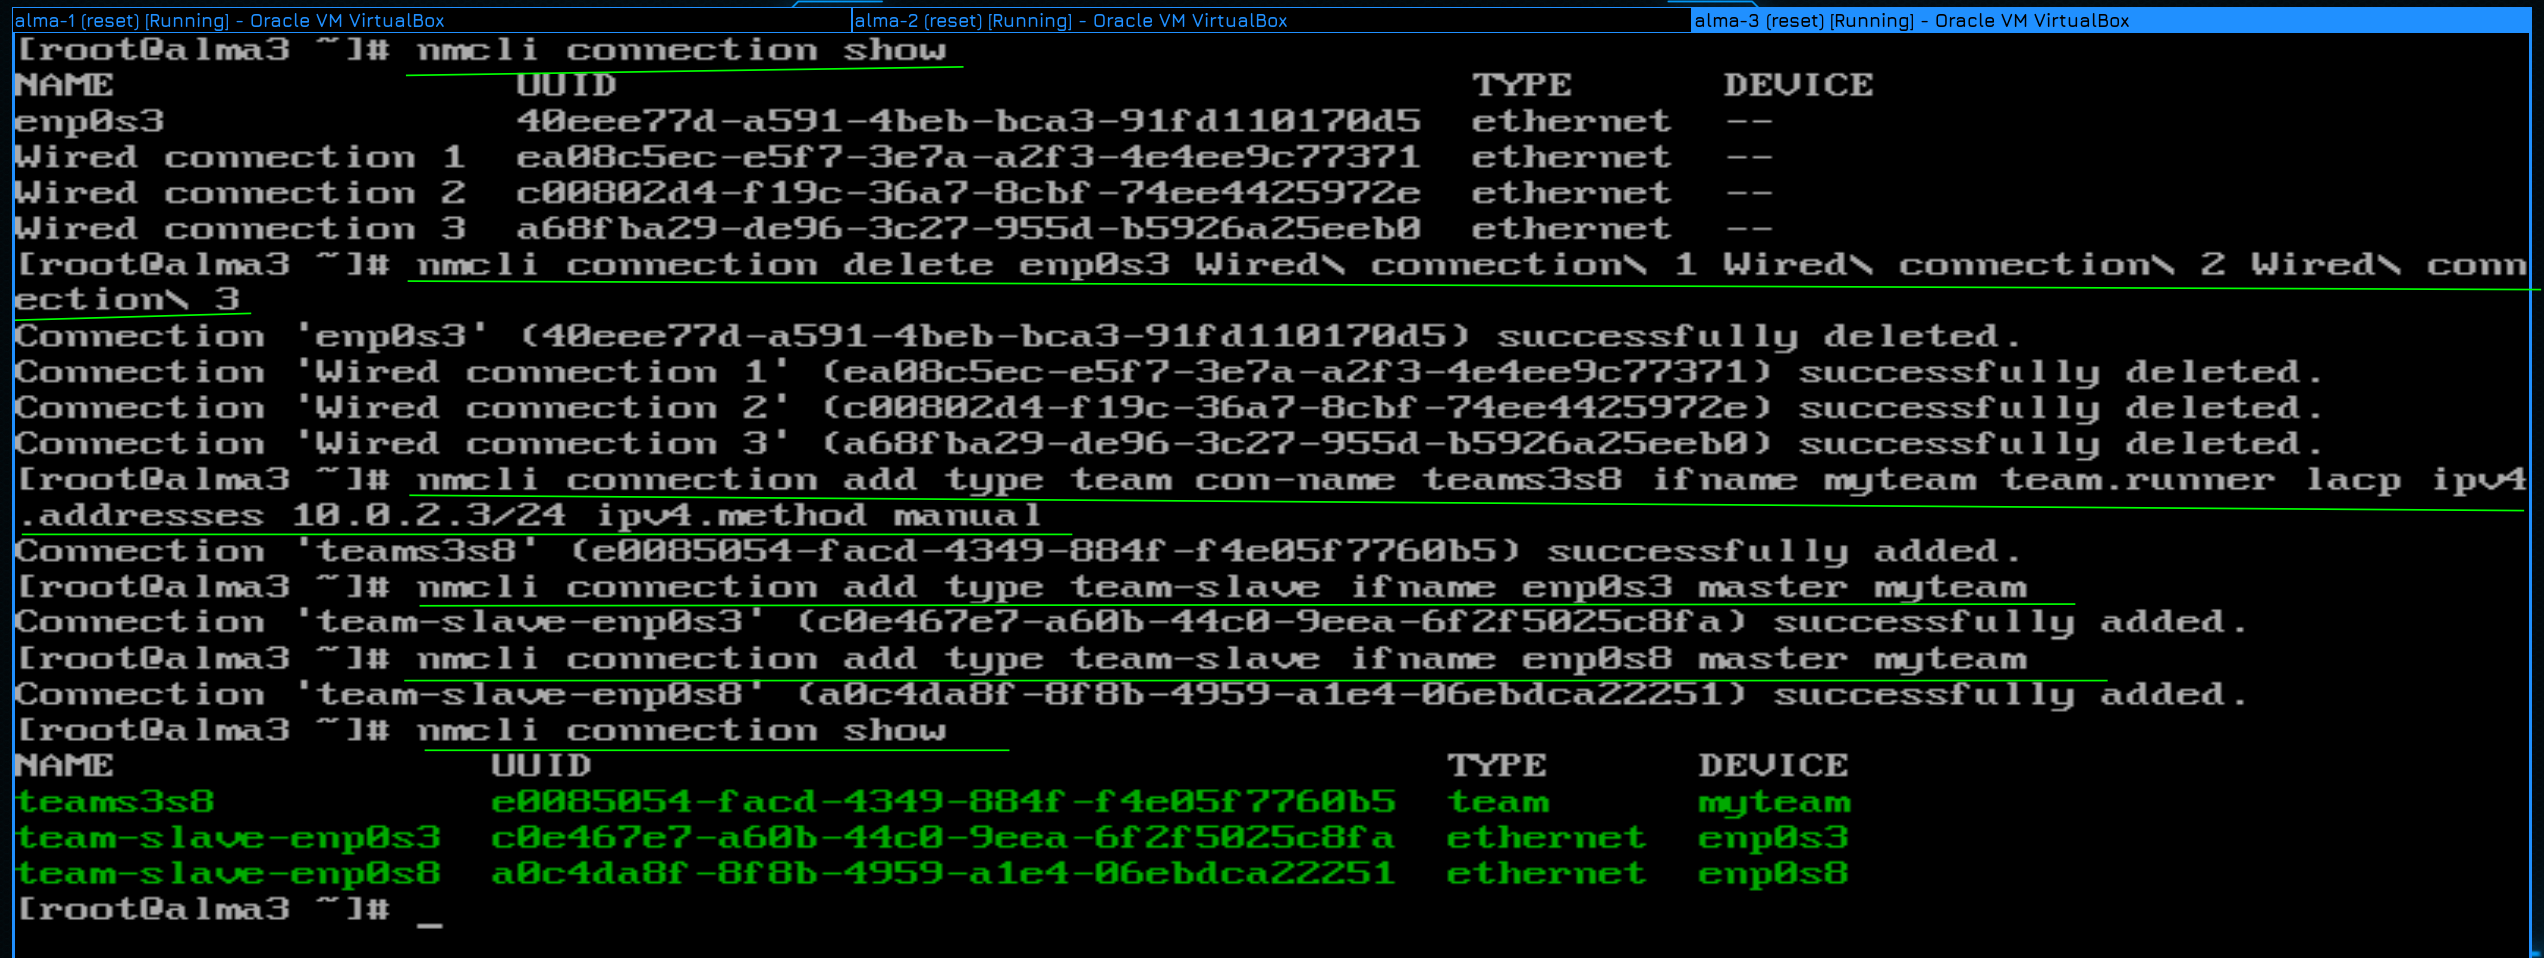
Well, on alma3, everything follows the same scheme – we clear the profiles, create a profile with a timing interface with the lacp runner and create slaves:
nmcli con show
nmcli con del enp0s3 Wired\ connection\ 2 VLAN2 Wired\ connection\ 1 Wired\ connection\ 3
nmcli con add type team con-name teams3s8 ifname myteam2 team.runner lacp ipv4.addresses 10.0.2.3/24 ipv4.method manual
nmcli con add type team-slave ifname enp0s3 master myteam2
nmcli con add type team-slave ifname enp0s8 master myteam2
nmcli con show
I understand the console is a mess with fonts and it’s hard to read, but setting up ssh would require network and NAT setup, which are future topics, so I didn’t want to jump ahead.
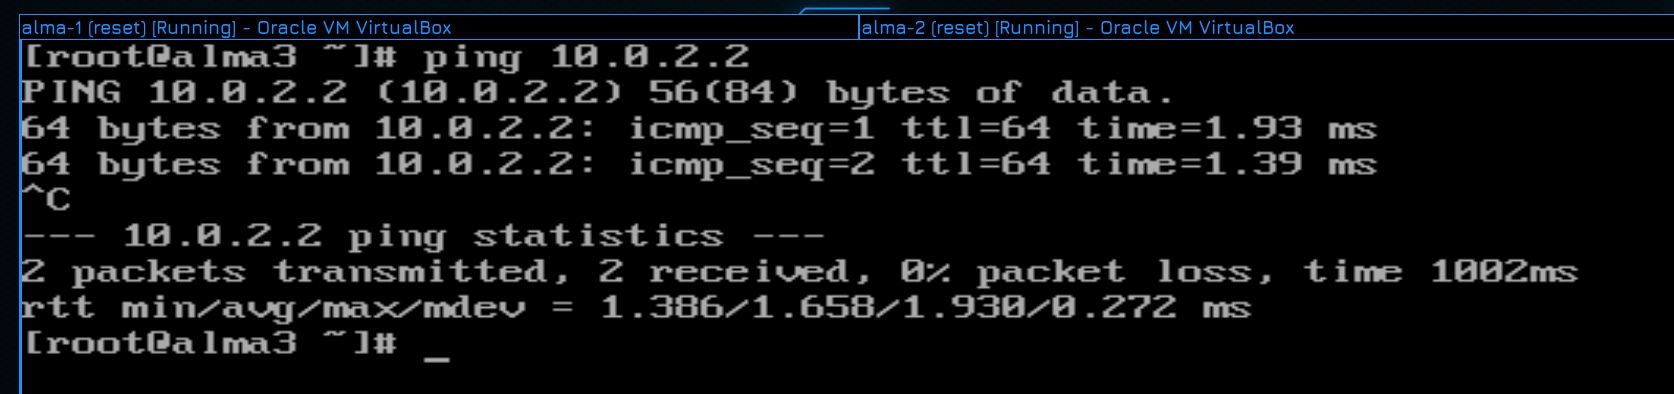
After configuring the network, we will try to ping the second host from Alma3:
ping 10.0.2.2
Everything is pinged, so the network is working.
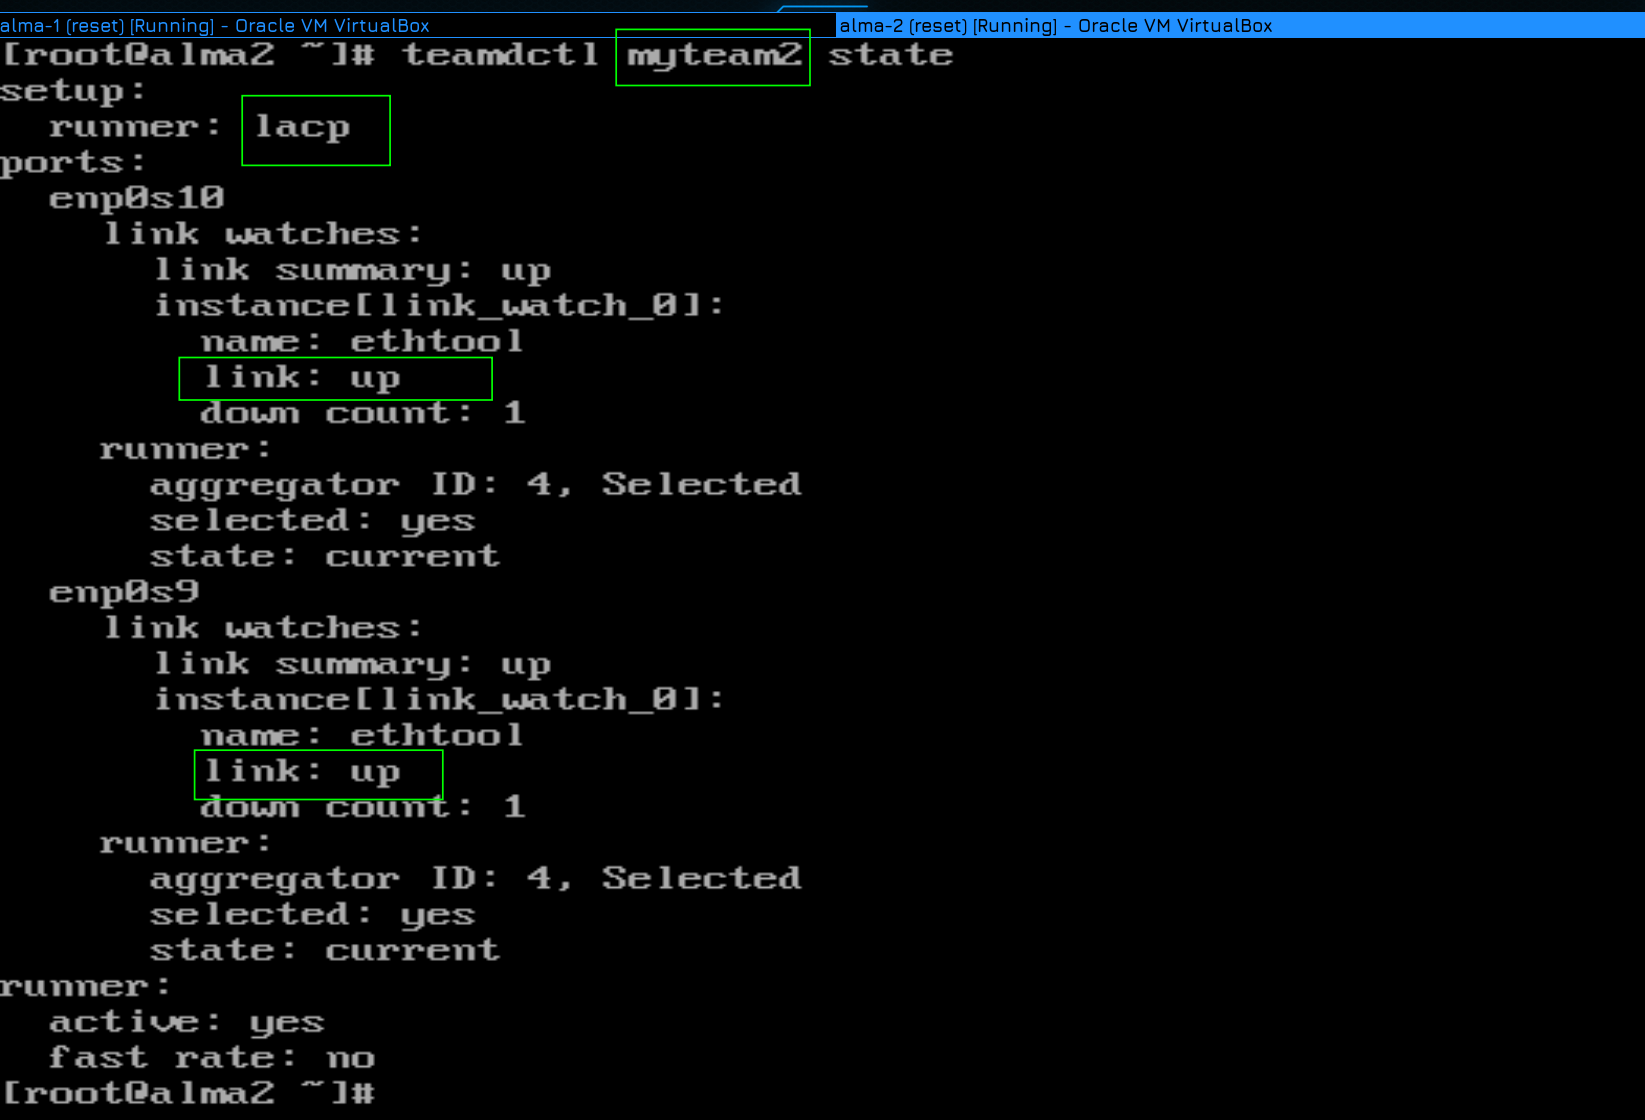
Let’s look at teamdctl on the second interface on alma 2:
teamdctl myteam2 state
As you can see here, lacp is selected as the runner and both interfaces are in the api.
And let’s test it. I run a ping:
ping 10.0.2.3
then I cut one of the links in GNS, wait a couple of seconds, cut it, then wait a couple of seconds for the first interface to come to its senses, then turn off the second link, wait again and turn it on.
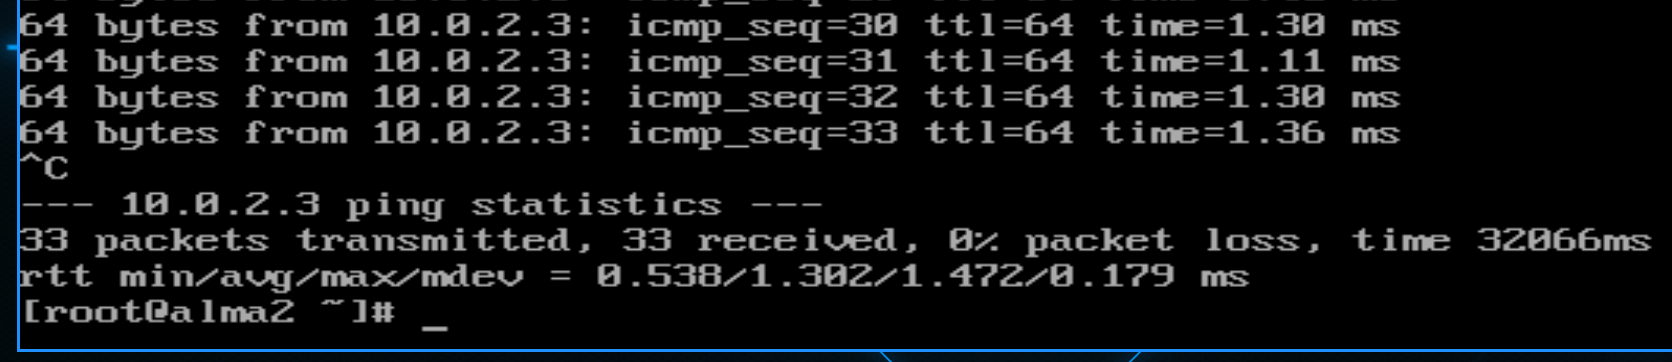
And you can see that there is no lost packet according to the inspection results. Everything works great. So LACP is better in production, but as a last resort you can use activebackup to configure failover even with a dumb switch.
To configure the alias and plan at the same time, you must first create a command interface and then use it as the interface for the vlan.
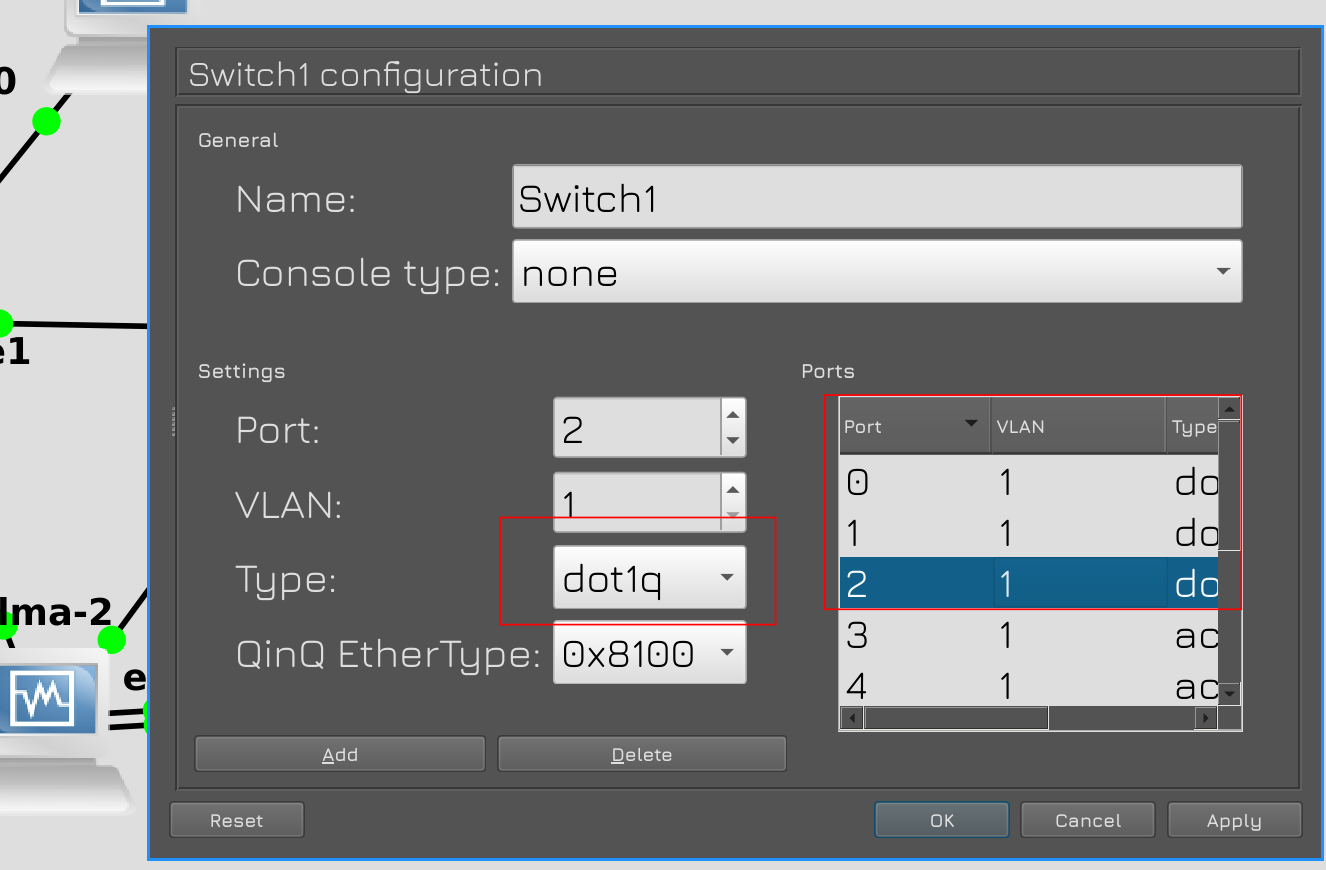
For example, let’s create a second vlan and run it between Alma 1 and Alma 2. First, you need to set the dot1q type on ports 0, 1, and 2 of both switches. These switches don’t know how to pass only two powers, so they let either one, as it should be by default, or all. Well, now we allow everything. In this case, the first link remains untagged.

Next, on Alma 1 and 2, we create profiles with vlan type using nmcli:
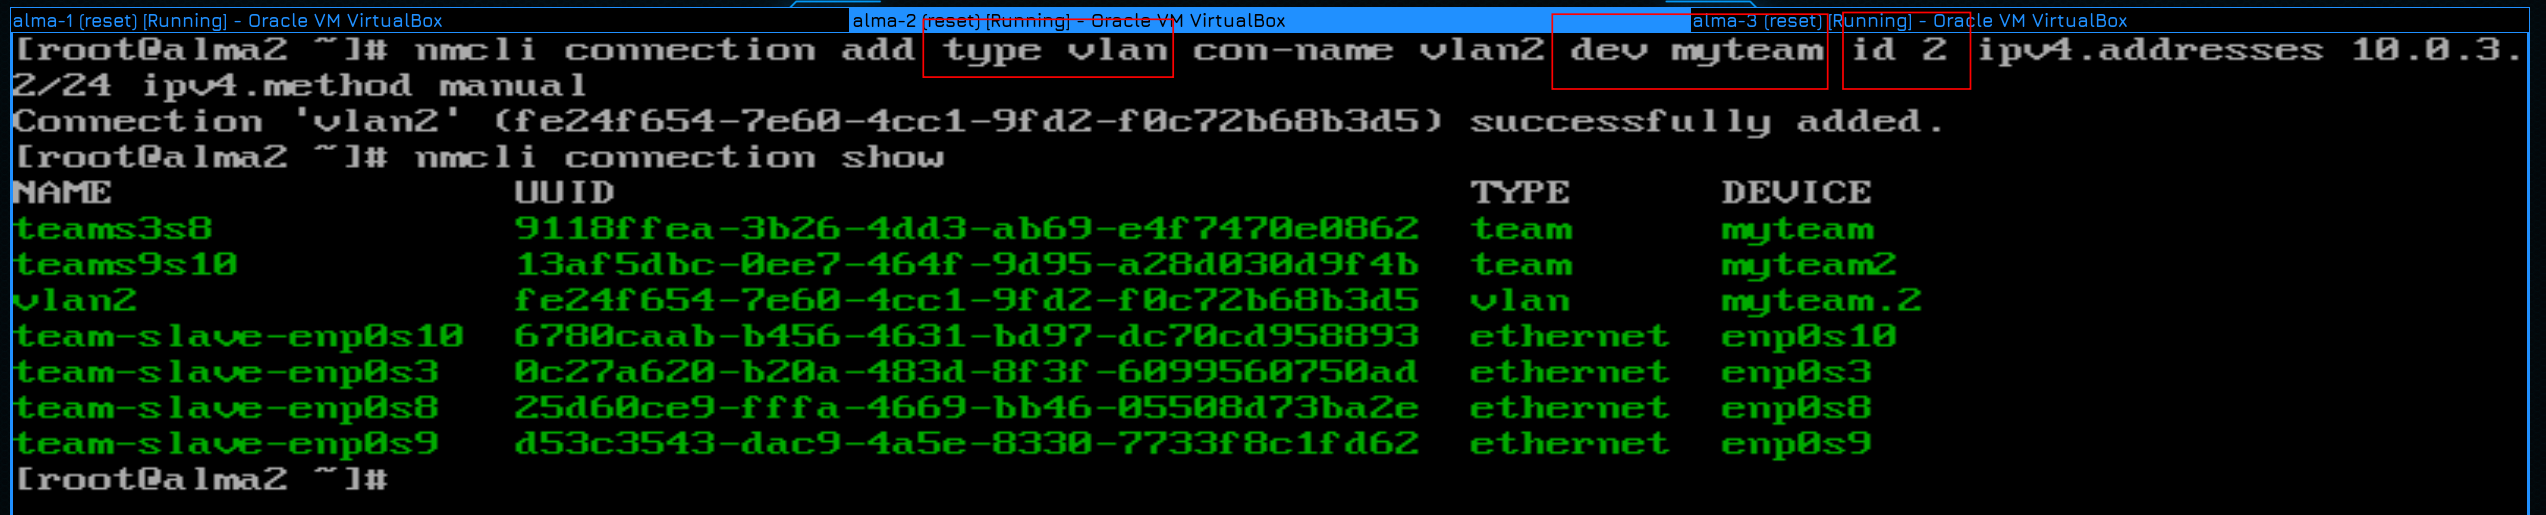
nmcli con add type vlan con-name vlan2 dev myteam id 2 ipv4.addresses 10.0.3.1/24 ipv4.method manual
nmcli con add type vlan con-name vlan2 dev myteam id 2 ipv4.addresses 10.0.3.2/24 ipv4.method manual
Please note that when creating, I specify the interface on top of which the vlan will be dev myteam, and the id of this vlan is id 2. And the profile name and addresses are all standard.
Well, let’s look at the list of received interfaces:
nmcli con show
As you can see, the profiles have been created.
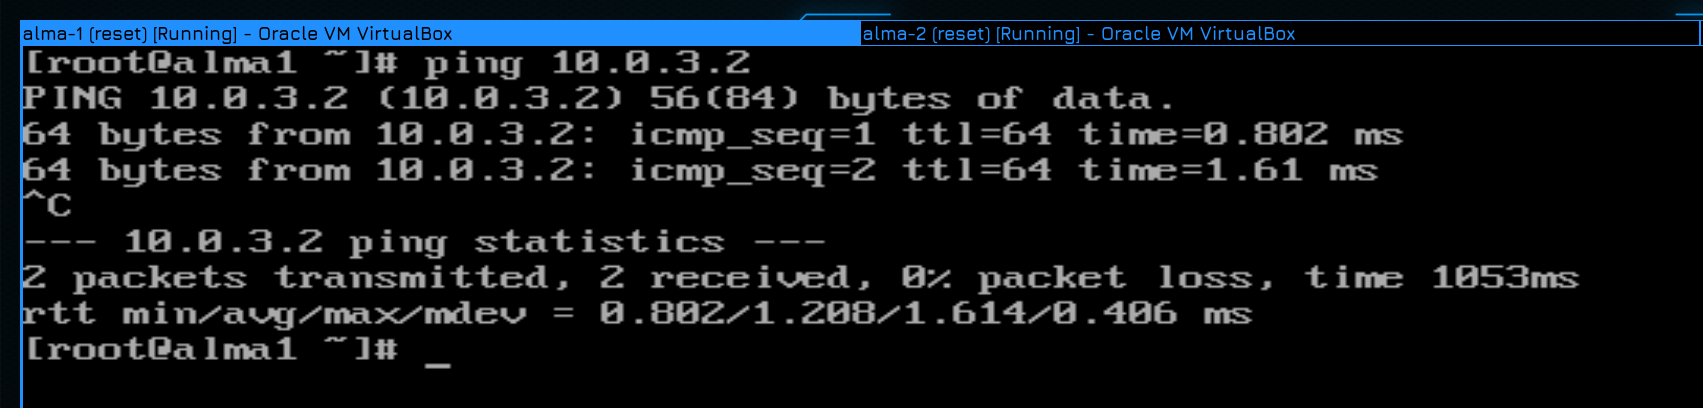
And pings also work, that is. everything as we wanted.
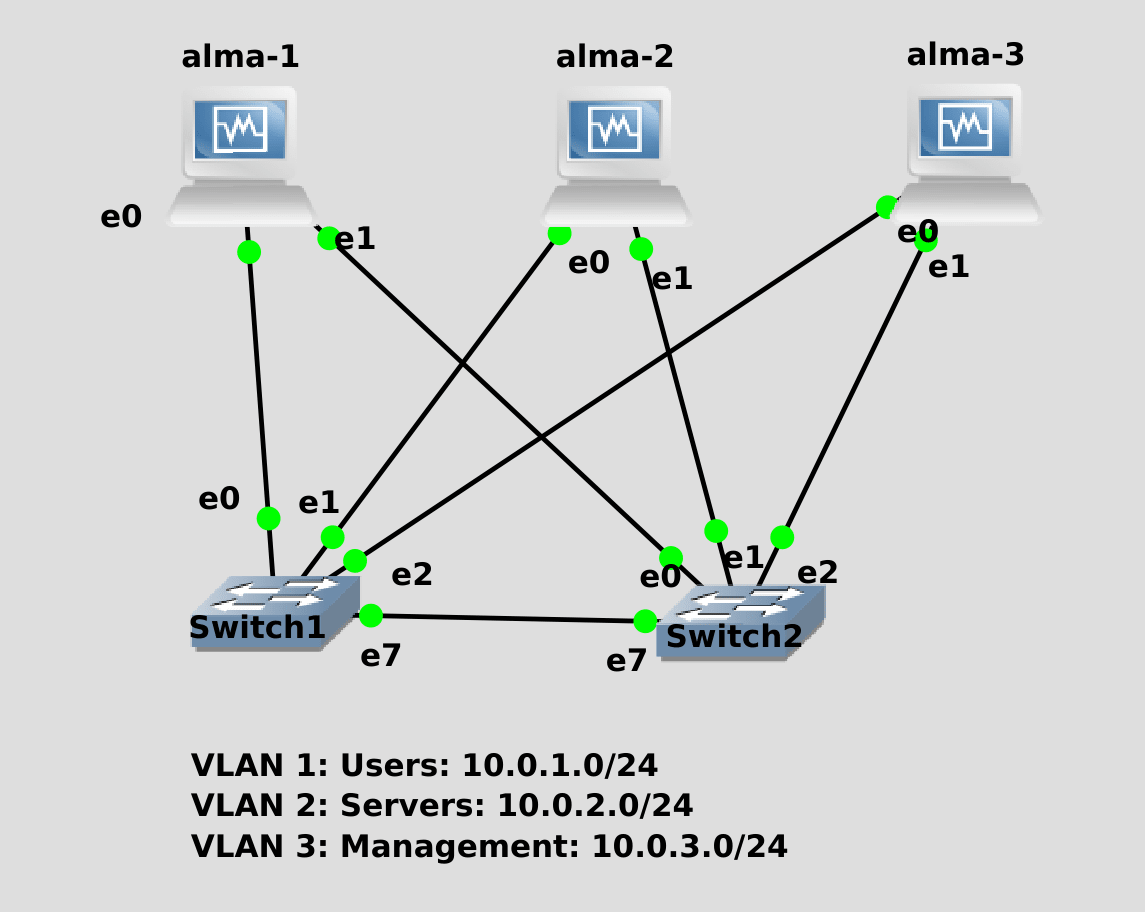
In order to summarize everything we have said today, you will need to add up the indicated number. So I use Nick timing in activebackup mode to connect 3 hosts to 2 switches and configure 3 steering wheels with 3 networks on those interfaces. And of course make sure everything works – everyone checks each other on all 3 networks, then disconnect the wires and check for stability.
To summarize, today we will understand what nictiming is, learn how to configure it, understand the difference between activebackup and lacp, learn how to power on top of the aggregate interface and make sure that the commands do not scare you, even if the commands are long, they are very simple.