You will find out. how the IT infrastructure is arranged.

It explains how to connect to the network via SSH using the so-called “jump host”. It is about setting up a secure tunnel between home and work networks using SSH, which allows you to connect to servers in the internal network through an intermediate host (jump host). Several ways to connect are described, including configuring an SSH client to simplify the jump host connection process and using SSH keys to automate authentication.


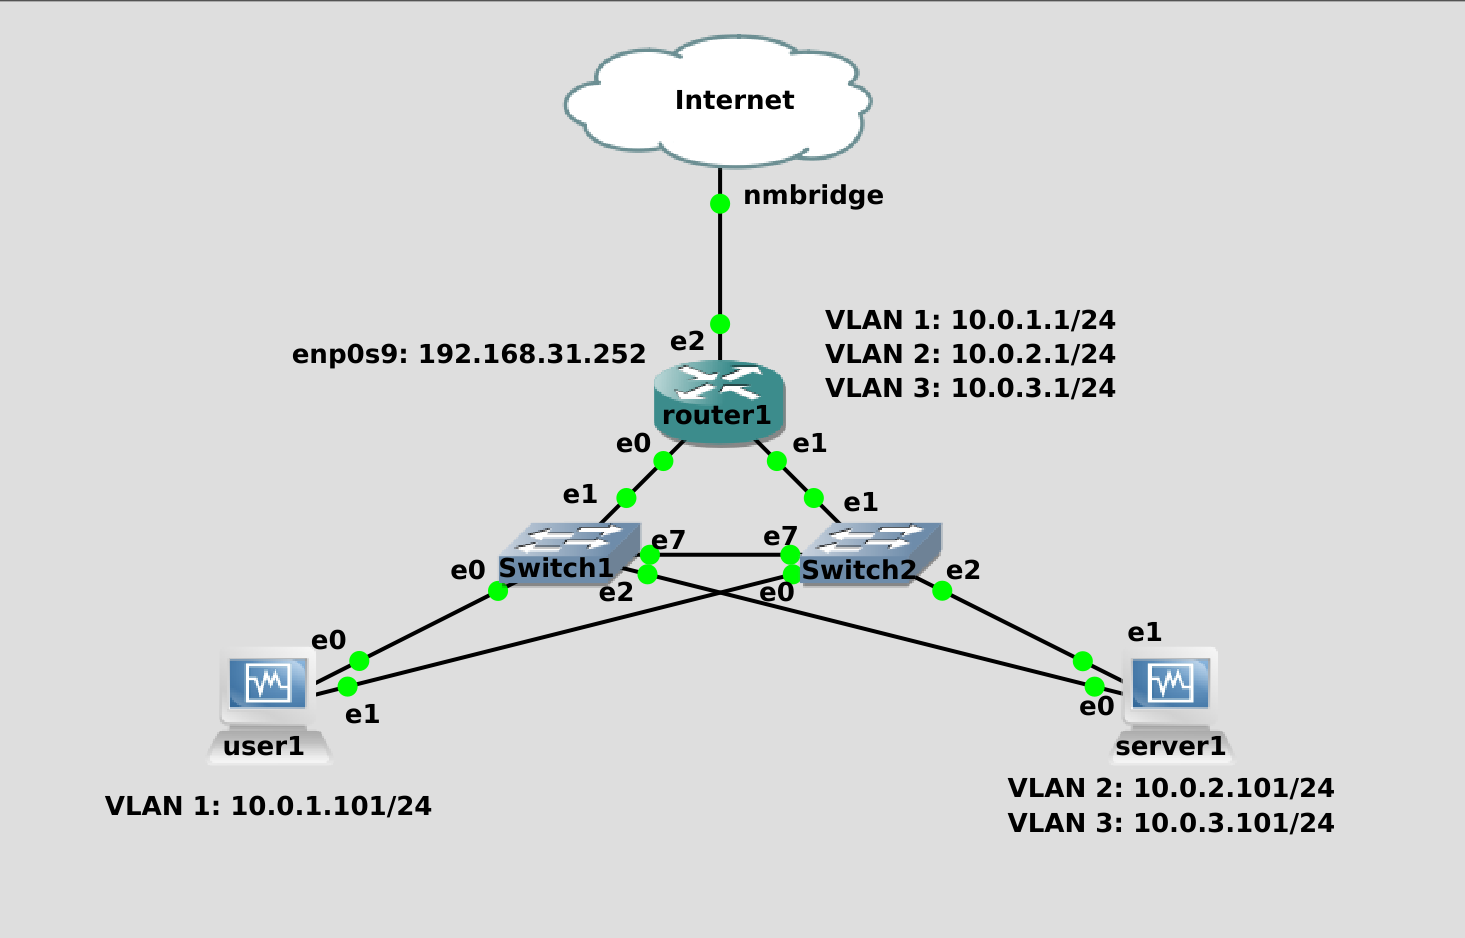
Last time we finally set up communication between the GNS network and our home network. They are connected by router1, which has a home network address on one of its interfaces. Similarly, in the real infrastructure you have a router that has a public address issued by the provider on one of the interfaces.
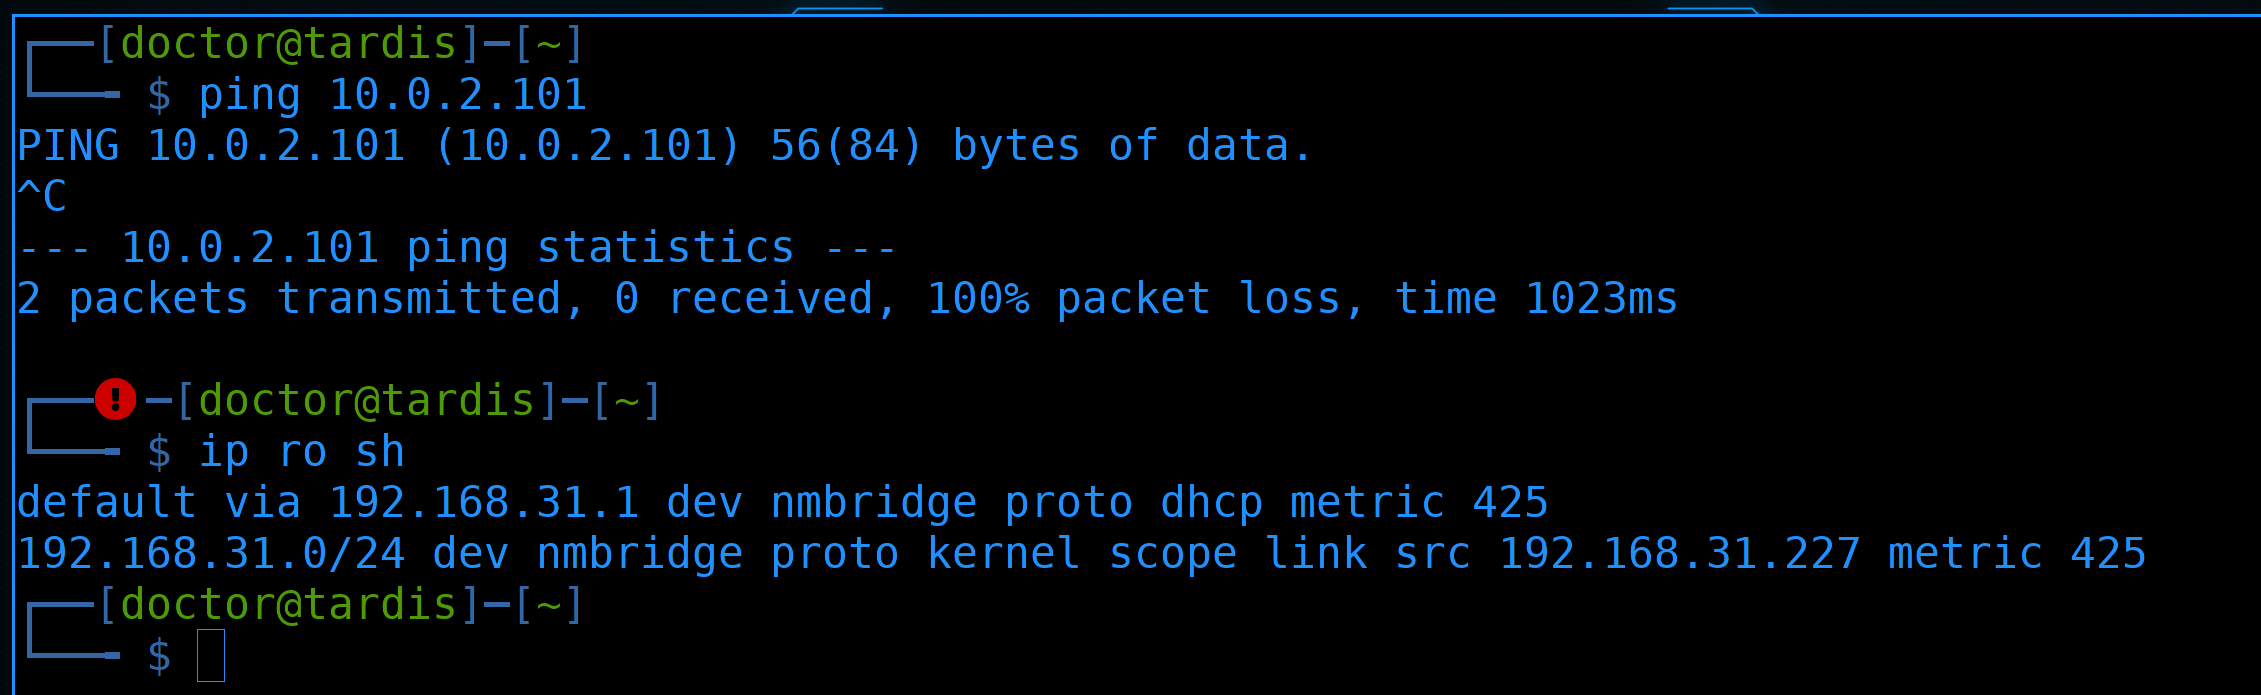
In a real network, you can’t connect to your work network so easily from home:
ping 10.0.2.101
ip ro sh
As a rule, for the remote work of employees, a VPN server is organized, with the help of which a secure tunnel is created from one network to another. Almost all modern routers and UTM solutions have such functionality, so we will also raise our vpn server, but not today. Even without a VPN, we can organize a secure tunnel and just ssh is enough for that. To begin with, let’s imagine that we need to connect via ssh to the servers.
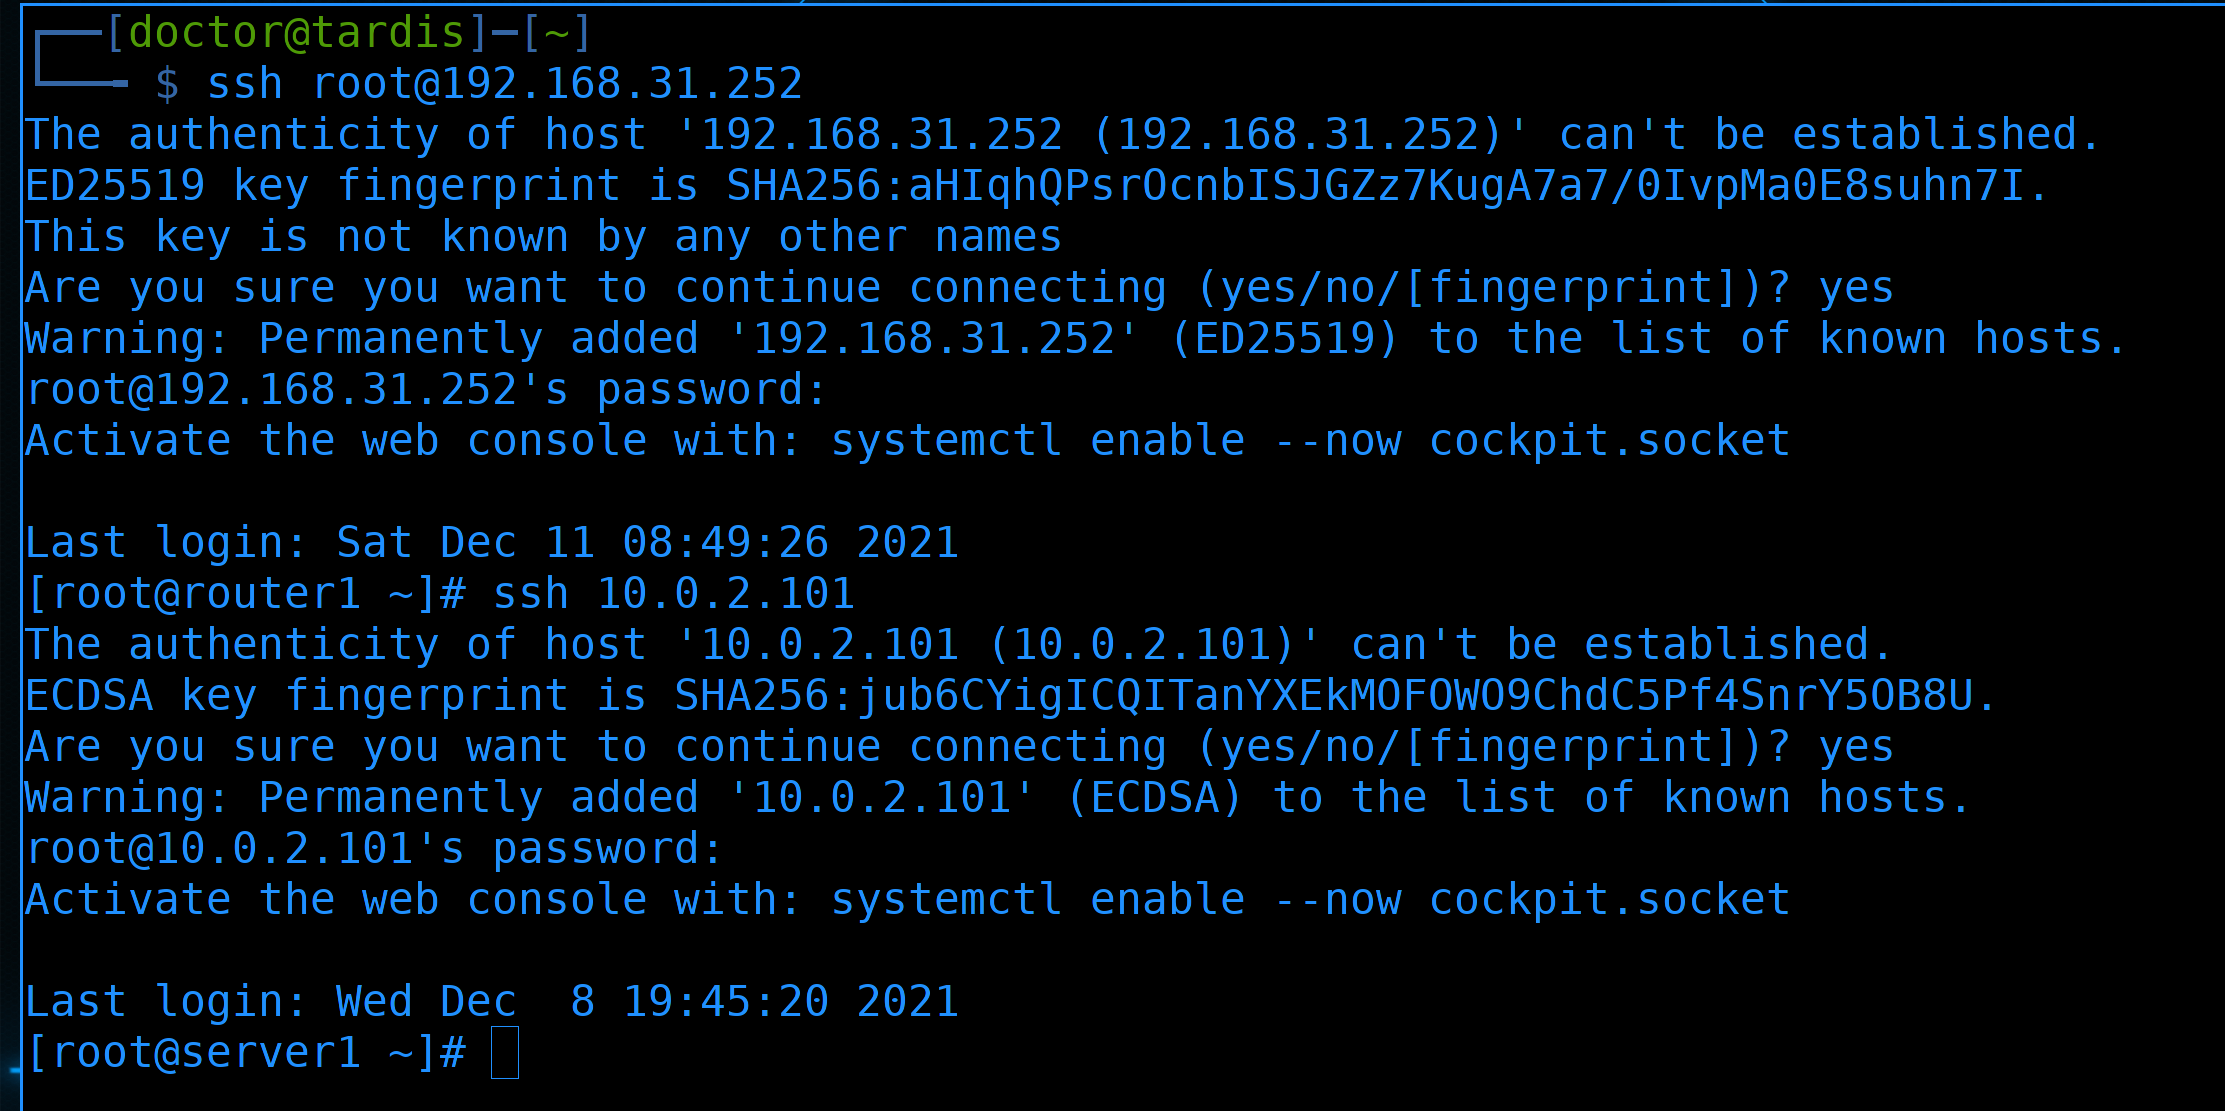
The most primitive way is to connect via ssh to the router:
and then connect to other machines from it, for example, to server1:
In principle, it will work out that way. But if we have a lot of cars and we constantly need to go here and there, it becomes a bit inconvenient.
We use a router as an intermediate host for connection. Such intermediate hosts through which you can get from one network to another without routing are called jump hosts. Do not pay attention that we are using a router as a jump host, in fact it can be any machine that has access to both networks.
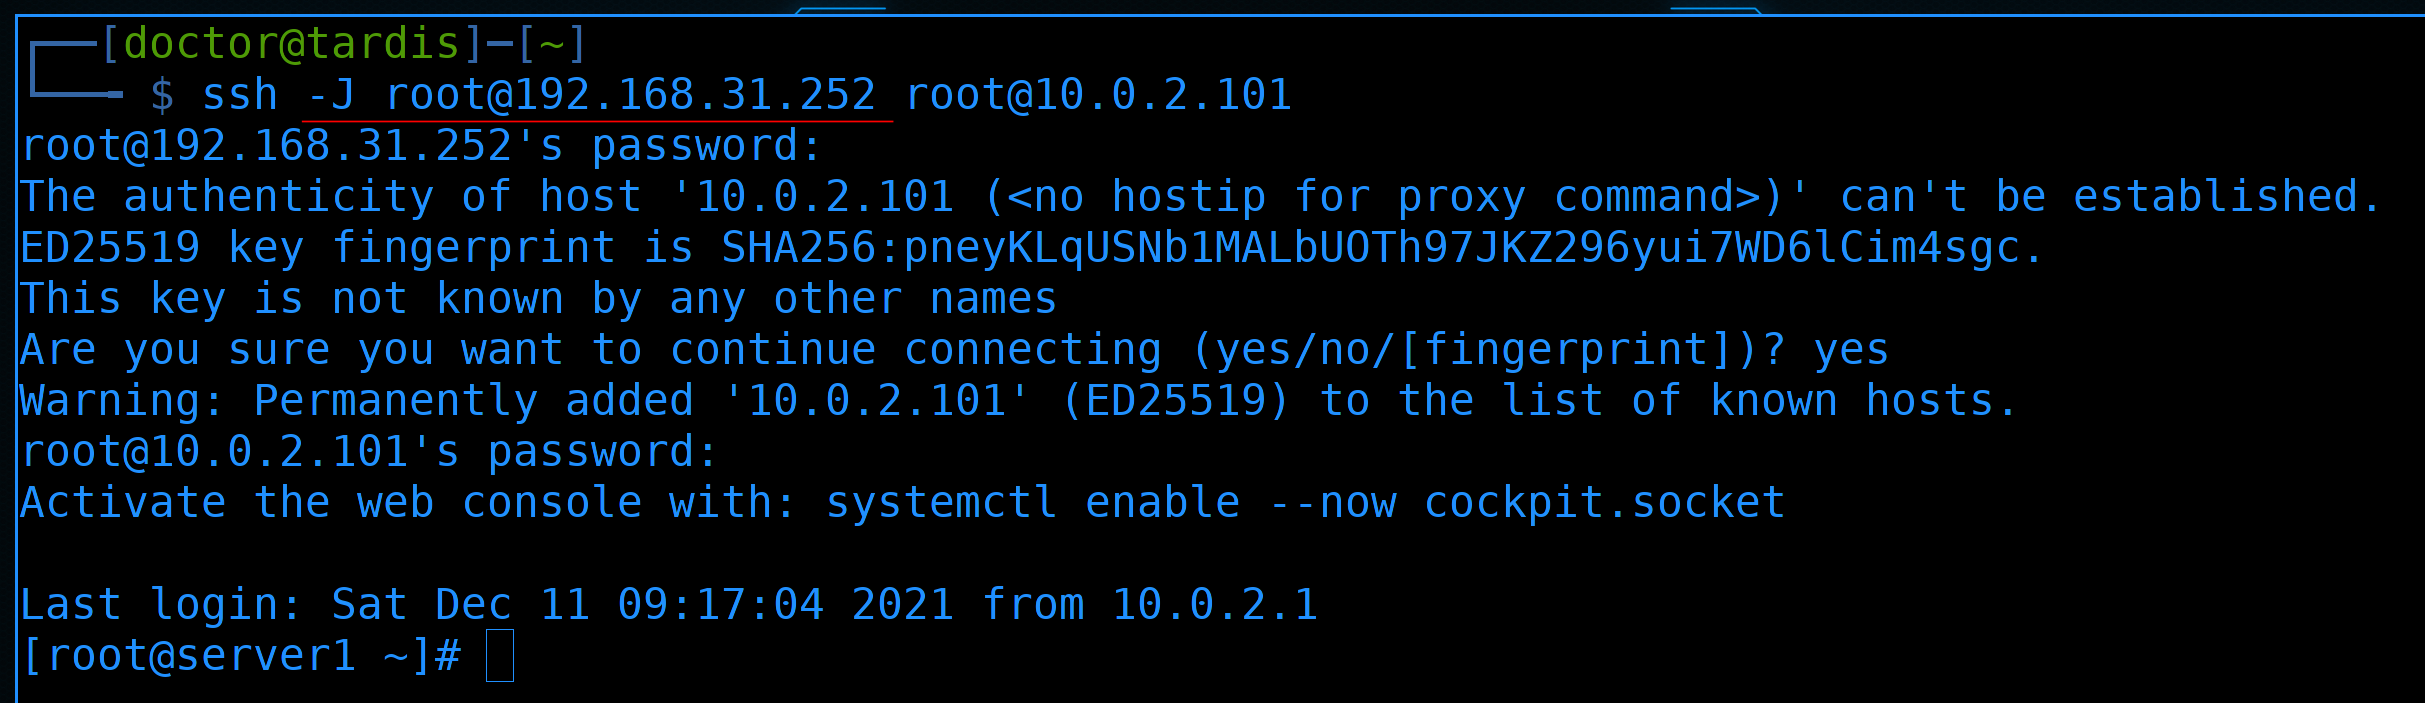
So, the ssh client can simplify connection through jump hosts. It is enough to immediately indicate with the -J key that such a server is a jump host, and we want to connect there and then:
In the background, the same process as last time takes place – first we go to the router, and then to server1. We still have to specify the passwords from both hosts. But now it looks to us not as two steps, but as one. Yes, the team turned out to be more authentic, but this is a correctable matter.
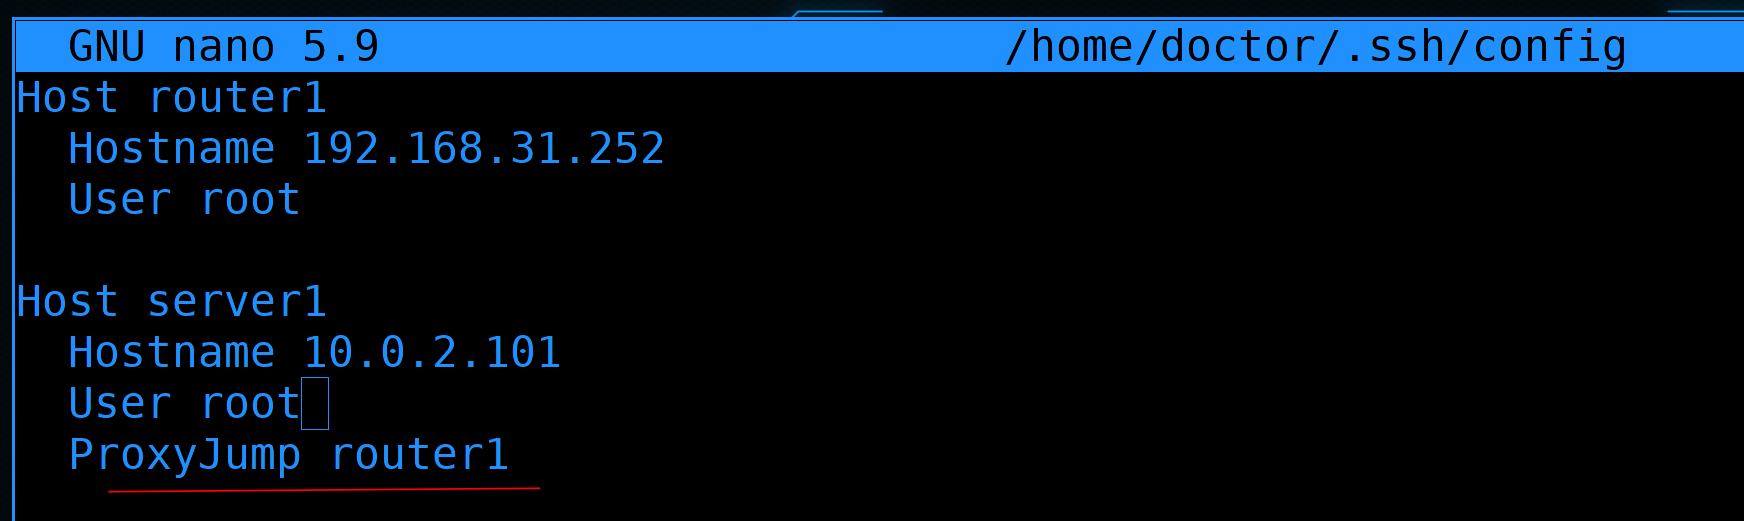
We can specify both hosts in ~/.ssh/config of our ssh client. And to say that to connect to server1 you need to use router1 as ProxyJump:
Host router1
  Hostname 192.168.31.252
  User root

Host server1
  Hostname 10.0.2.101
  User root
  ProxyJump router1
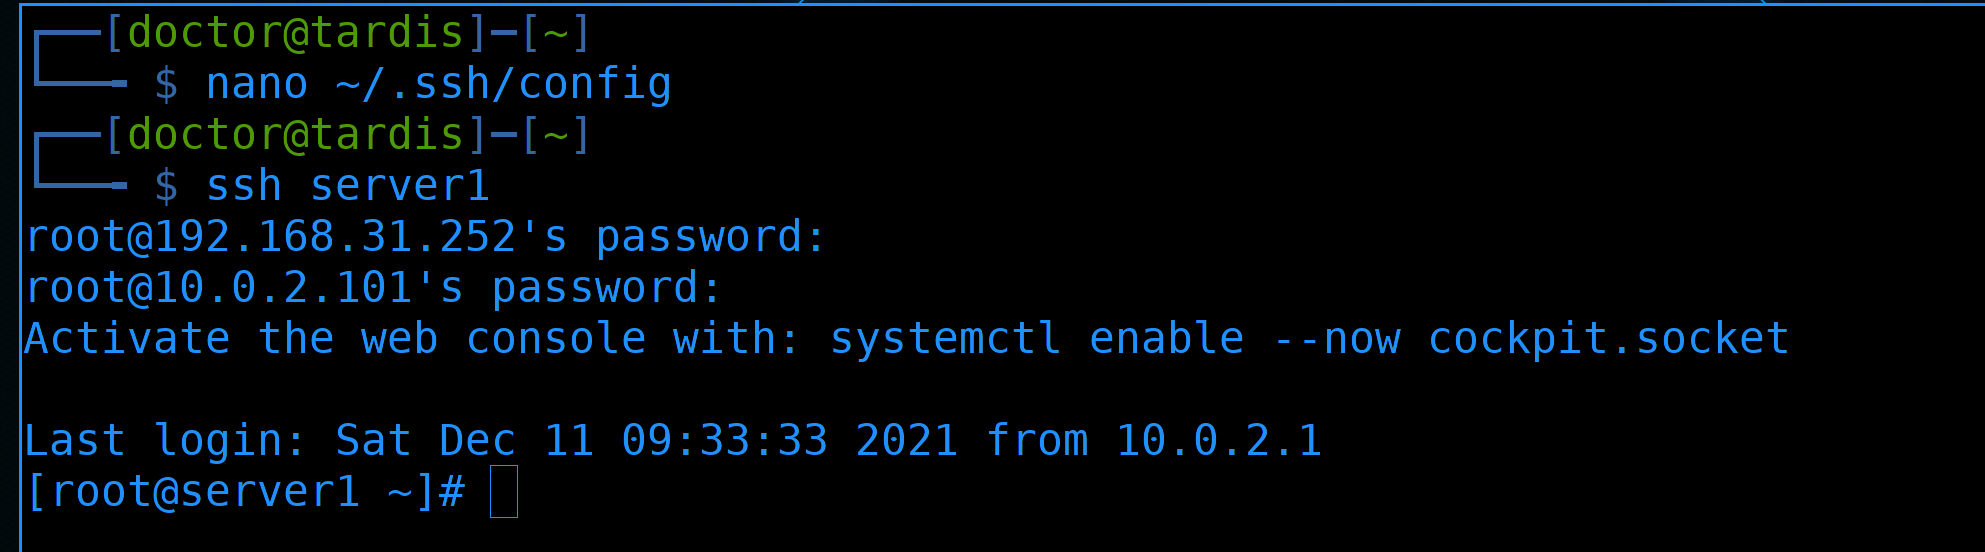
And now, to connect, it is enough to specify the name of the target host, which we wrote in the configuration:
ssh server1
We still have to enter passwords from both the jump host and the target. But even this matter can be fixed. For this we need ssh keys.

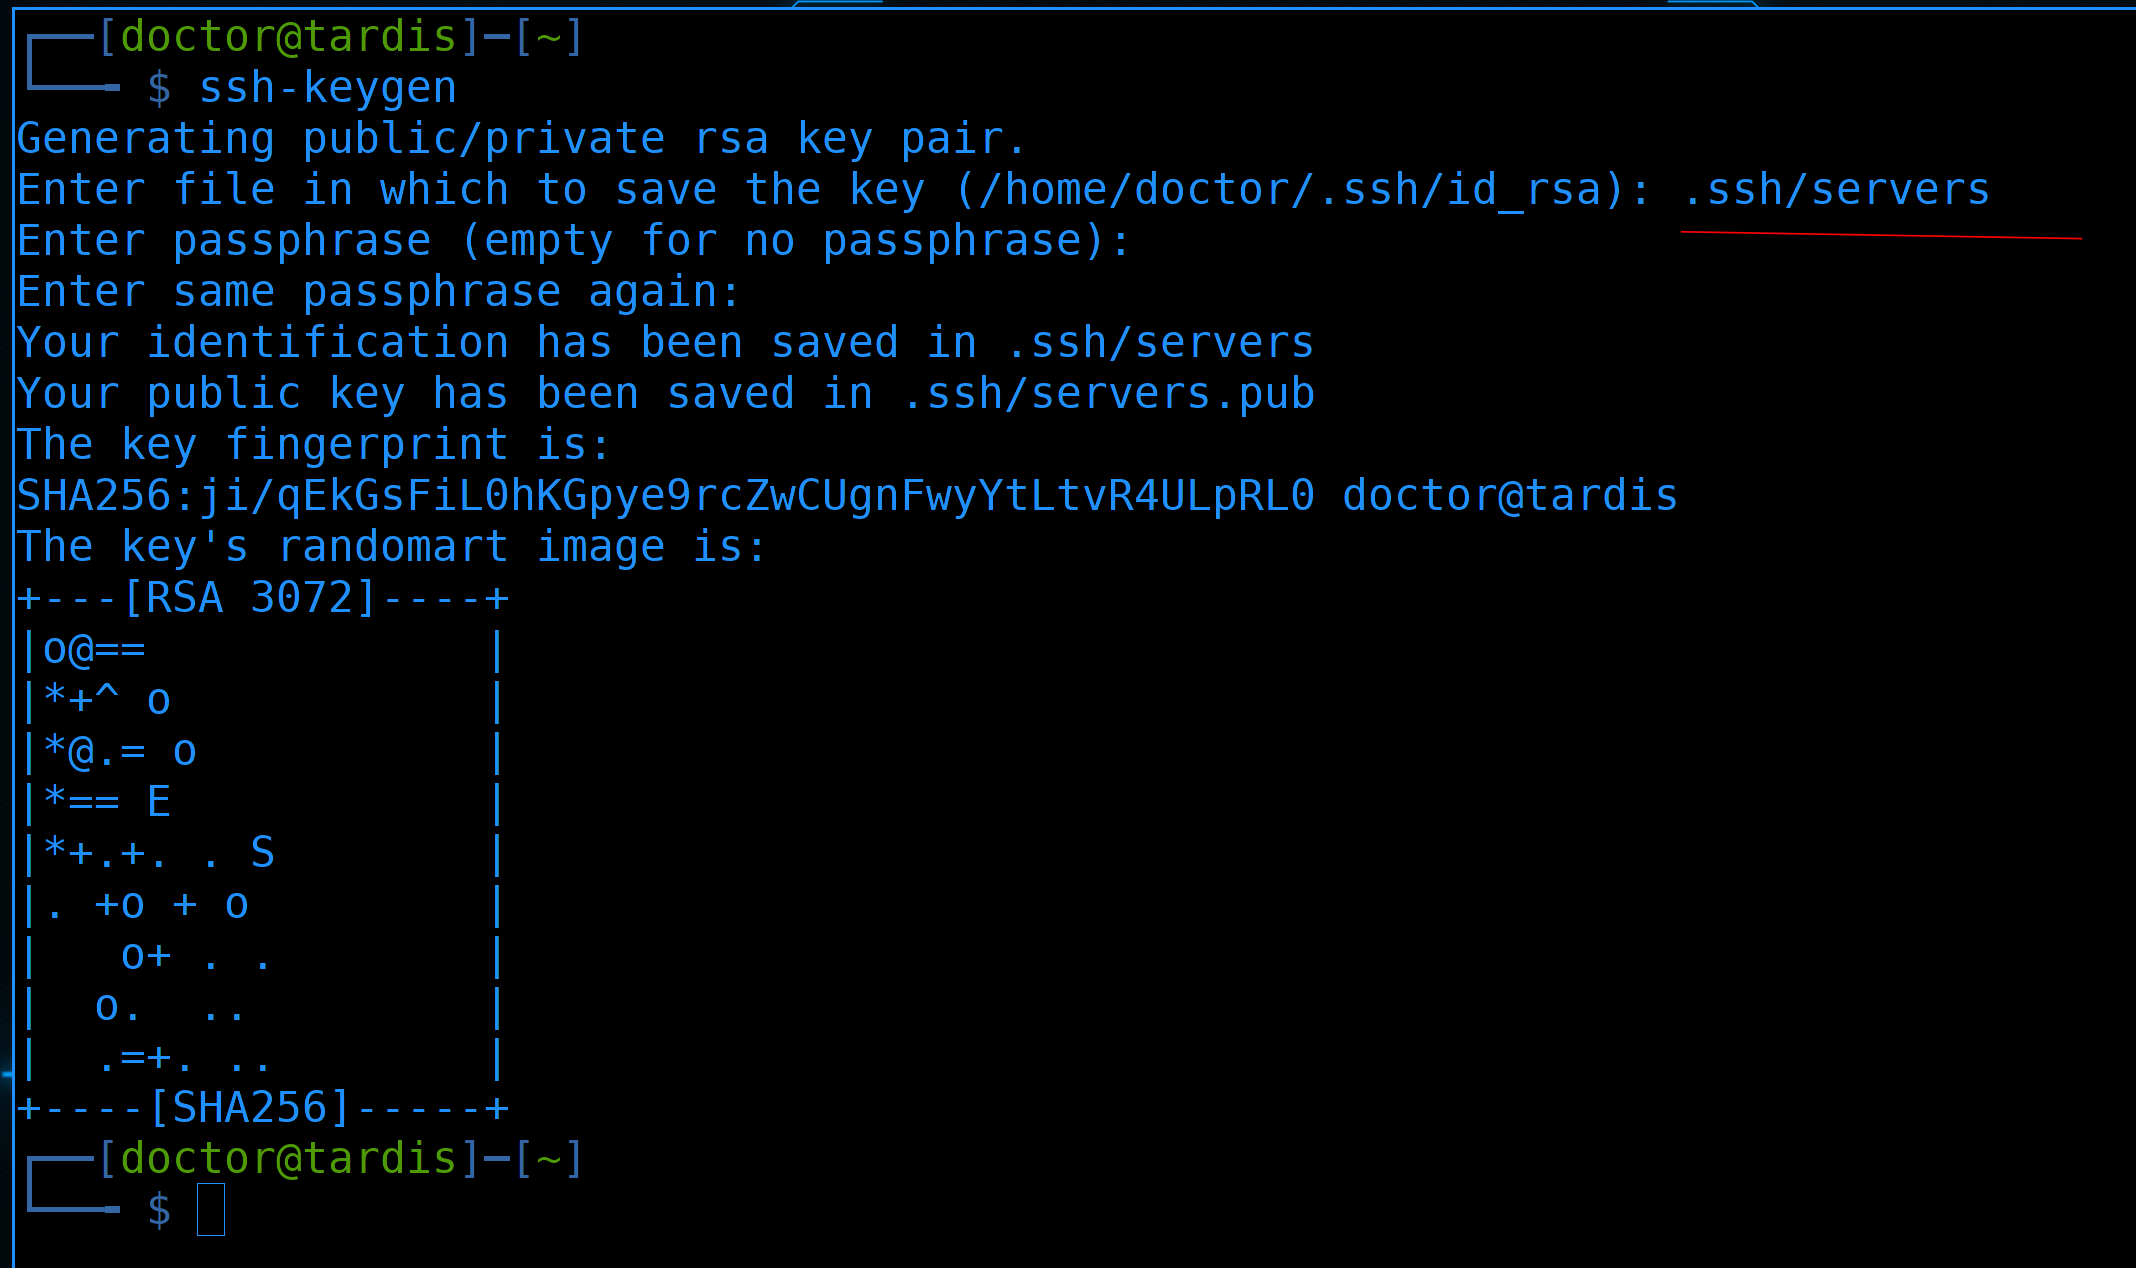
First, let’s generate the keys.
ssh-keygen
Since we have already started building infrastructure, let’s do it right.

First question – should we make a separate key for each server? Should I use the same key on all servers? Despite all the obviousness, the question is quite complicated. On the one hand, having a separate key for each server seems safer – if we lose one private key, we will not put the others at risk. On the other hand, what is the probability that we lose only one key, and not all at once?
They are located in the same directory on the same administrator’s computer. Plus somewhere else to dig. Due to the fact that it is almost impossible to find a private key, it will be much easier for hackers to steal the keys from the administrator’s computer. We can protect ourselves from this by putting a password on the key.
True, a hacker can choose the right one by generating passwords. And here, if we have one password for all keys, then again he will get access to all servers. But if we put different passwords on different keys, it will take much more time to break all the keys. But, again, this is theoretically possible. Therefore, ideally, we should have different keys for different hosts with different passwords and we should change them periodically. When the infrastructure is not small, then fiddling with the keys takes a lot of time. Maybe if we have very critical data and someone is constantly trying to hack us – it’s worth it.

But in calmer conditions, you can compromise. For example, to divide the hosts into groups and issue one pair of keys with a separate password for each group. And of course, periodically change the keys.
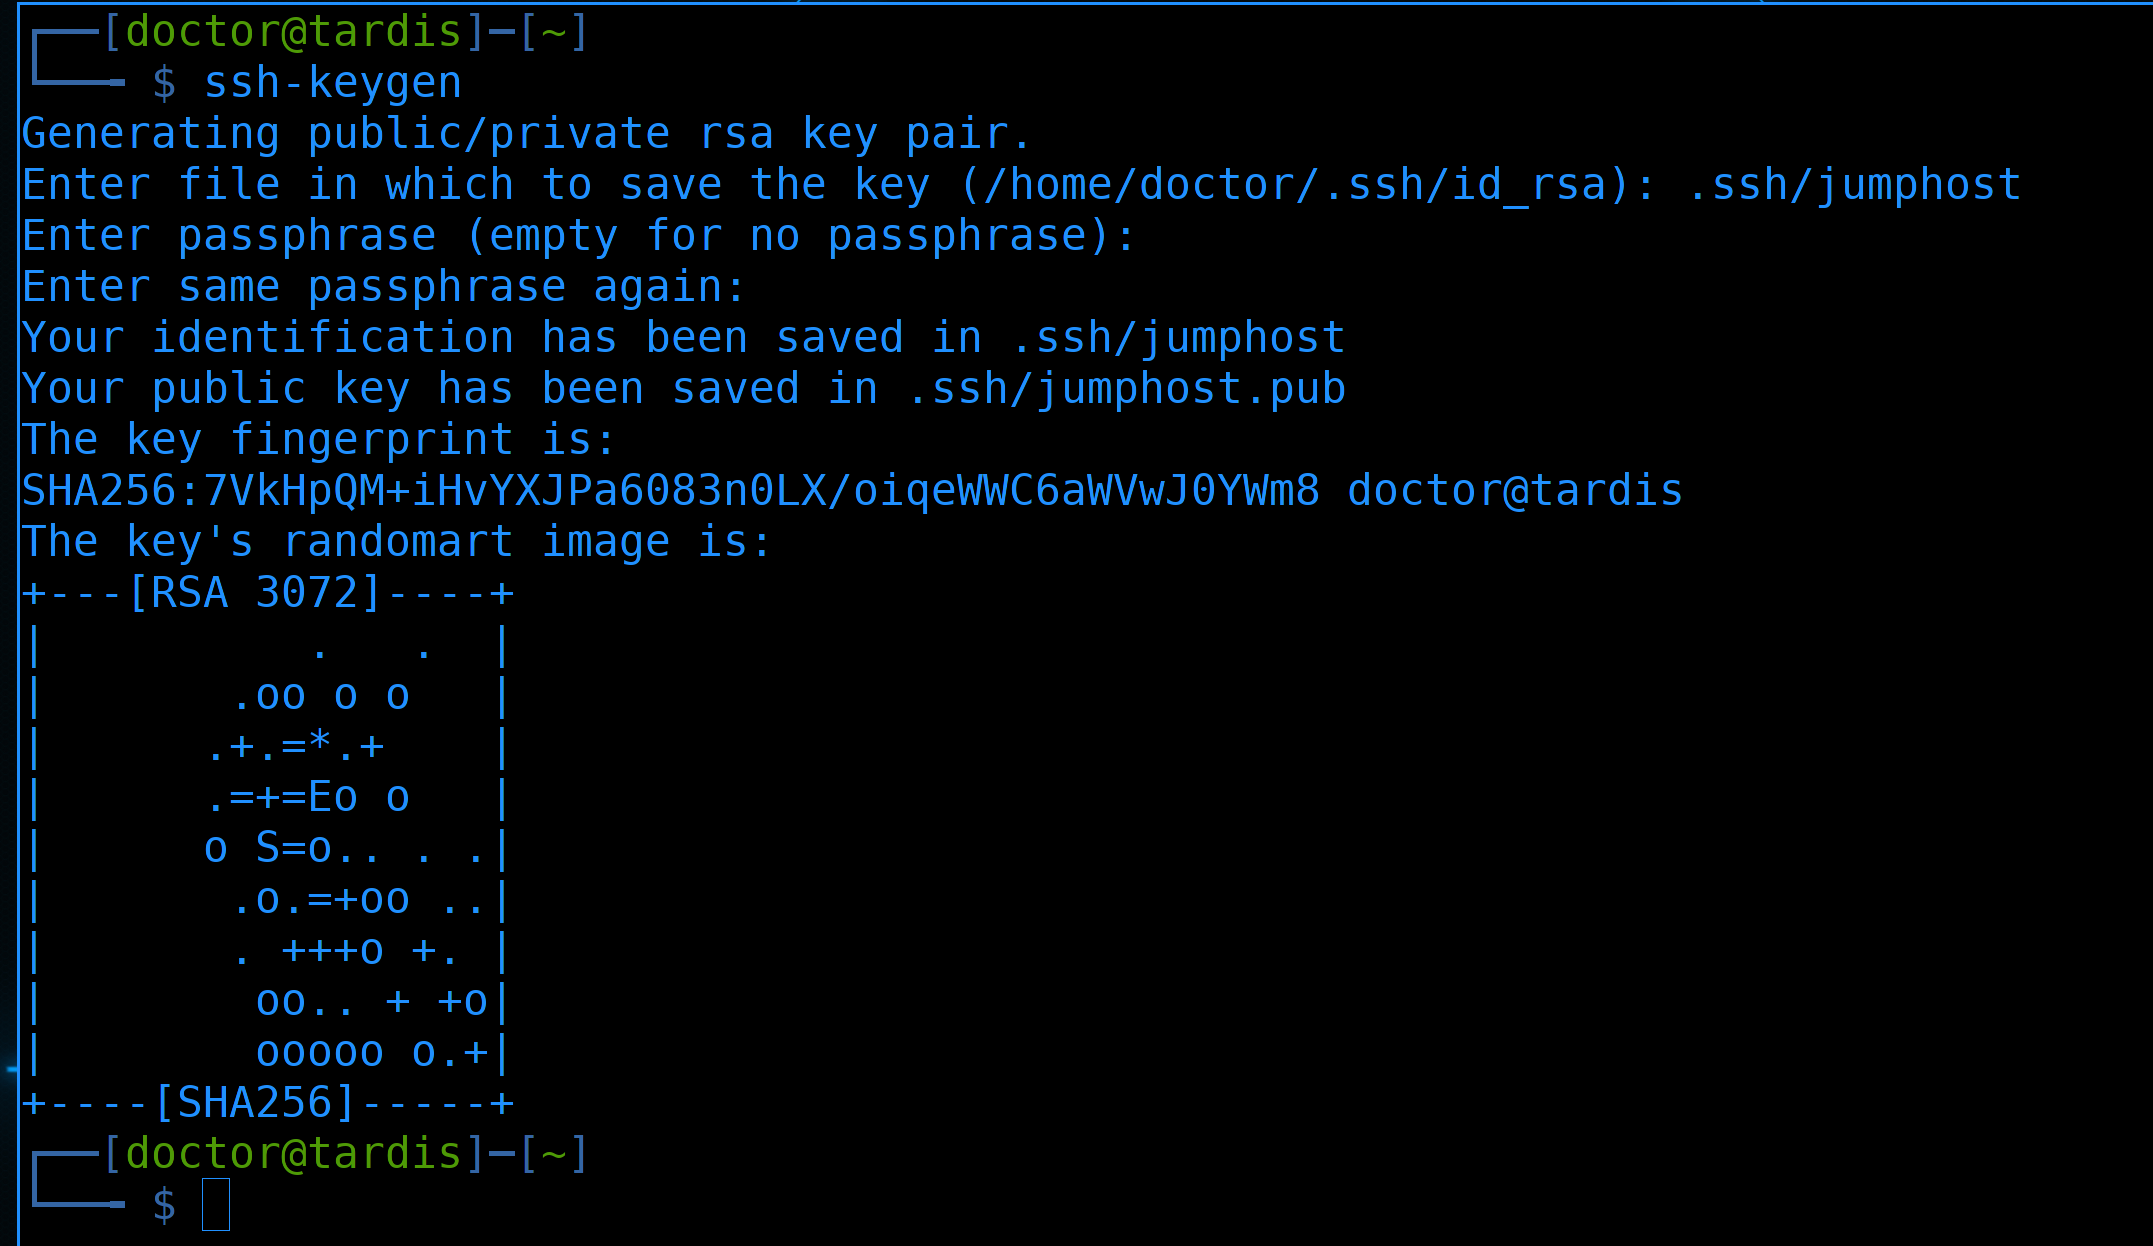
And following our conclusion, we will generate a separate key for the jump host:
ssh-keygen
Let’s name the keys .ssh/jumphost and set a password for the private key.
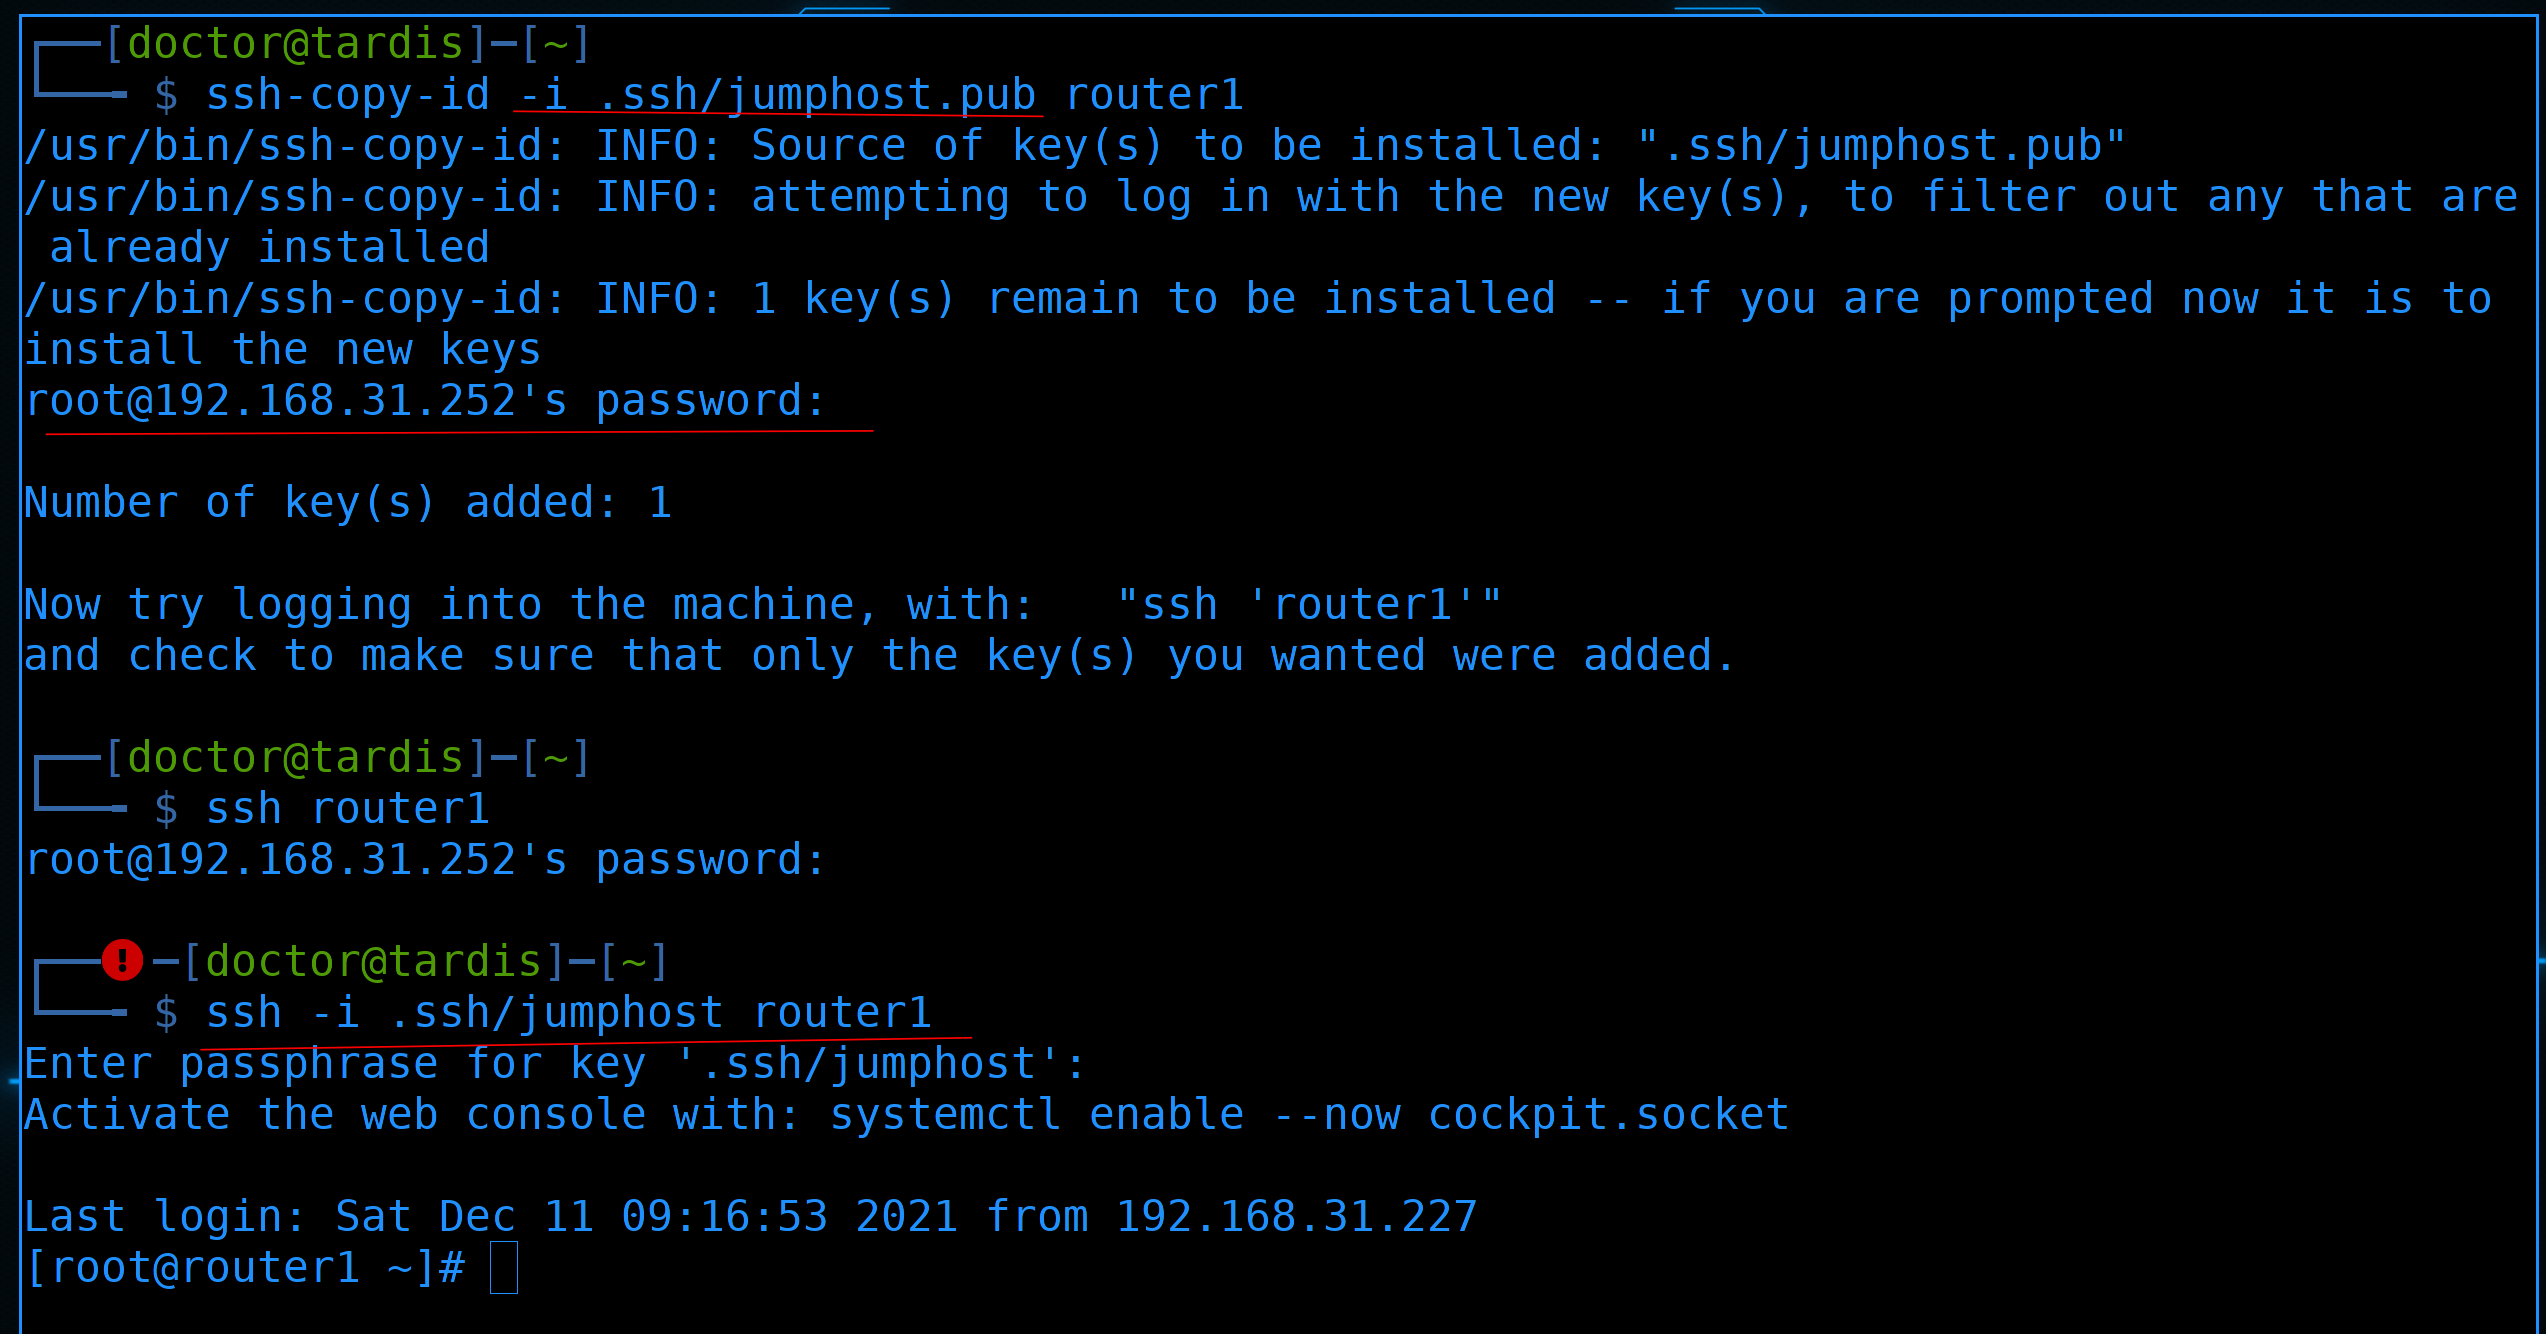
After generation, throw the key on the jump host using the ssh-copy-id command:
ssh-copy-id -i .ssh/jumphost.pub router1
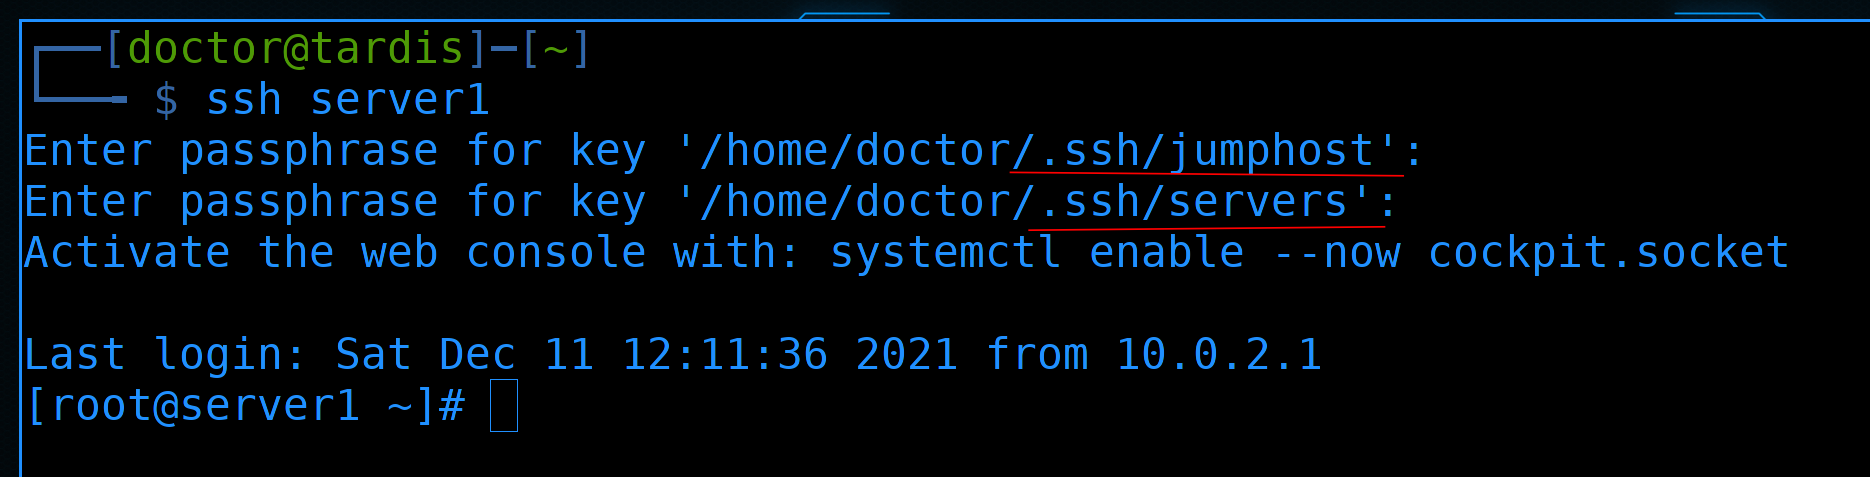
And after entering the password, the key was added to the server. Now, when connecting to the server, we need to specify the key with which we want to access router1:
ssh -i .ssh/jumphost router1
When connecting, you are asked to enter the password from the key we created. And after entering the password from the key, we get to the server without a password.
Now let’s generate the keys for the servers:
ssh-keygen
We specify a separate file and password for them.
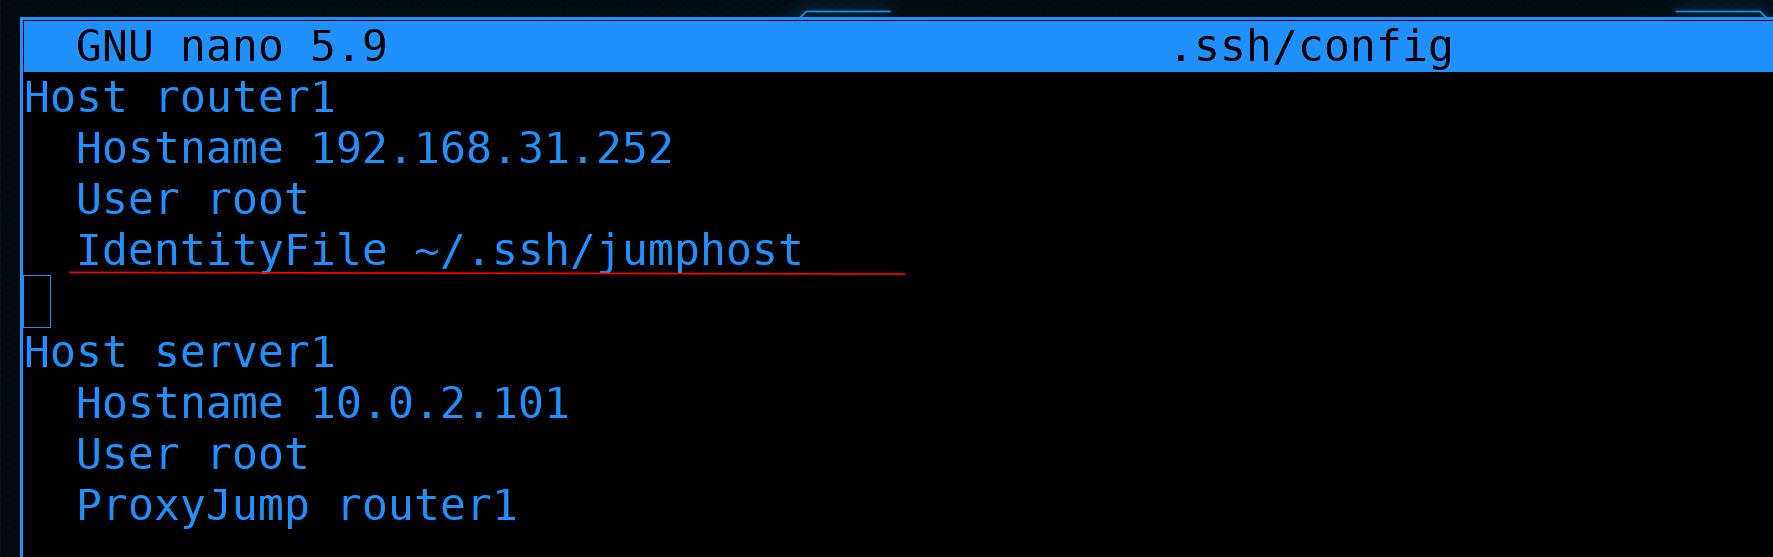
Before throwing the key on server1, let’s indicate in the config file ~/.ssh/config that a separate key is needed for the jumphost:
...
IdentityFile ~/.ssh/jumphost
...
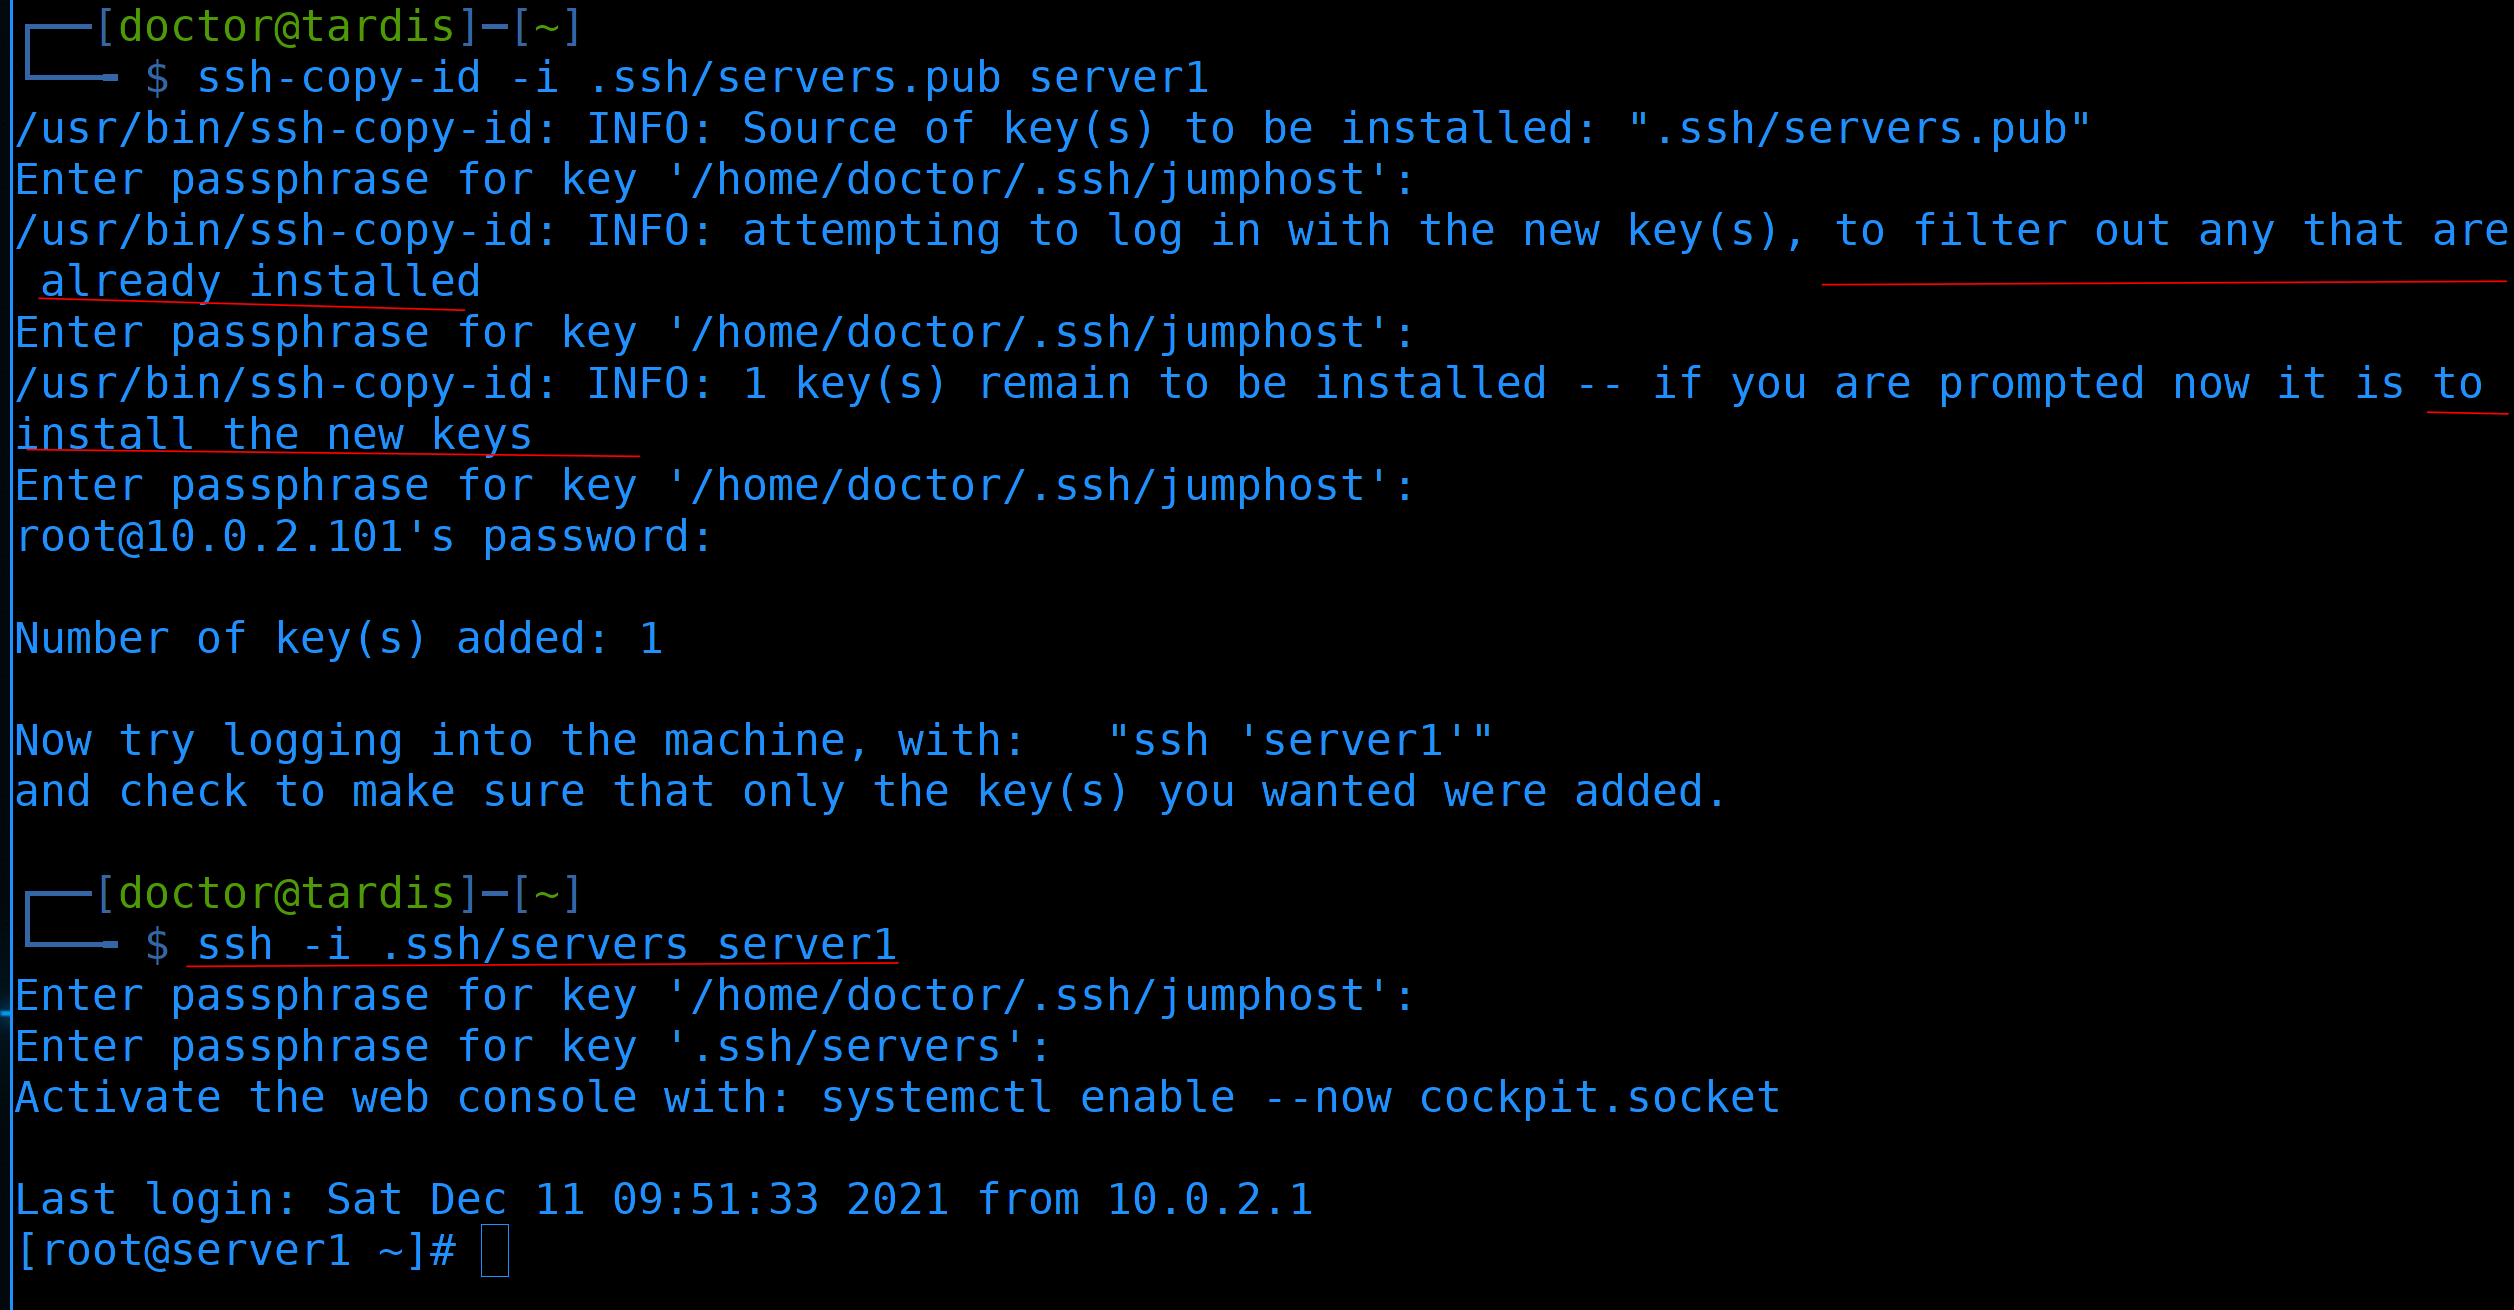
Now let’s try to throw the key on server1:
ssh-copy-id -i .ssh/servers.pub server1
ssh will ask us several times to enter the password of the key for the jumphost – once it will try to enter with the key, or not enough, suddenly it is already installed on the server, then it will try to add the key, for this it will additionally ask for the password from the server itself. Then we will see information that the key has been successfully added. Now we can try to log in using the key:
ssh -i .ssh/servers server1
To do this, you will need to enter the passwords for the jumphost keys and servers. After that, we will enter the server itself without a password.
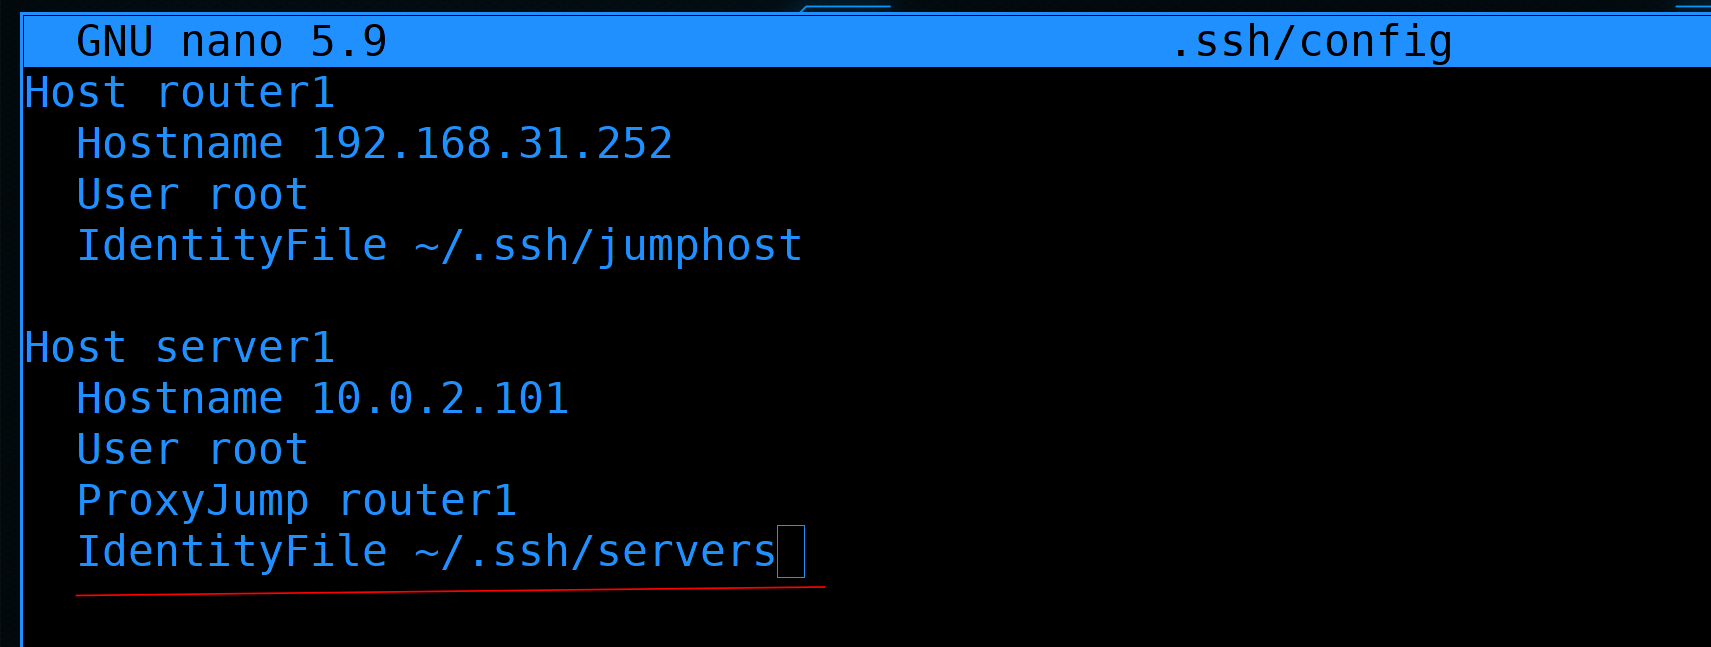
We will also specify the key in the config file ~/.ssh/config so as not to specify the keys when connecting:
...
IdentityFile ~/.ssh/servers
...
This time, when connecting, we again do not specify any options, but simply enter the passwords from the keys. But entering these passwords every time you connect can be inconvenient, especially when we have many servers and are constantly connecting back and forth. And it seems that you don’t want to constantly enter passwords, but they should be on the keys. There is a simple solution for this – ssh-agent. In short – you start the ssh-agent process and add keys to it. While the process is running, you won’t need to enter key passwords. Conditionally, you start working – start ssh-agent and add keys, entering passwords from the keys. Then work without passwords. Stop working – go for lunch or a break – kill the process.
To start the agent, use the command:
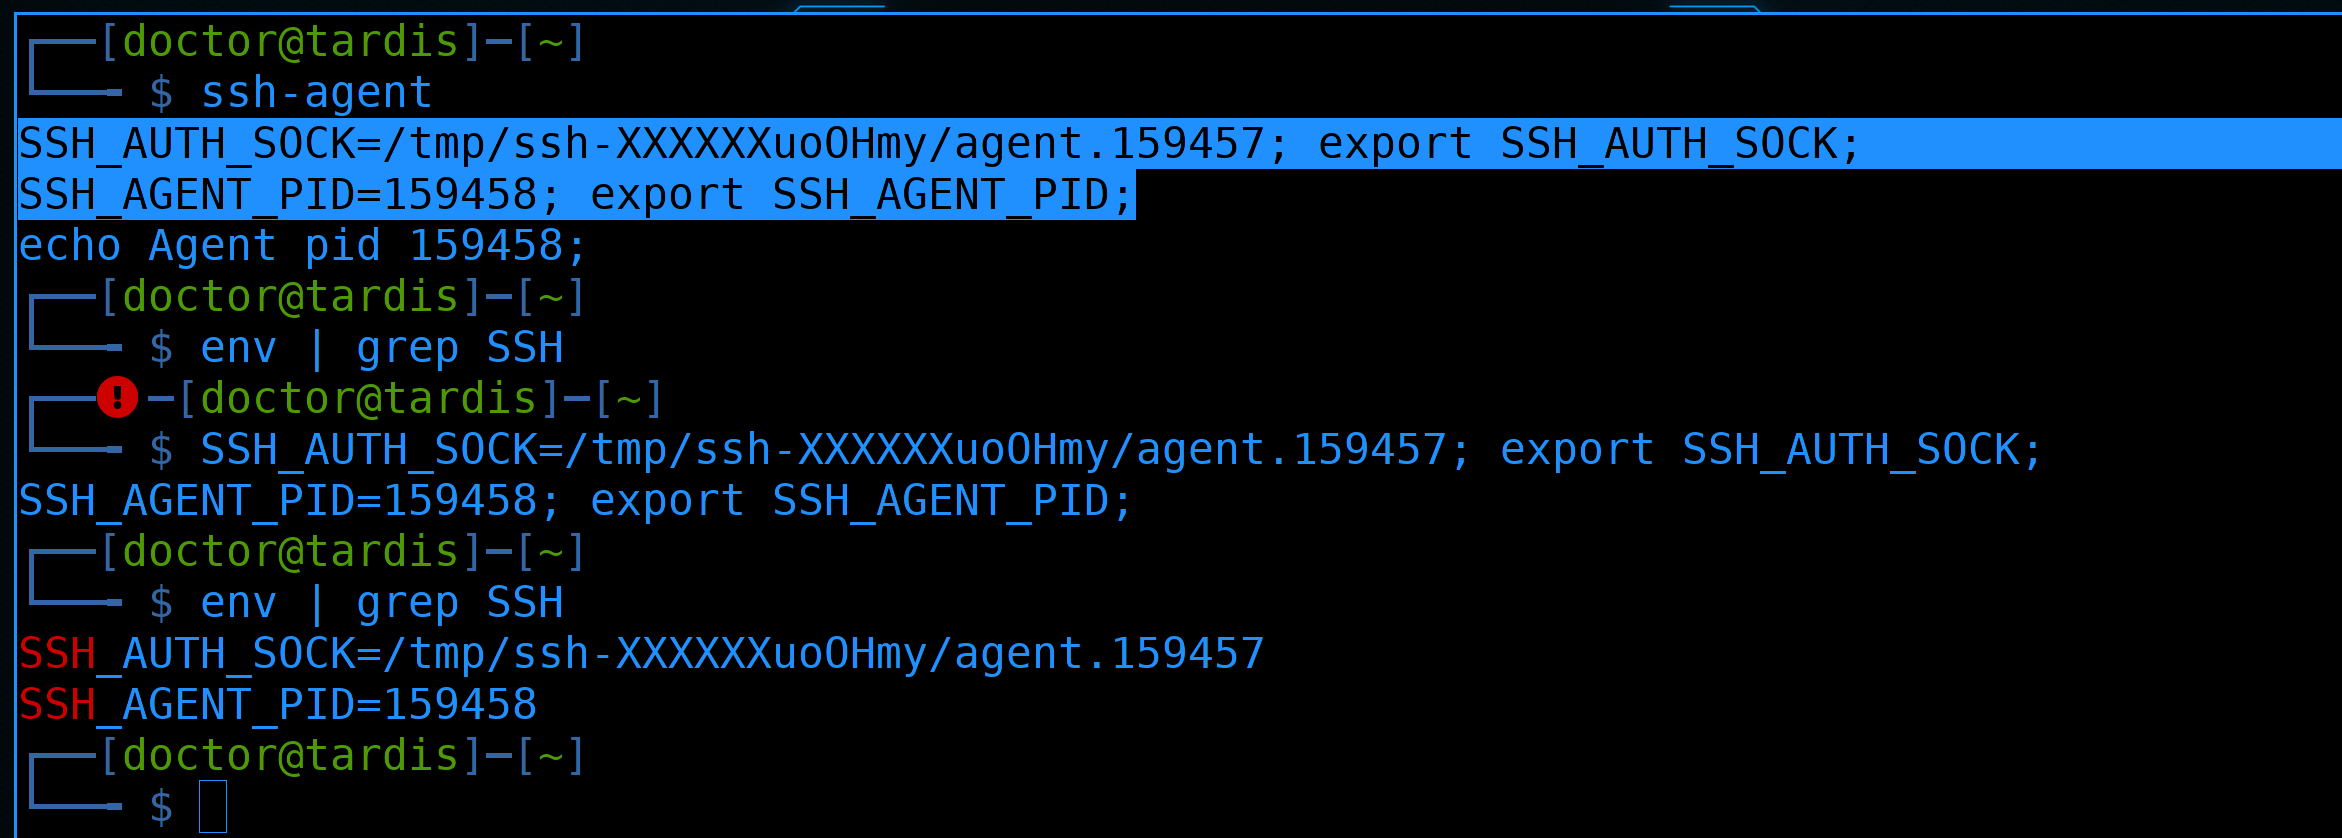
ssh-agent
In doing so, the command shows a couple of commands that you should use to create environment variables. Without these commands, the variables will not be written:
env | grep SSH
And then you won’t be able to work with the agent. ssh-agent itself cannot write these variables. So you need to manually copy these commands and execute:
SSH_AUTH_SOCK=/tmp/ssh-XXXXXXuoOHmy/agent.159457; export SSH_AUTH_SOCK;
SSH_AGENT_PID=159458; export SSH_AGENT_PID;
env | grep SSH
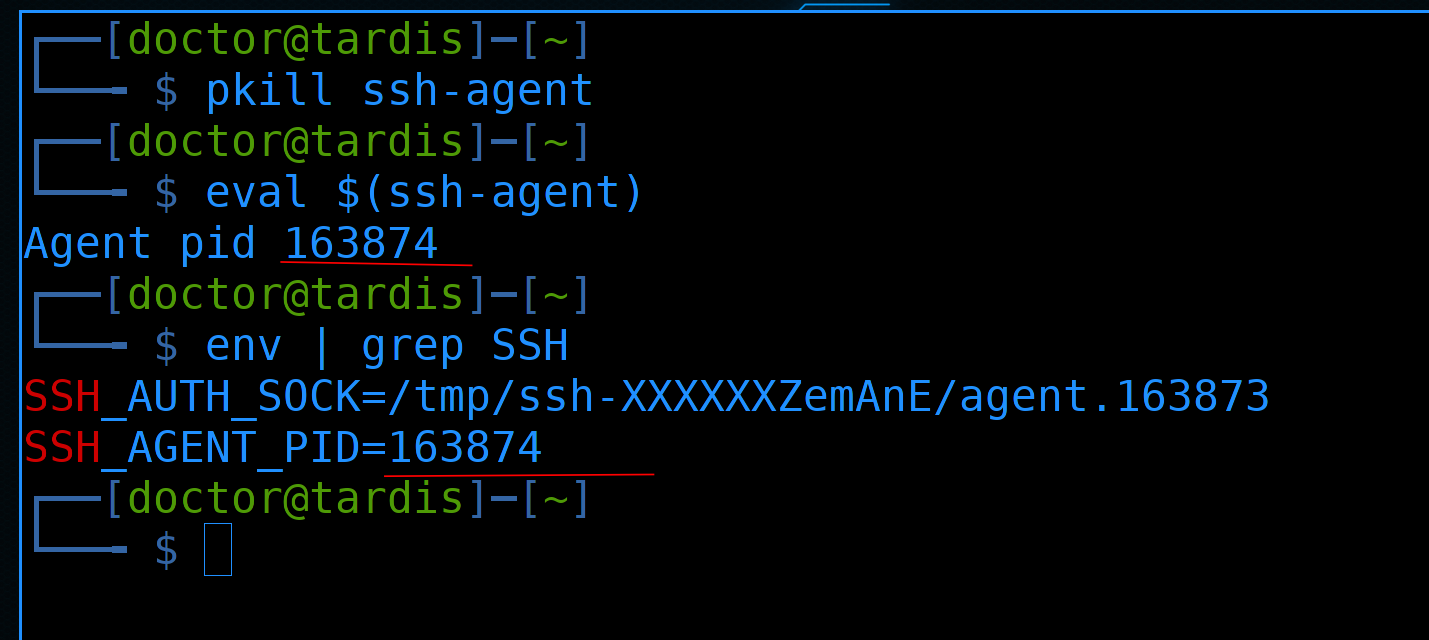
But it can be quite convenient. There is another way, but for this we will terminate the agent process:
pkill ssh-agent
And then we will launch a new one, but through the eval command:
eval $(ssh-agent)
It will immediately add the variables:
env | grep SSH
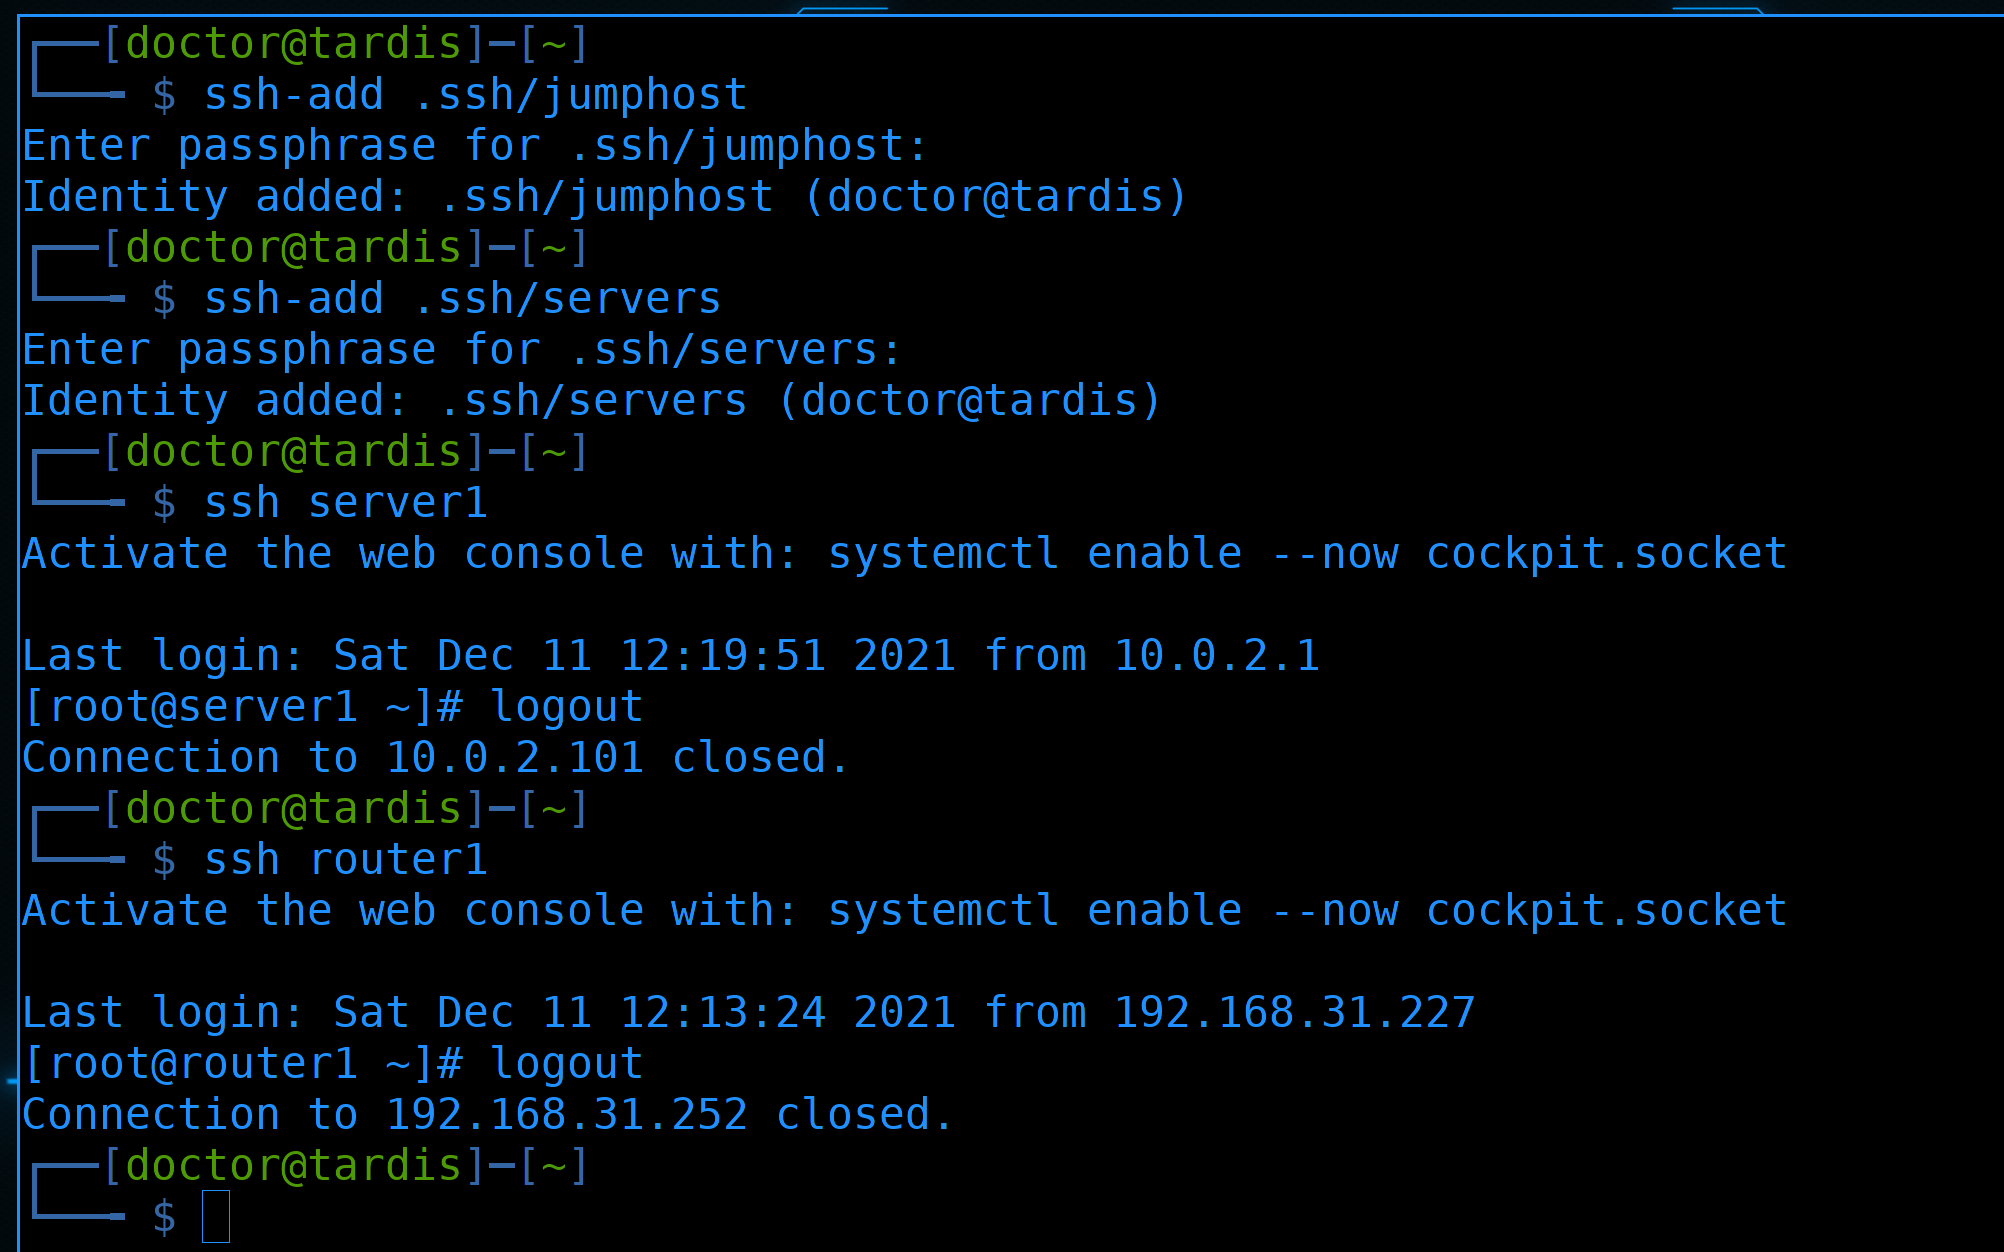
Now we can add the keys to the agent using the ssh-add command:
ssh-add .ssh/jumphost
ssh-add .ssh/servers
After that, when trying to login to the server or jumphost, no password is required:
ssh server1
ssh router1
And, on the one hand, our keys are protected by a password, and on the other – now it is also convenient, as without a password, unless you need to write a couple of commands before work.

Let’s try to make our scheme a little more real. Usually, companies do not have Linux installed on their routers, or there is such a stripped-down Linux that you can’t do much. Therefore, the router itself cannot be used as a jump host. Let server1 be better. But how, you ask, is it not available from the Internet? And this is a correct matter. When we have a host in an isolated network and we don’t have direct access to it, we can still get to it using NAT.
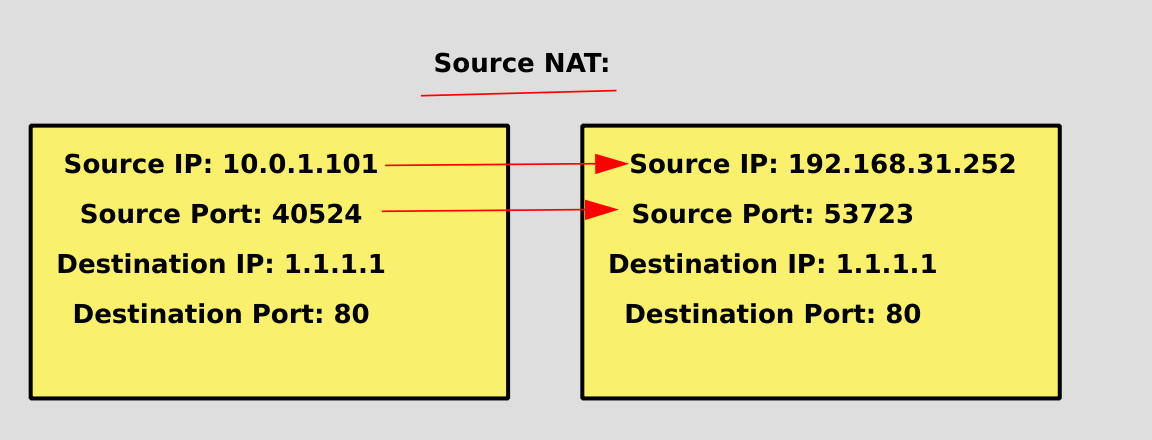
Last time we analyzed source nat, when our packets were leaving the network, they swapped the Source IP and Source Port so that the packets could return back to the network with private addresses.
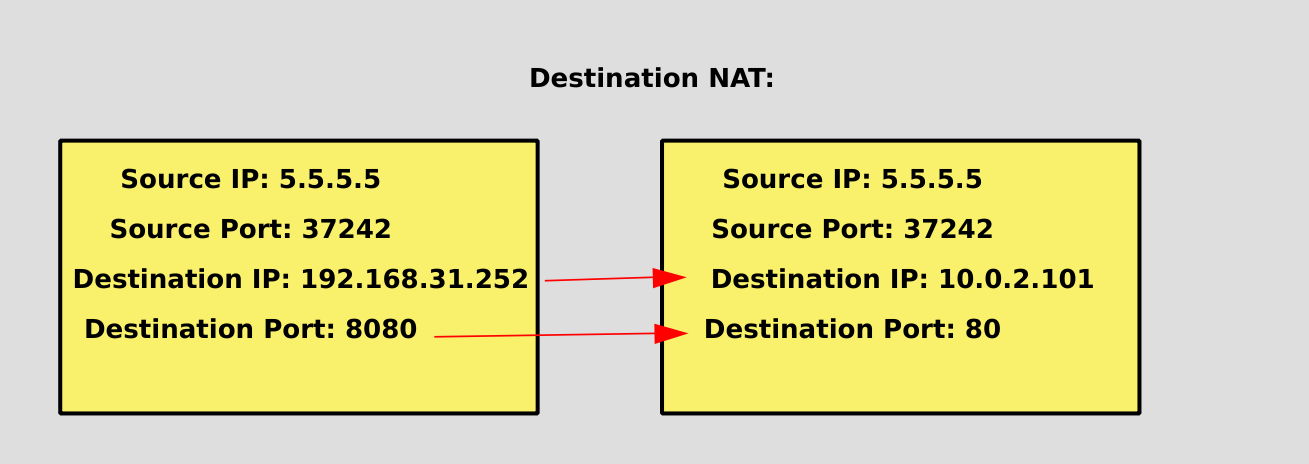
Now we need to switch the destination addresses, since the one who wants to connect does not know if he can connect to the internal addresses, we need to redirect the packets to the internal address. Therefore, with the help of NAT, we can replace the destination address and port. This is called dnat or port awakening.
So, we want to connect via ssh to server1 by specifying the address of router1. At the same time, due to the fact that our router is conventionally located on the Internet, port 22 should not be used – there are a lot of bots on the Internet that will try to hack our server. Therefore, let’s choose some non-standard port for ssh.
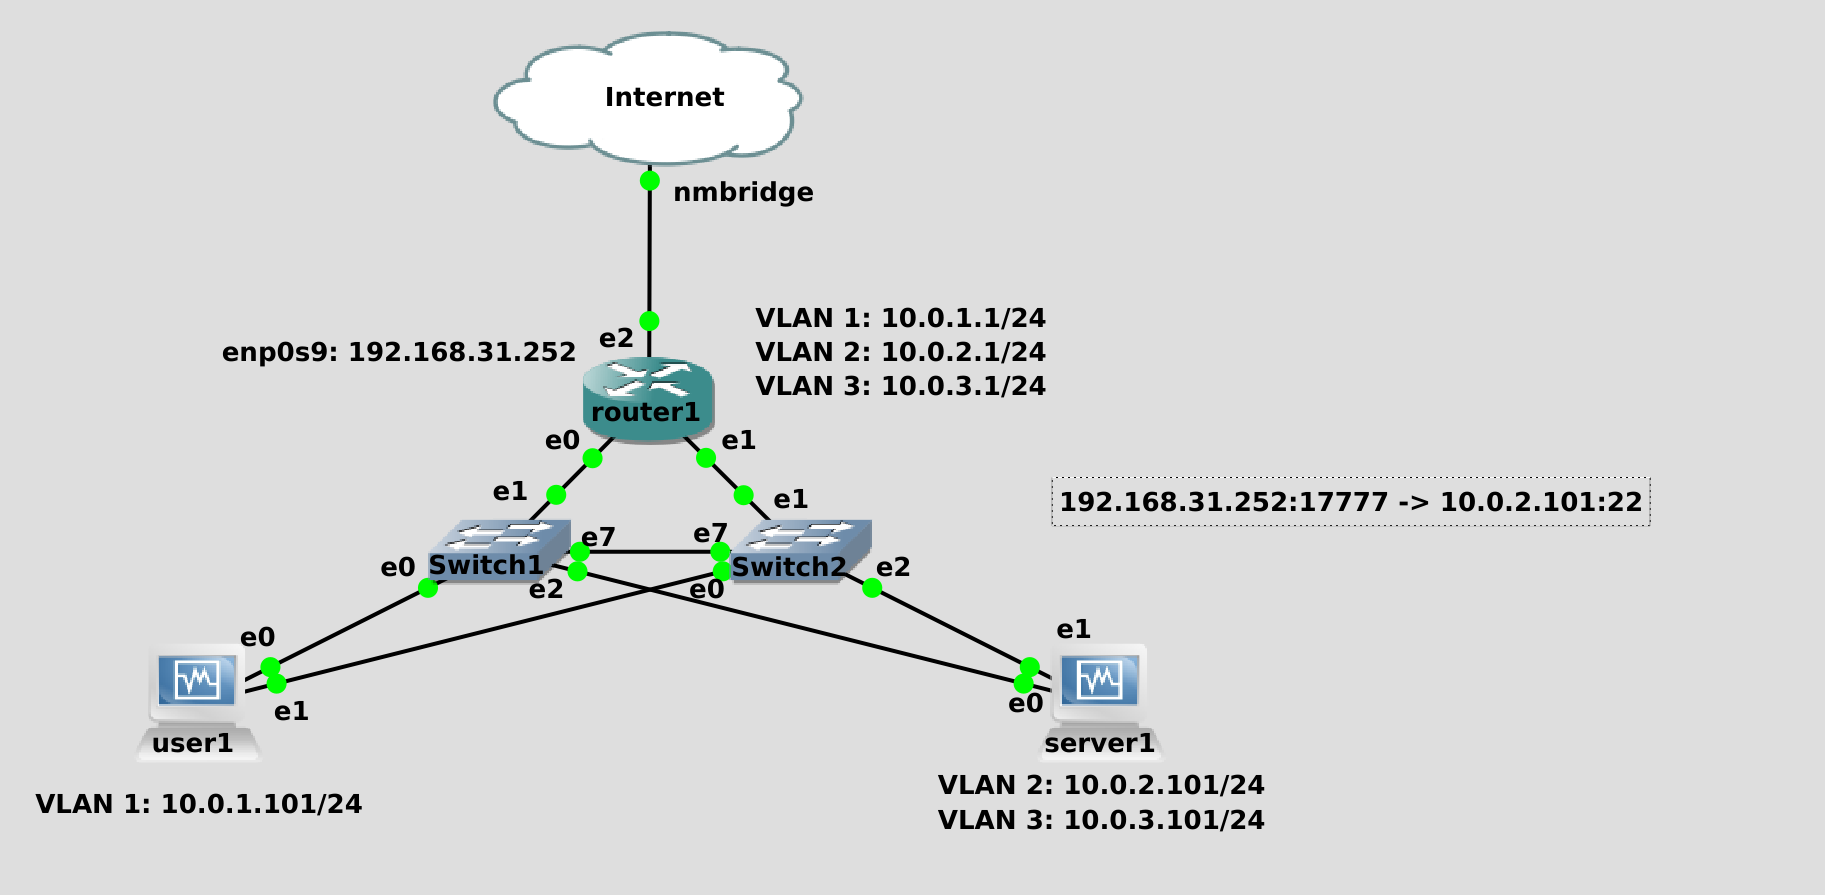
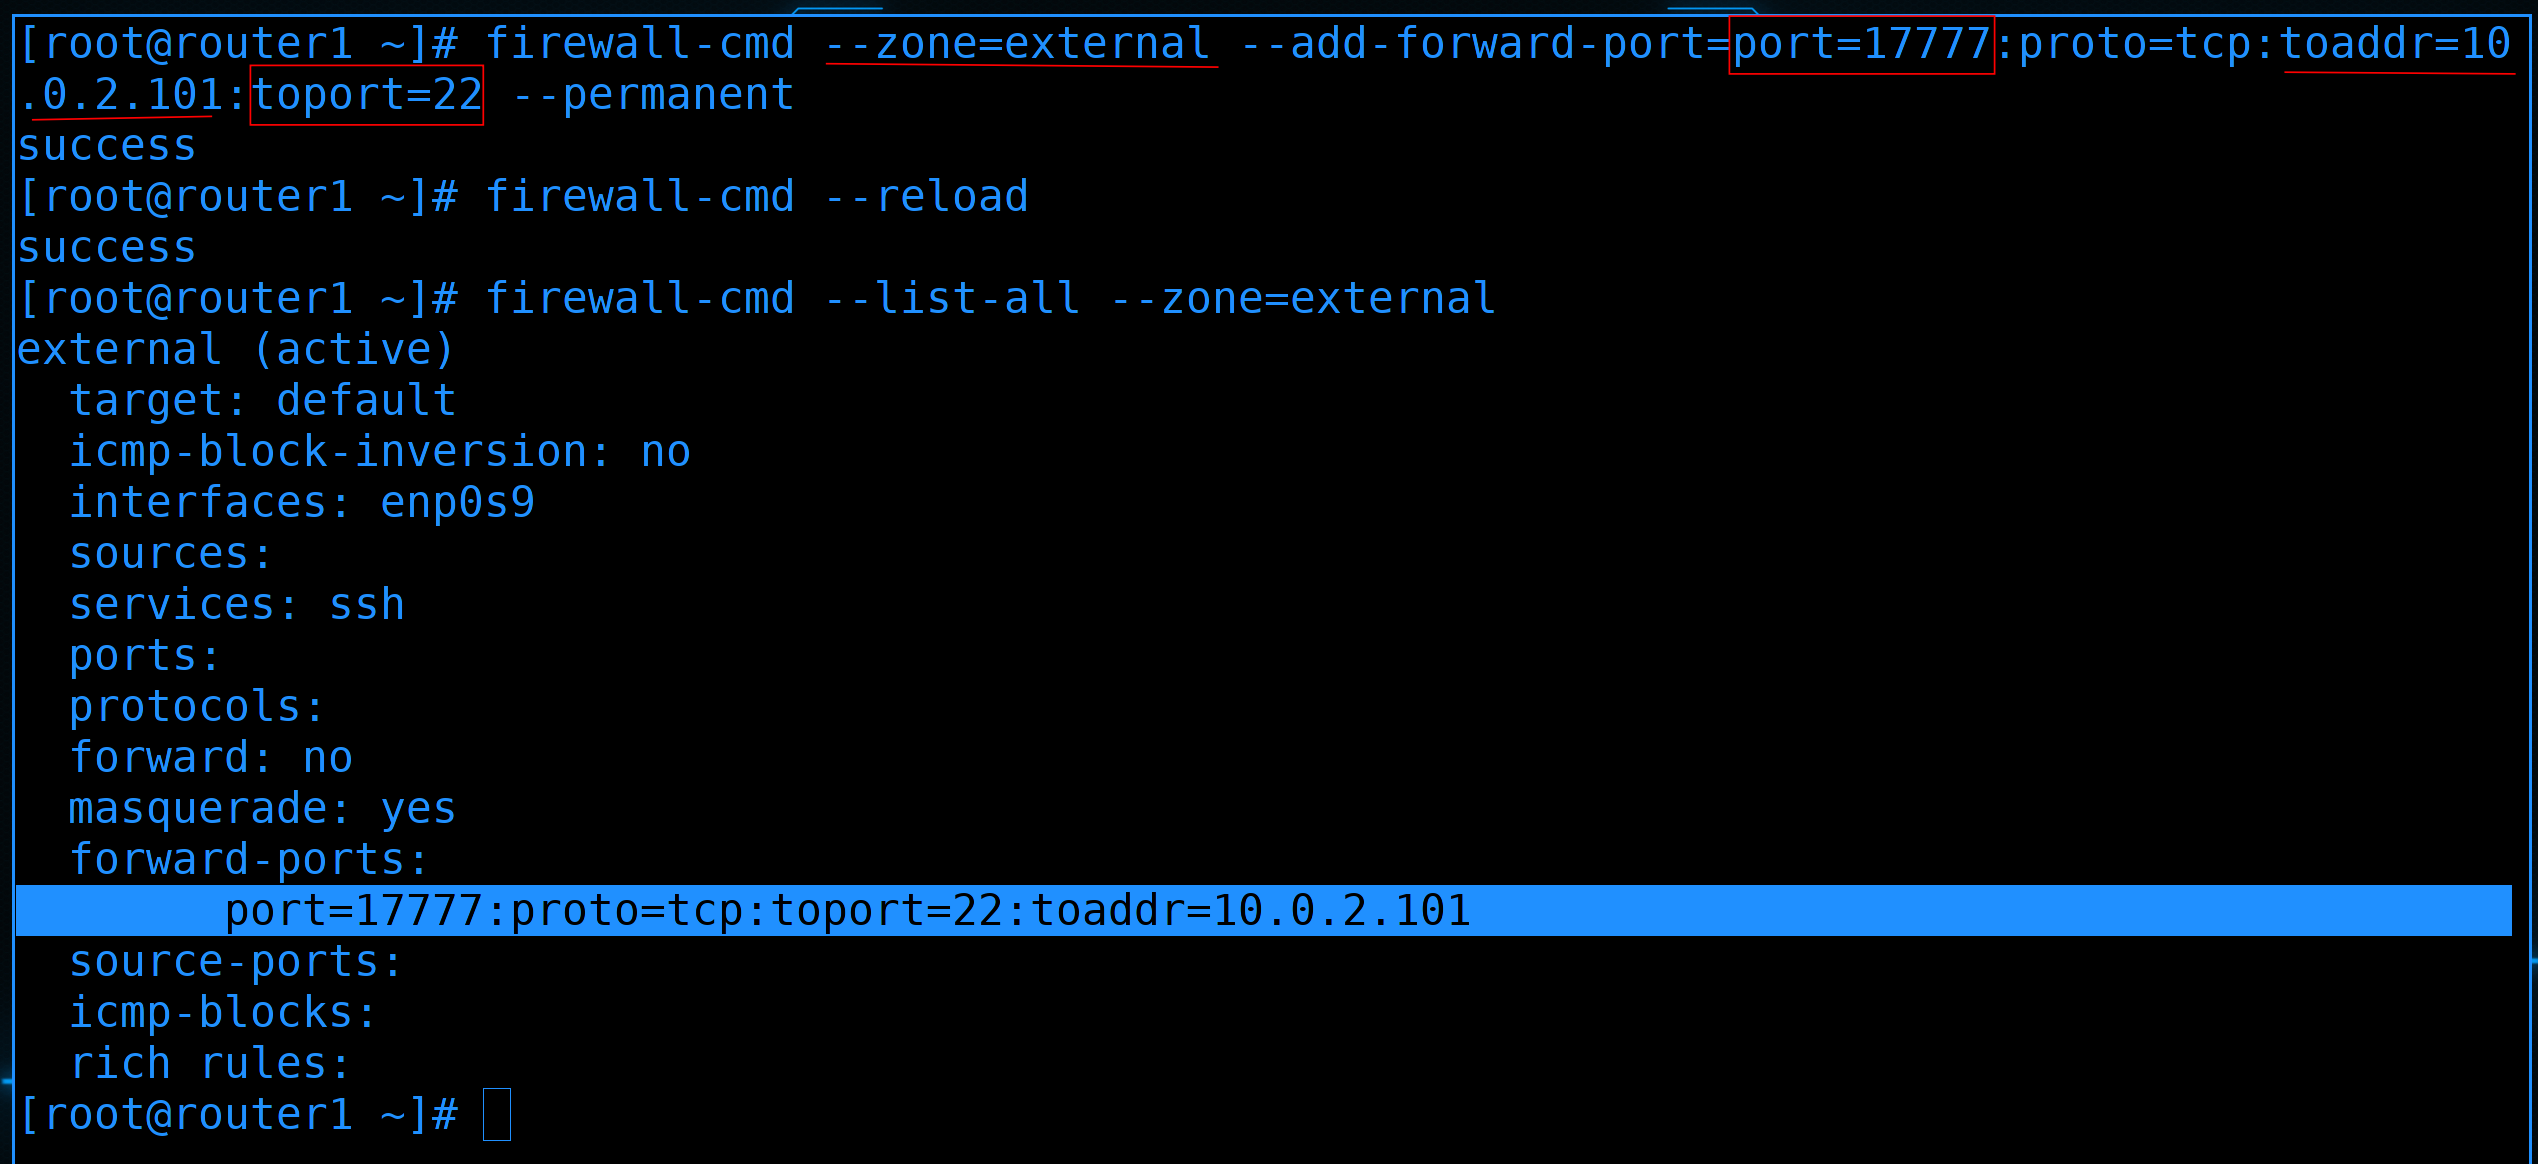
Let’s redirect everything coming to the router’s external address on port 17777 to server 1 on port 22.

To do this, go to the router:
ssh router1
We have an interface with an external address in the external zone on the firewall:
firewall-cmd --list-all --zone=external
Here we have to open the port.
The command will be a little long, but there is nothing complicated in it:
firewall-cmd --zone=external --add-forward-port=port=17777:proto=tcp:toaddr=10.0.2.101:toport=22 --permanent
First, we specify the zone in which we want to add a rule. Since the interface is in the external zone, we specify it. Next, we use the –add-forward-port switch to add a port forwarding rule. After that, we write which port we want to open – port=17777, which protocol – proto=tcp, which address – toaddr=10.0.2.101 and which port – toport=22. All these values are separated by colons. And at the end, don’t forget to specify –permanent so that our changes are saved in the settings.
Then we overload the rules:
firewall-cmd --reload
And check the result:
firewall-cmd --list-all --zone=external
As you can see, a rule under forward-ports has appeared in the external zone.
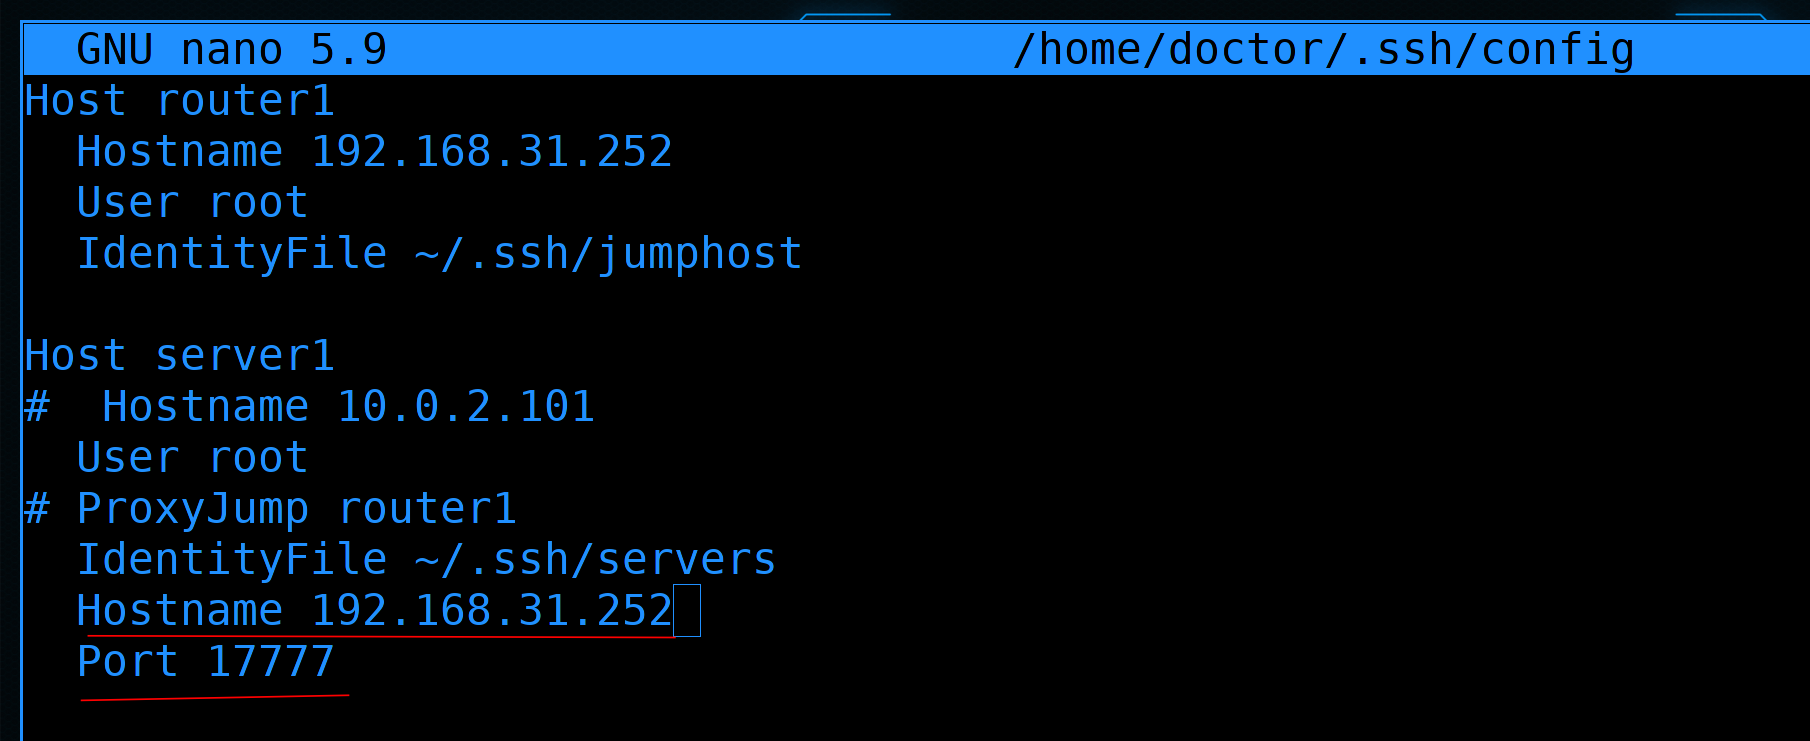
Since our server1 is now accessible directly from the Internet, in the ssh settings – ~/.ssh/config we remove the line ProxyJump, and instead of it we write the router’s external address and port:
...
Hostname 192.168.31.252
Port 17777
...

When connecting for the first time:
ssh server1
we will see a message that our computer has recognized this host and it used to have the address 10.0.2.101, now we connect to it at a different address. We write yes and connect without problems.
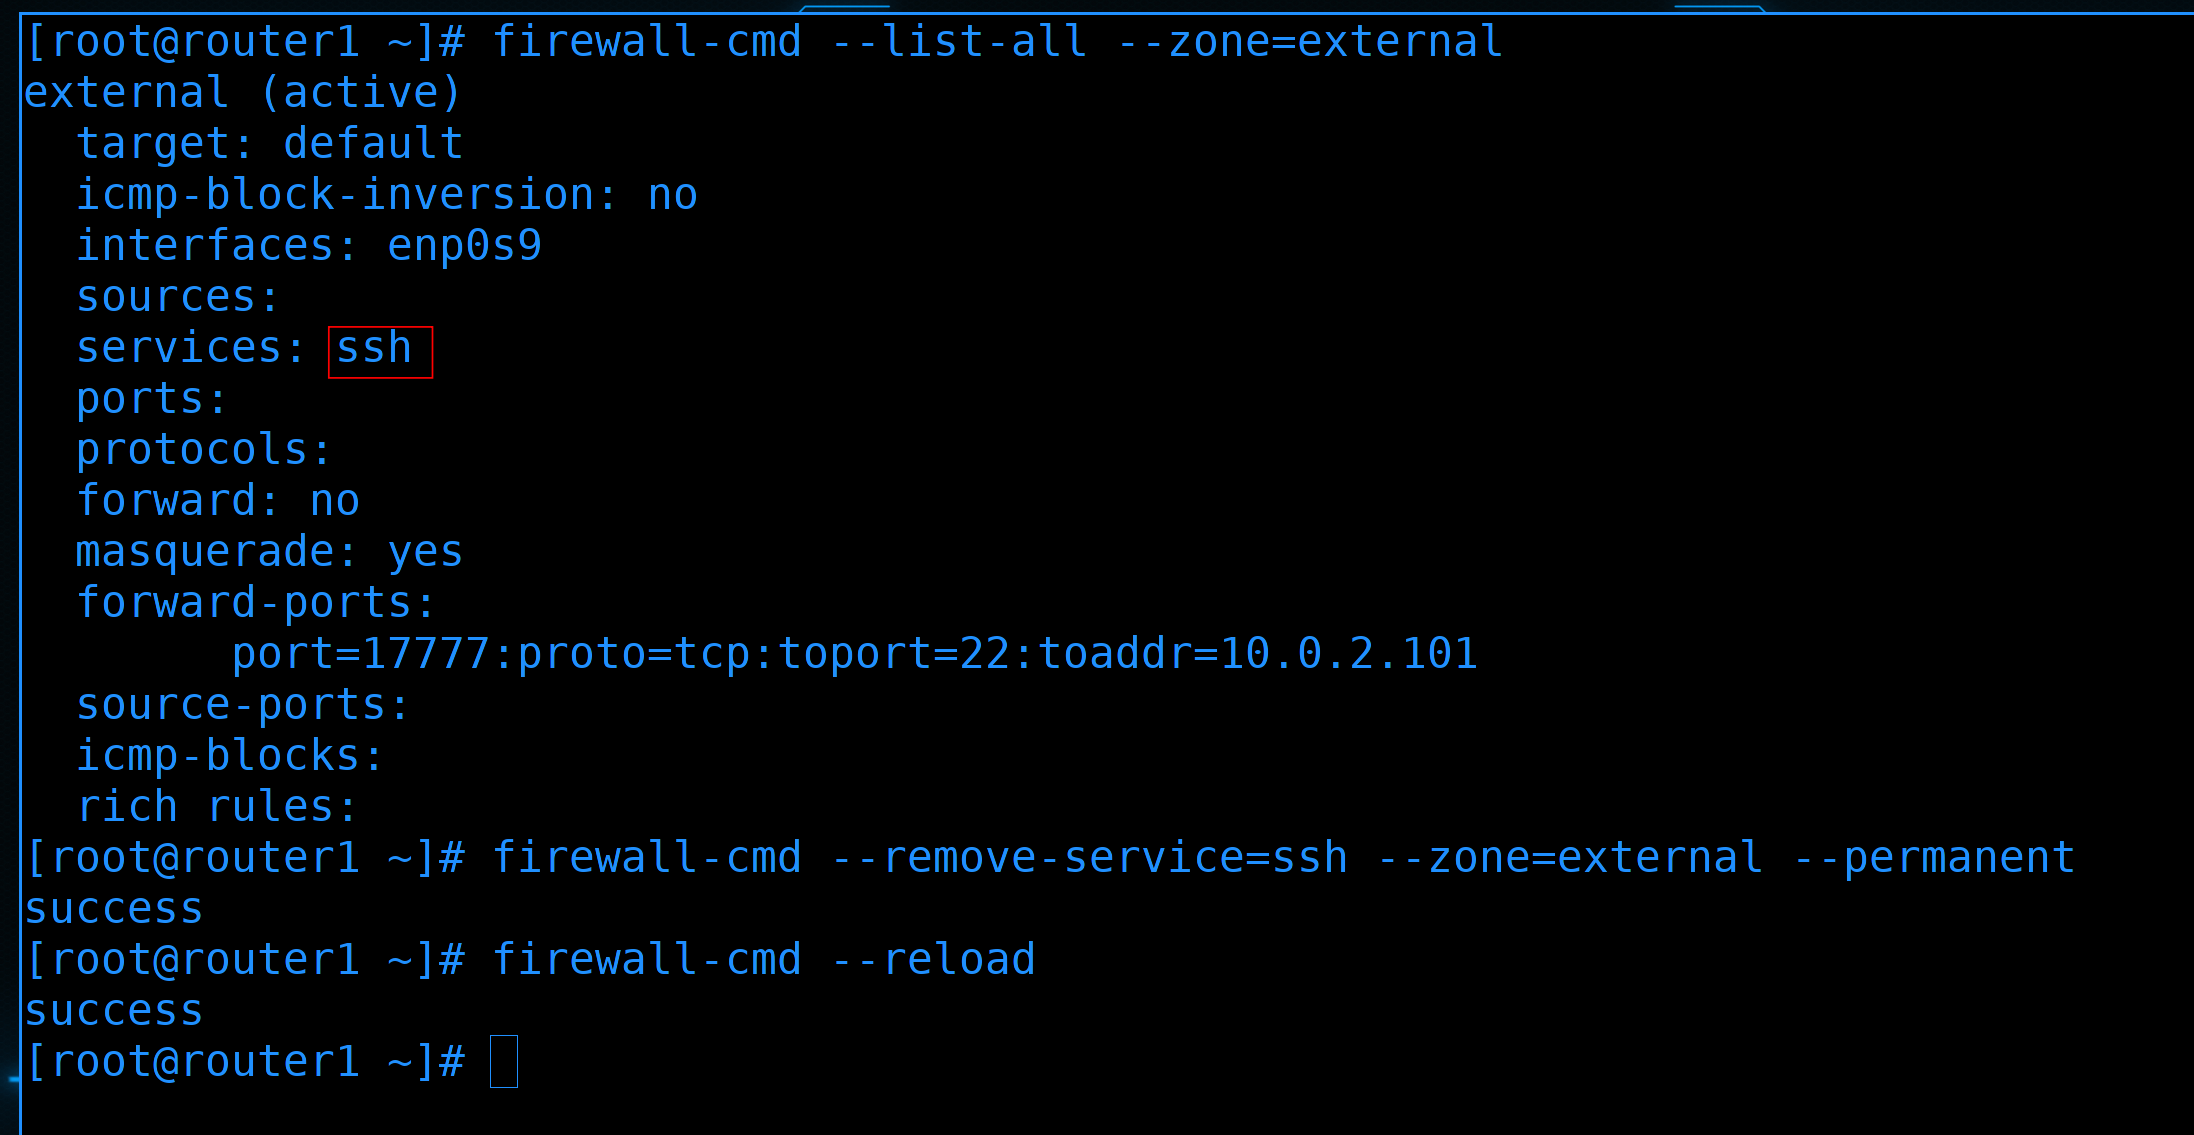
Now let’s configure the router. Now, conditionally, anyone can connect to it via ssh:
firewall-cmd --list-all --zone=external
For greater security, we remove this option:
firewall-cmd --remove-service=ssh --zone=external --permanent
firewall-cmd --reload

Now we have such a situation that we cannot get directly to the router, but we can through server1. That is, now ~/.ssh/config specifies that server1 should be used as JumpHost to connect to the router. Well, we write the internal address of the router:
...
ProxyJump server1
Hostname 10.0.2.1
...
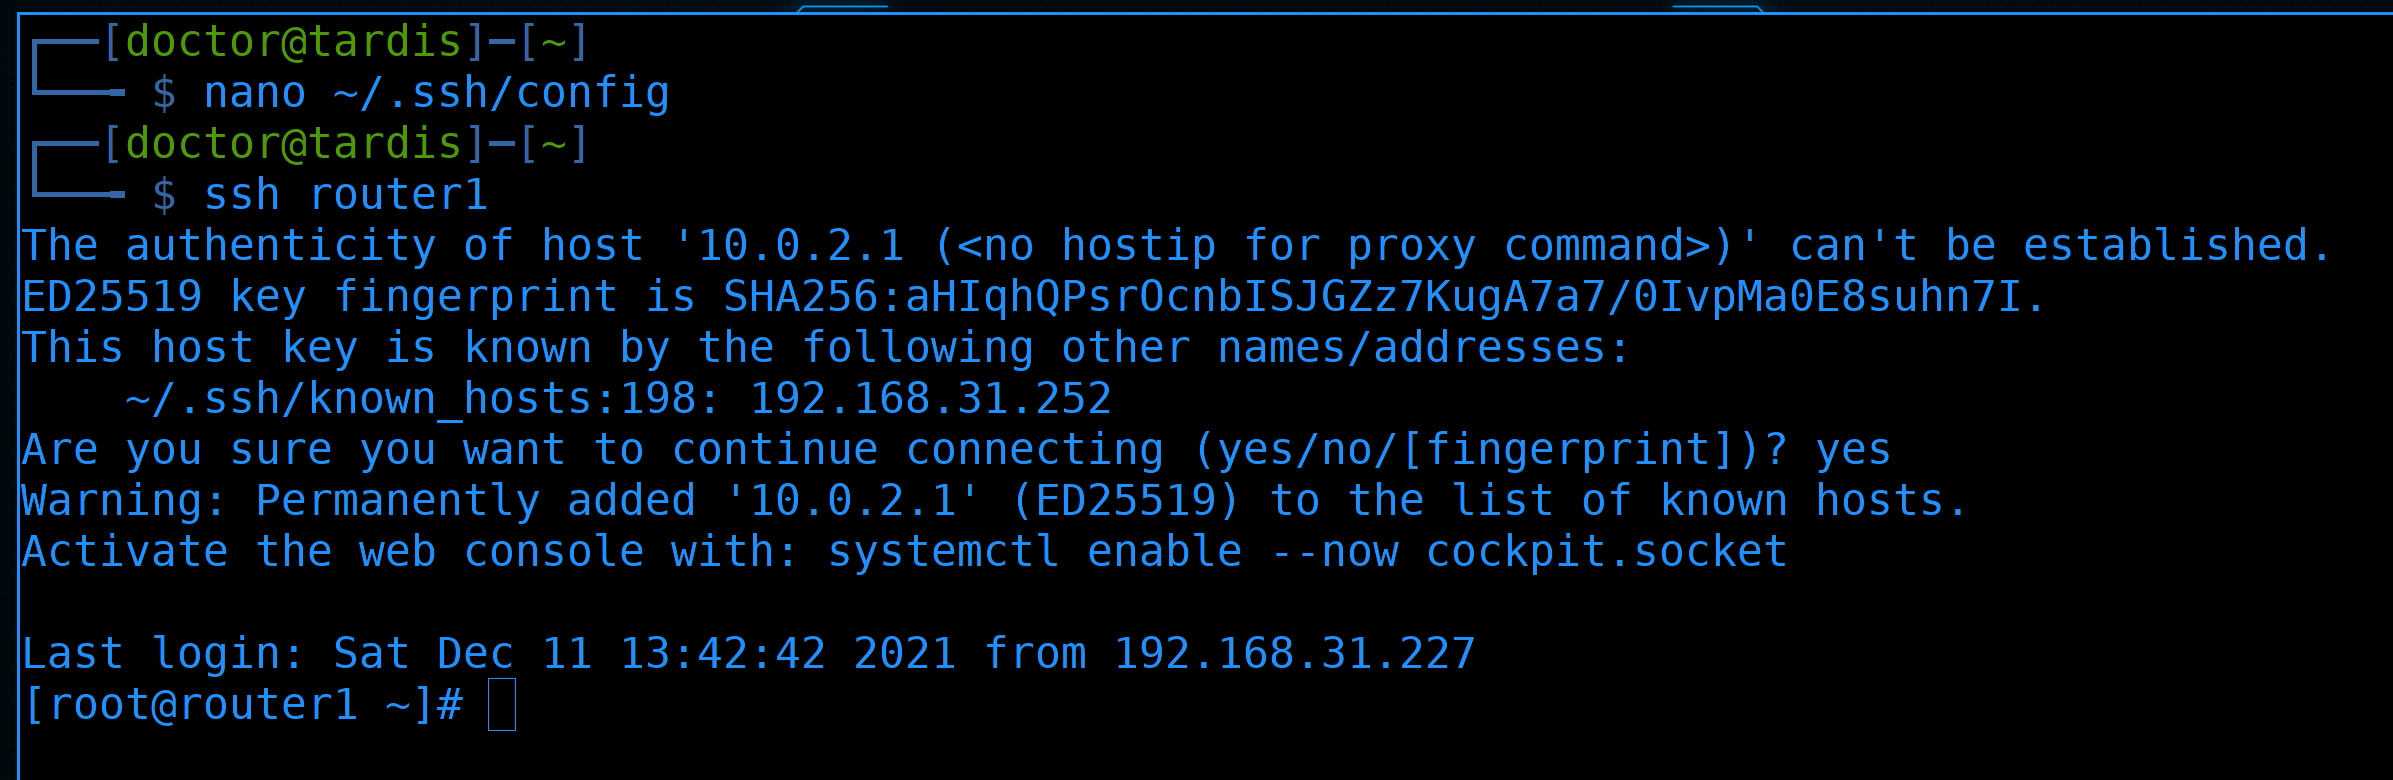
We check the connection:
ssh router1
everything works.

And our connection to the router now looks like this. First, we connect to the router’s external address via port 17777, from where the firewall forwards our packets to server1 on port 22. There, we log in via ssh and immediately connect from there via ssh to the router’s internal address. And all this by one team:
ssh router1
You may be wondering – why not just forward the ports to all servers? Why do you need a jump host? Here are a few reasons:
first, safety. When you have a jump host, only one host is accessible from the outside via ssh. And this means that all hacking attempts will be aimed only at him. Until it is hacked, all other hosts will be invisible. Basically, jumphost is your gateway to the network. It is easier to protect one door than many.
secondly, convenience. When you have 3 servers, you can do without opening ports. What if you have 300 servers? What if they are constantly being added and removed? What, sit and constantly wake up the ports? And yes, from one jump host you can get to all other machines.
And so, how can we make our connection even more secure?
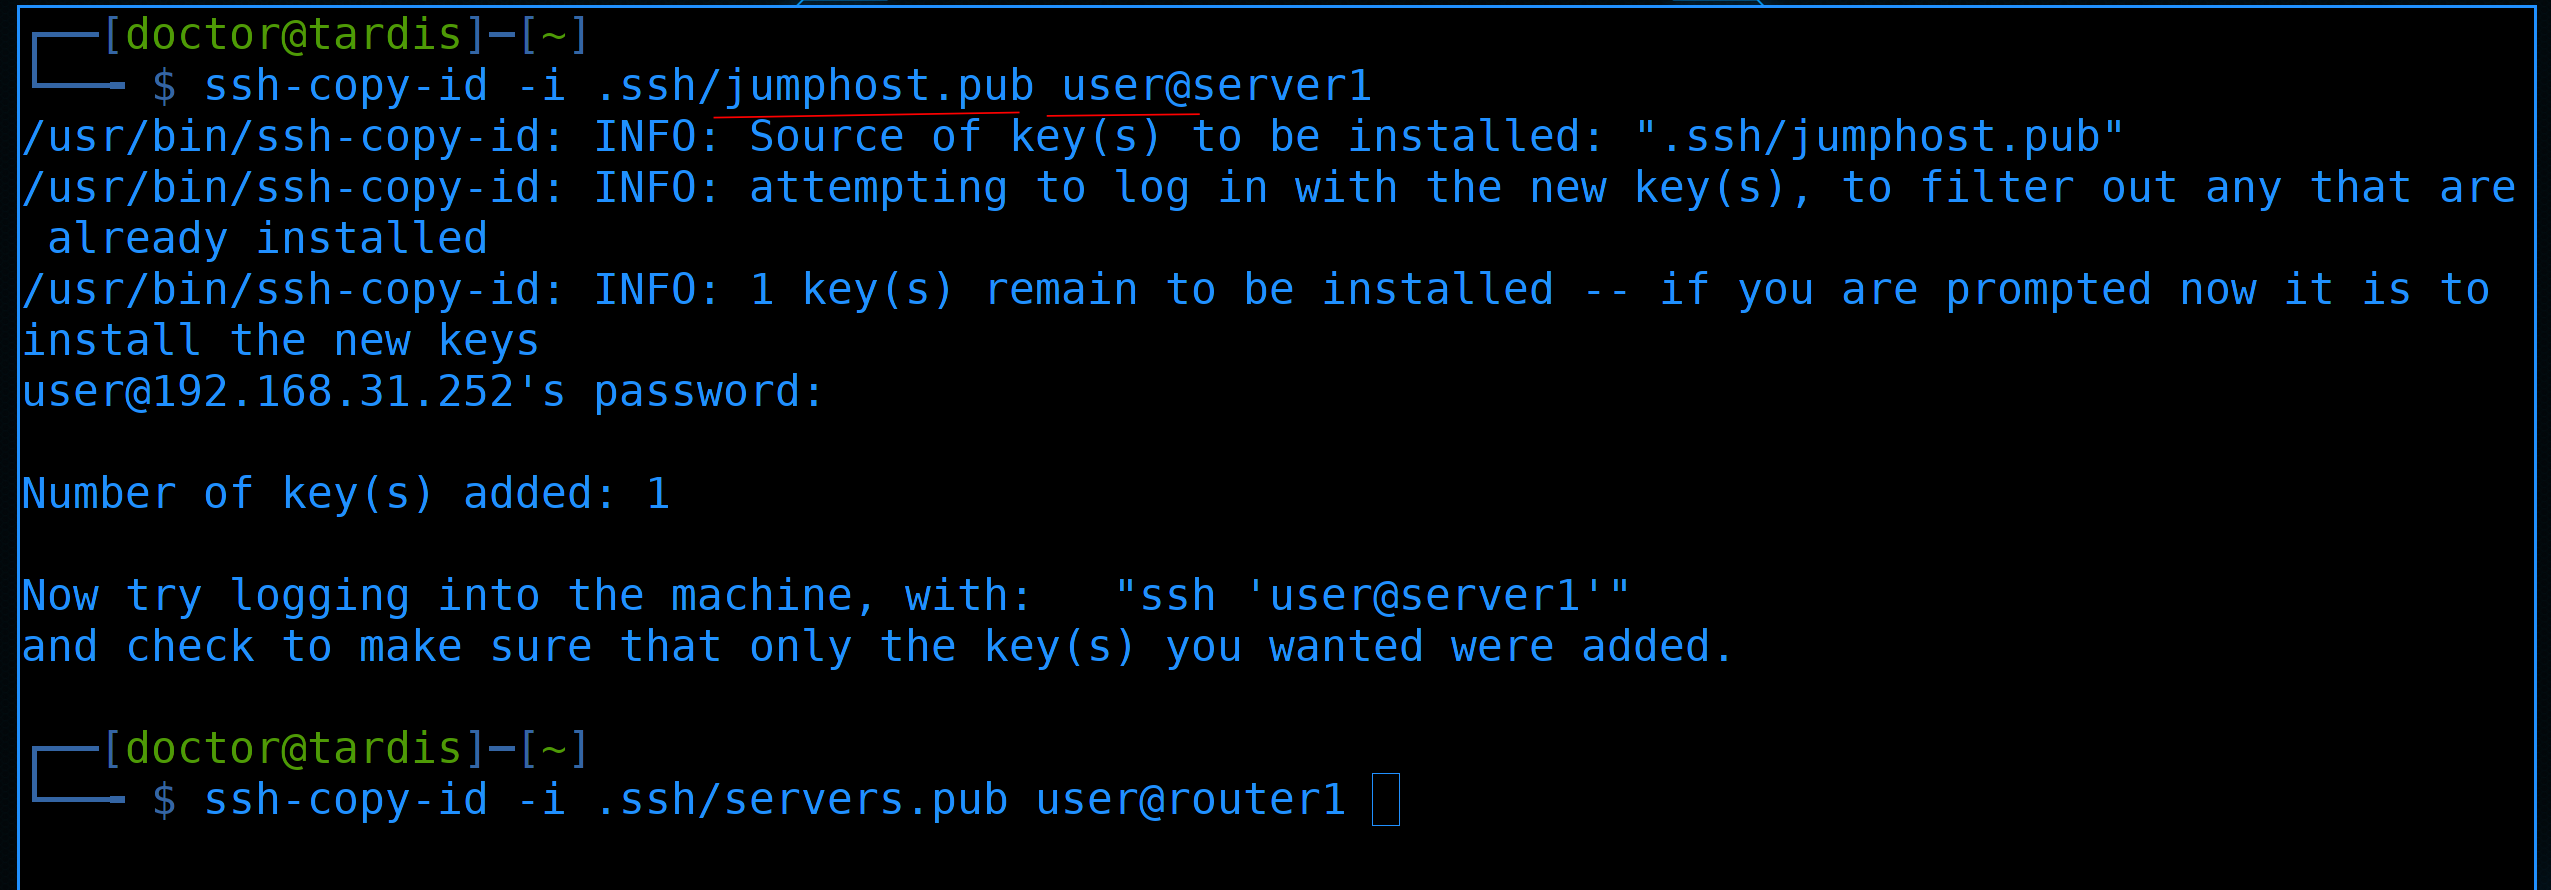
Well, first, stop using root. Let’s login with a user instead of root. And for this, the keys need to be thrown at the user:
ssh-copy-id -i .ssh/jumphost.pub user@server1
ssh-copy-id -i .ssh/servers.pub user@router1
Since now we have server1 as the jump host, we also throw the corresponding key. And for the router, we throw the second key. Then it will be necessary to rub the old keys near the root.
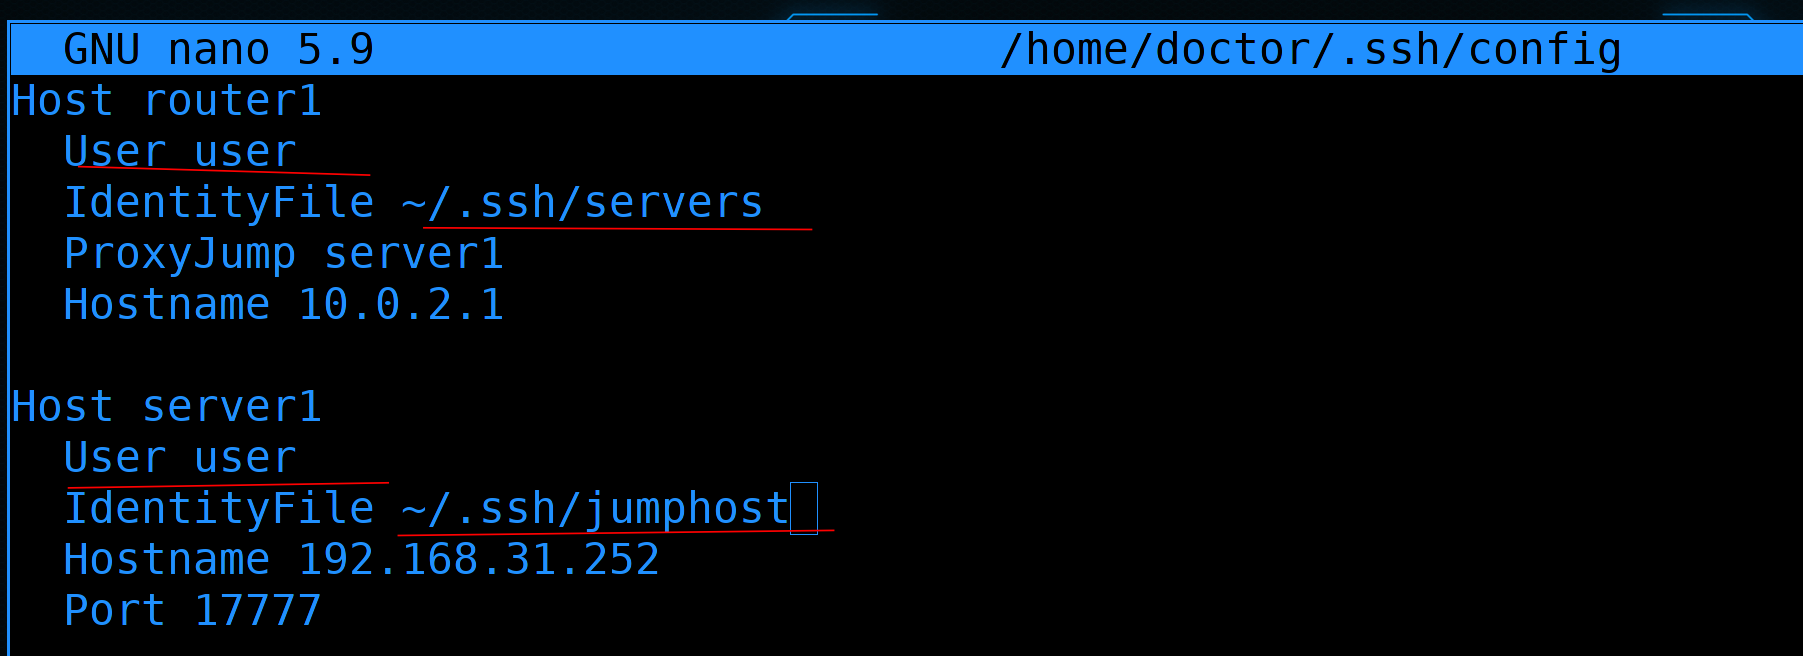
We correct the ssh config file – ~/.ssh/config. First, we change the user to user so that we don’t have to specify it every time we connect. Secondly, we change the keys.
...
User user
...
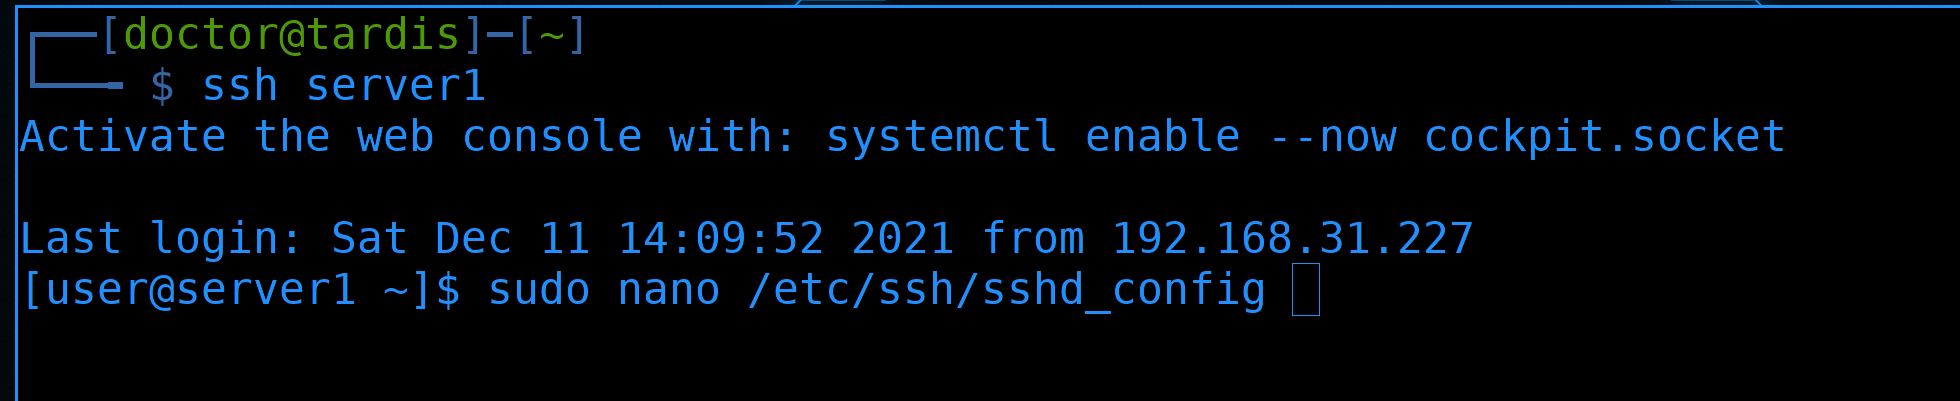
After making sure the connection is working:
ssh server1
it is best to fix something on an ssh server that is accessible from the Internet:
sudo nano /etc/ssh/sshd_config
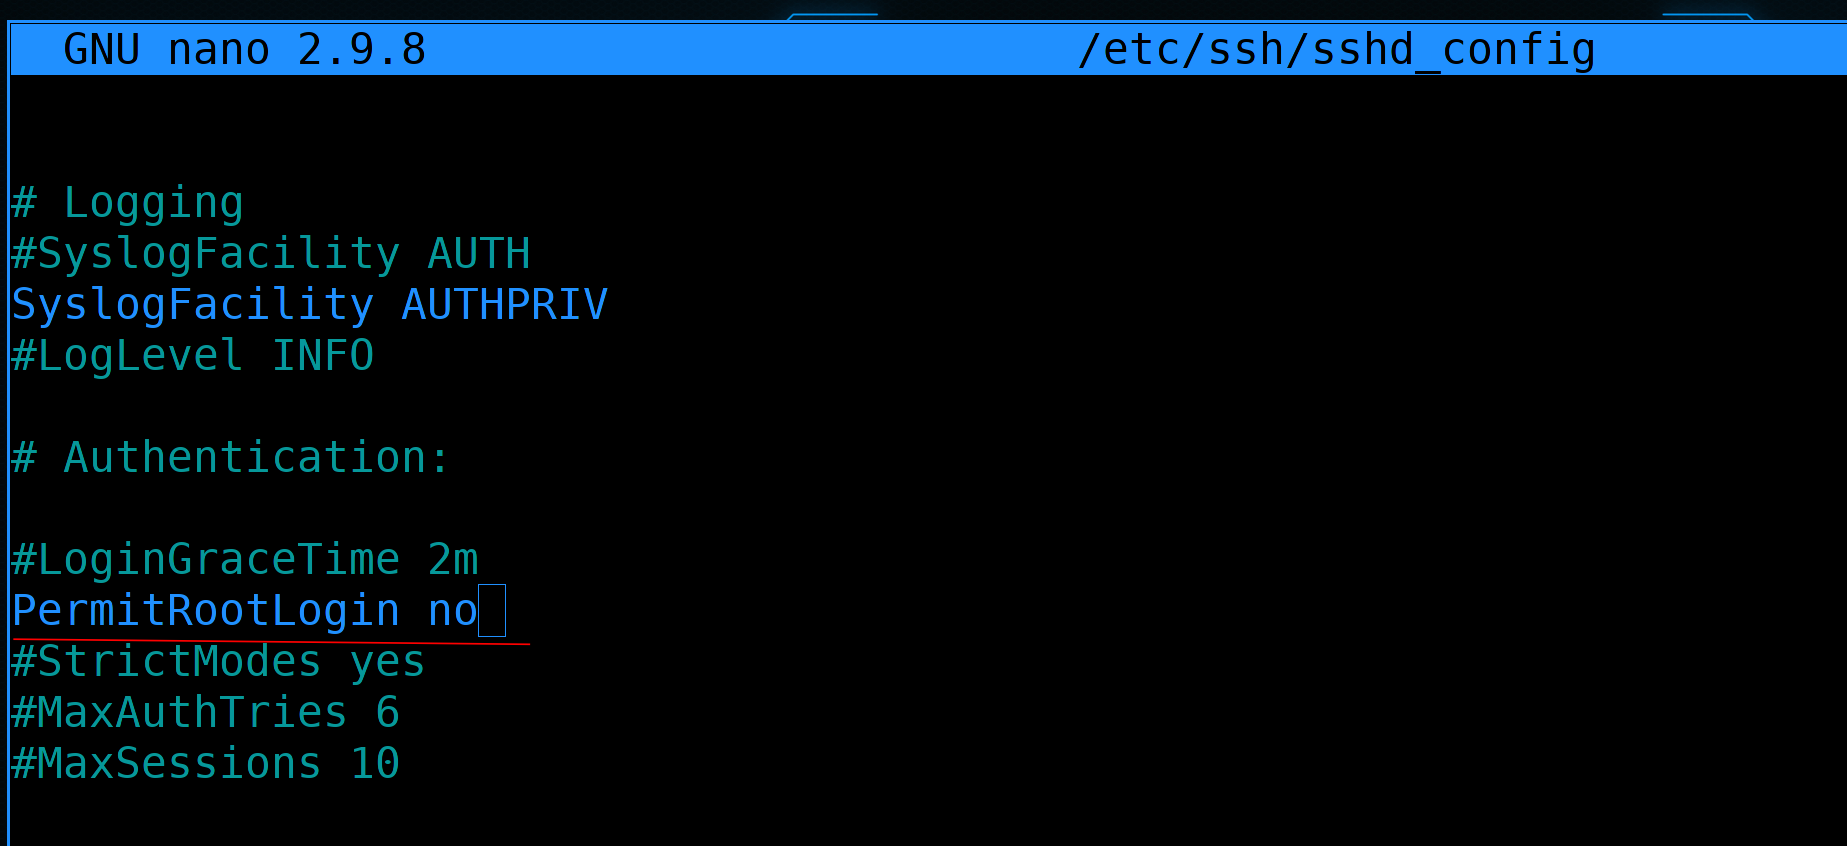
Find the line PermitRootLogin and change the value to no:
...
PermitRootLogin no
...
This option allows connection via ssh by the root user. And since everyone knows that there is a root user on any Linux system, most bots will try to break into this user. Therefore, by forbidding login as the root user, we make it a little more difficult for bots, because now they will have to guess the user’s login, not just the password.
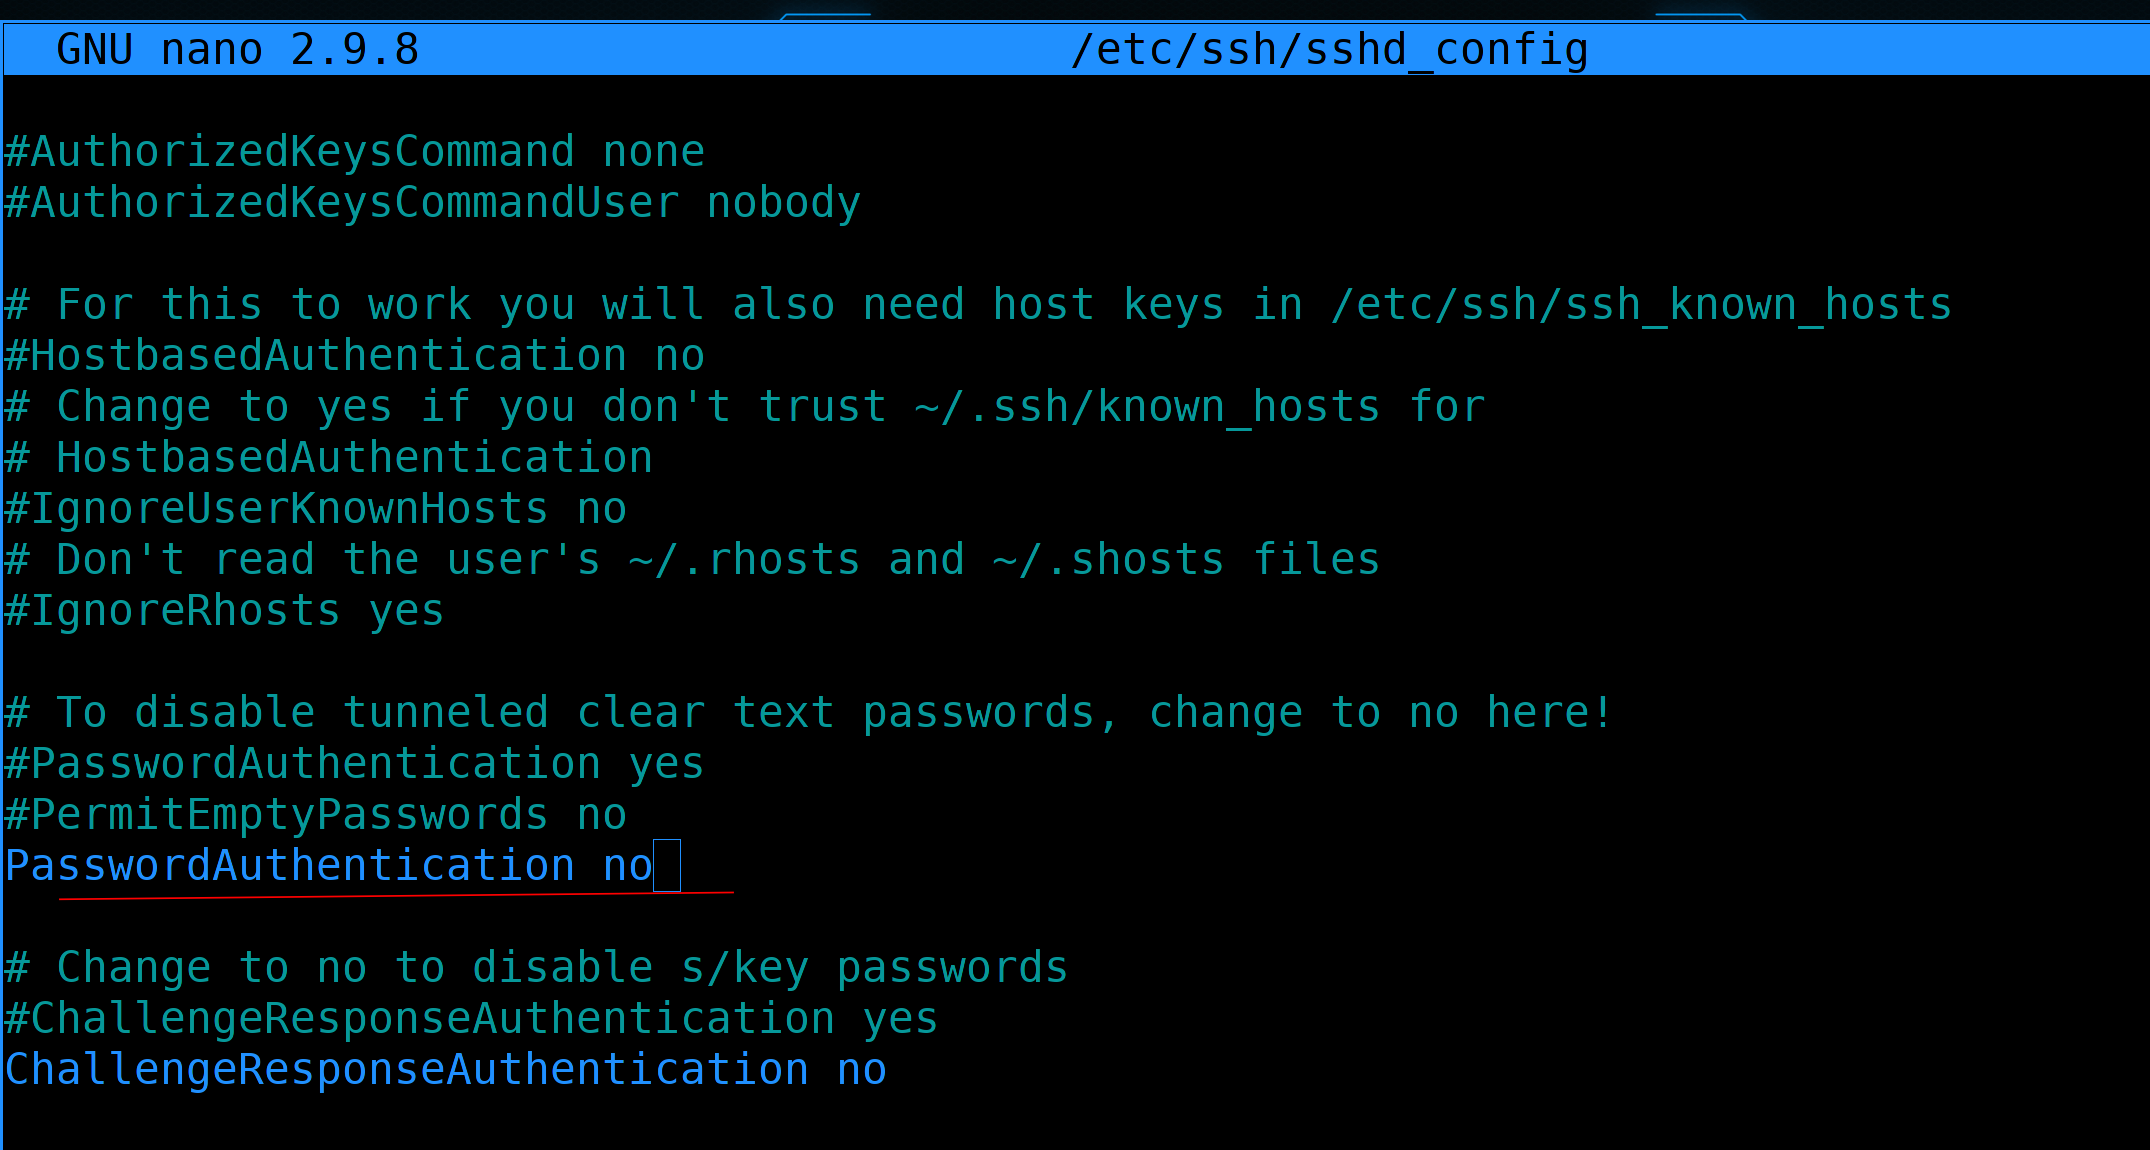
And then find the PasswordAuthentication line and change it to no:
...
PasswordAuthentication no
...
Thereby prohibiting login by password. Now the only way to log in is to use ssh keys, which weeds out all the bots because they are unlikely to get our ssh keys. Although, theoretically, some bots can use a database of some merged private keys, but this is a real rarity. These settings are quite enough in most cases, so we save the config and exit.

To apply the settings, restart sshd:
sudo systemctl restart sshd
For the test, let’s try to log in as root:
ssh root@server1
As you can see, we immediately receive an error – permission denied.
And if you try to log in as a normal user:
ssh server1
everything will work out.
Although using a non-standard port, banning root login and banning password login almost solves the problem with bots, we can’t help but talk about another mechanism – fail2ban. In our situation, it is not particularly needed, but if you cannot change the standard port for some reason, you cannot prohibit login using passwords – you will need fail2ban.
In fact, most bots simply scan public addresses on 22 and other frequently used ports and try to find a password. Most often, the root password, but sometimes some other standard logins. This type of attack is called brute-force. Easy passwords can be picked up in a couple of minutes, and difficult ones – as luck would have it. Well, one of the options to at least somehow restrain this is to block addresses that often enter the wrong password. This actually requires fail2ban. It works not only with ssh, but also with other services.

To install fail2ban, you must first mount the epel repository:
sudo dnf install epel-release
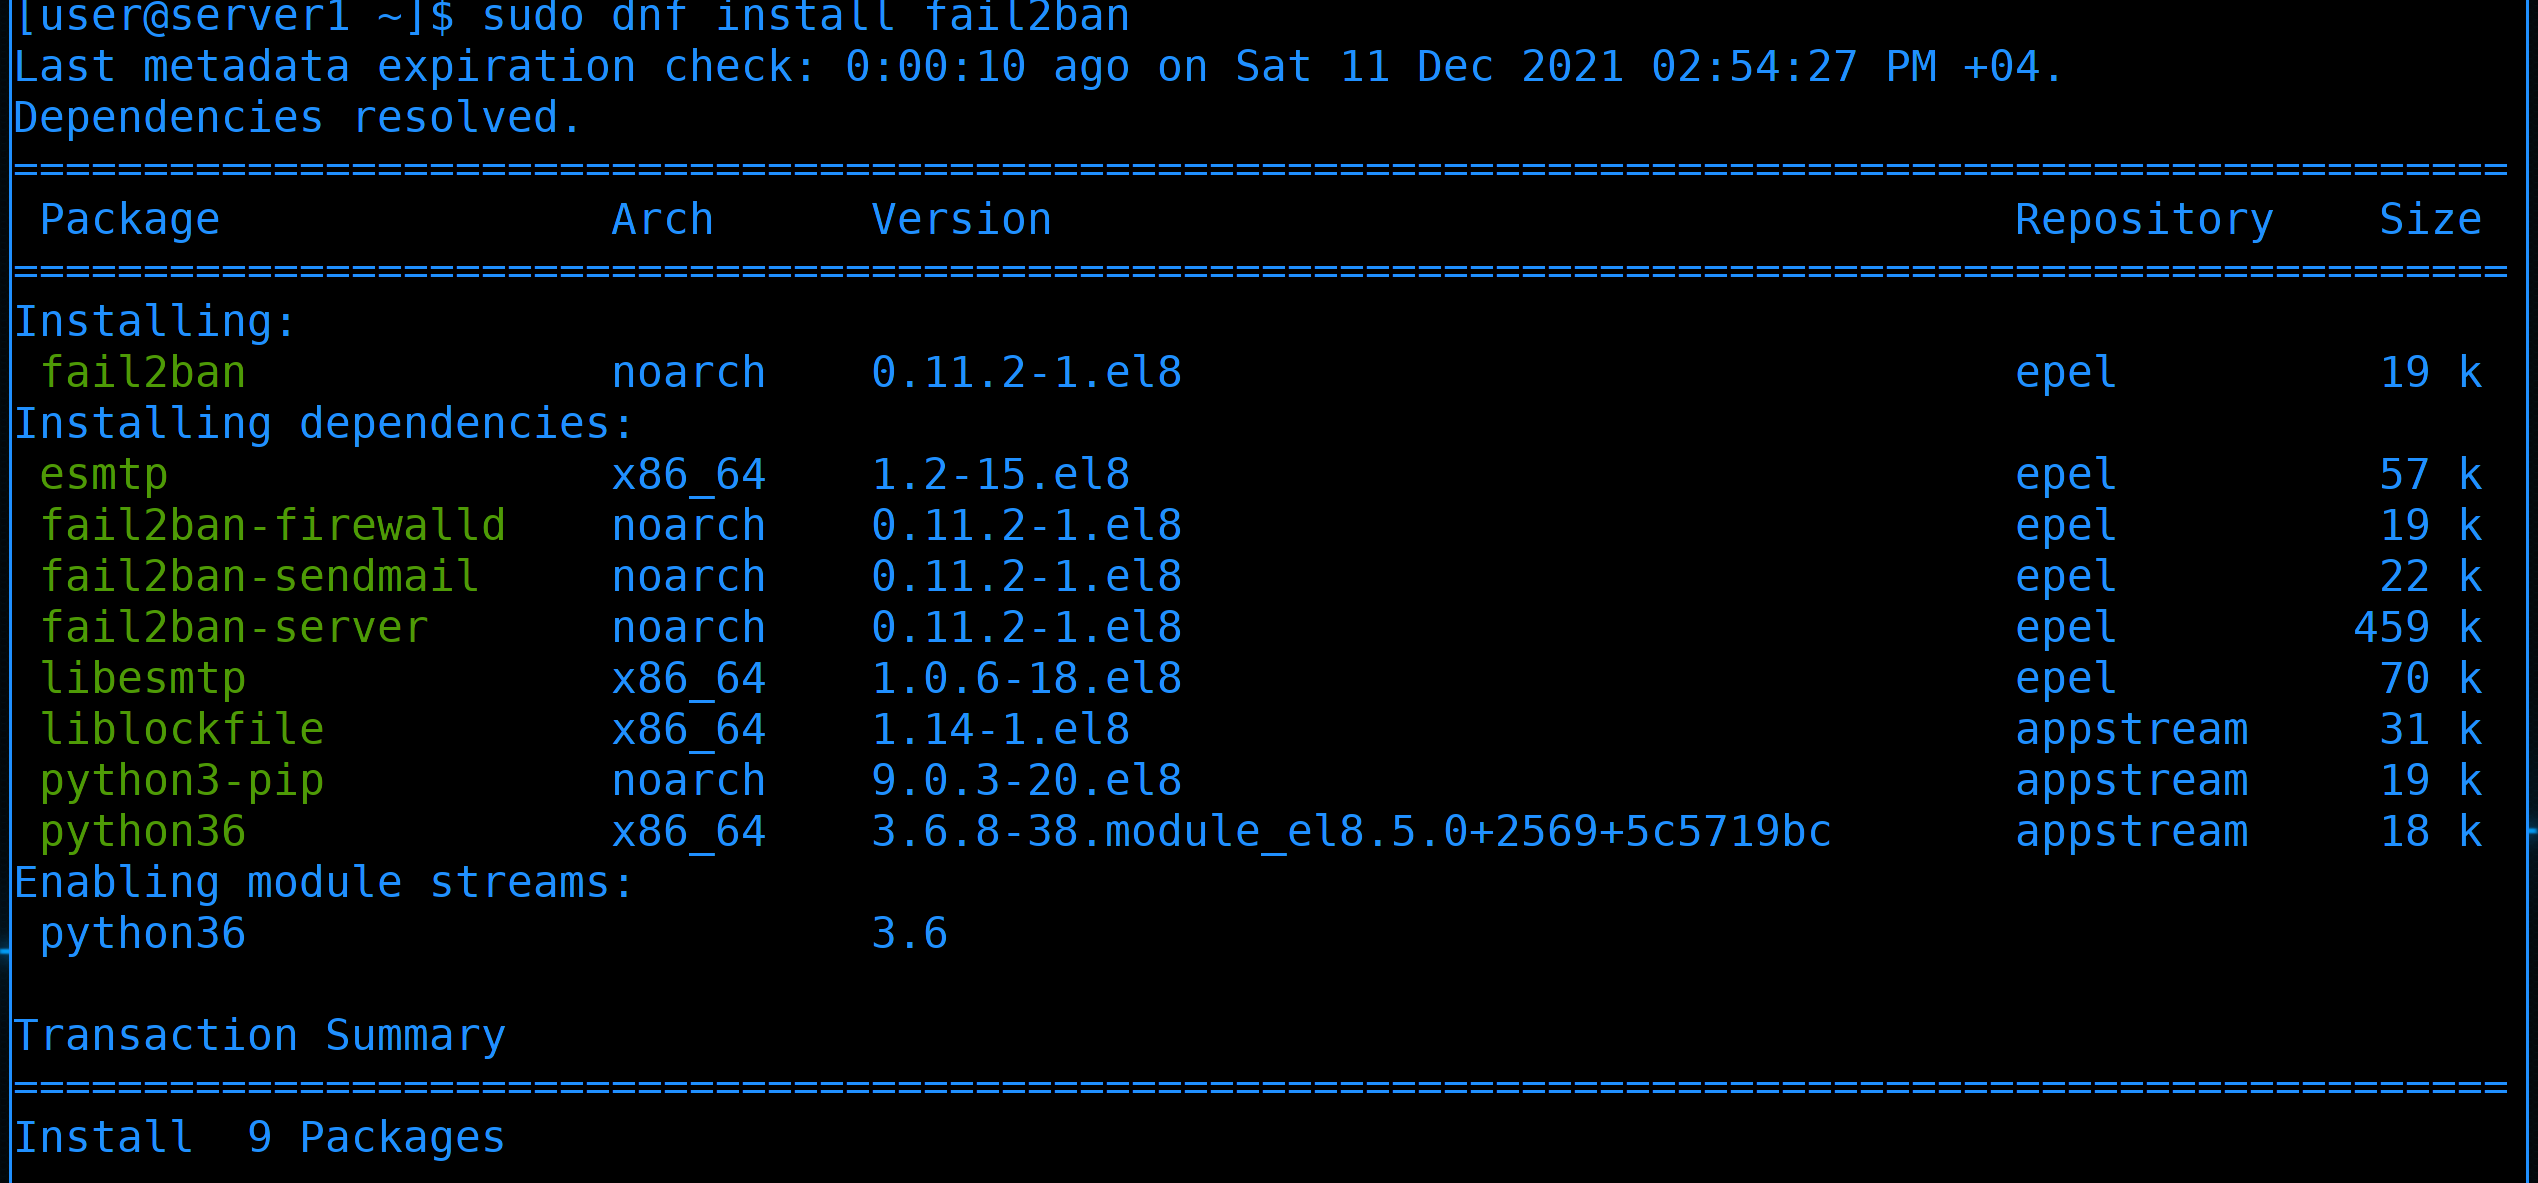
And then install a package called fail2ban:
sudo dnf install fail2ban -y

After installation, let’s start the service and add it to autoload:
sudo systemctl enable --now fail2ban
fail2ban is a very flexible thing that allows you to brute force almost anything. For some services, such as ssh, there are ready-made templates, and for self-written programs, you can configure yourself. The default fail2ban settings may vary by distribution. Let’s check if fai2ban is protecting anything now? Many things are done through the fail2ban-client utility:
sudo fail2ban-client status
So far we can see that fail2ban does not protect anything.

So we need to create a file /etc/fail2ban/jail.local.
sudo nano /etc/fail2ban/jail.local
The settings of various services are in the nearby jail.conf file. In jail.local we only overwrite these settings and also enable them.

For example, to enable sshd settings, add a few lines here:
[sshd]

enabled = true
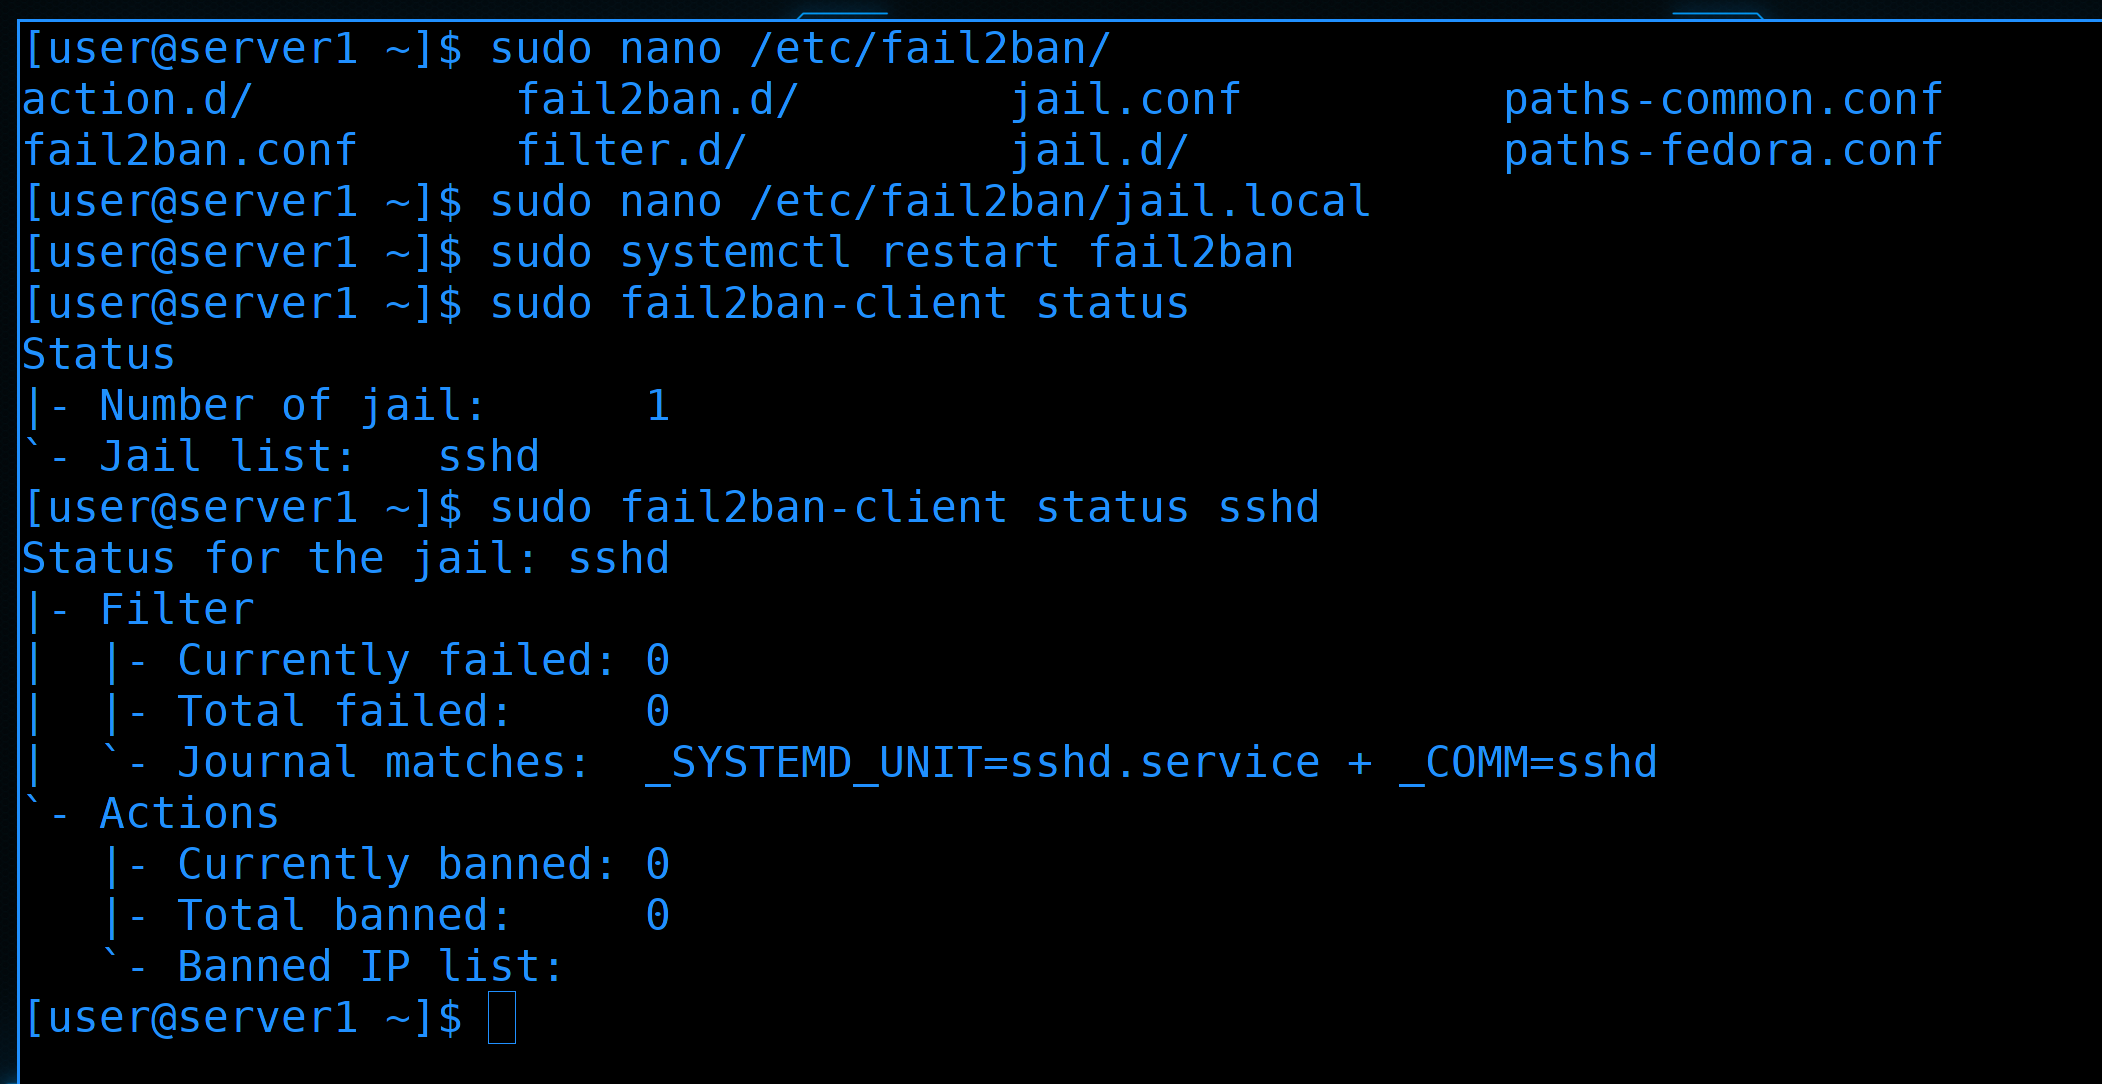
Then restart the fail2ban service:
sudo systemctl restart fail2ban
And let’s check the status once again through fail2ban-client:
sudo fail2ban-client status
sudo fail2ban-client status sshd
As you can see, we now have 1 jail – sshd. And no banned IP yet. That’s enough for now. There are many settings, but we will work with fail2ban in more detail sometime in the future. If you are interested, there are many articles on the Internet, and there is also documentation in the system.
Finally, we will show how to connect from Windows. Any ssh client supports work with jump hosts and keys, and mobaxterm is no exception.
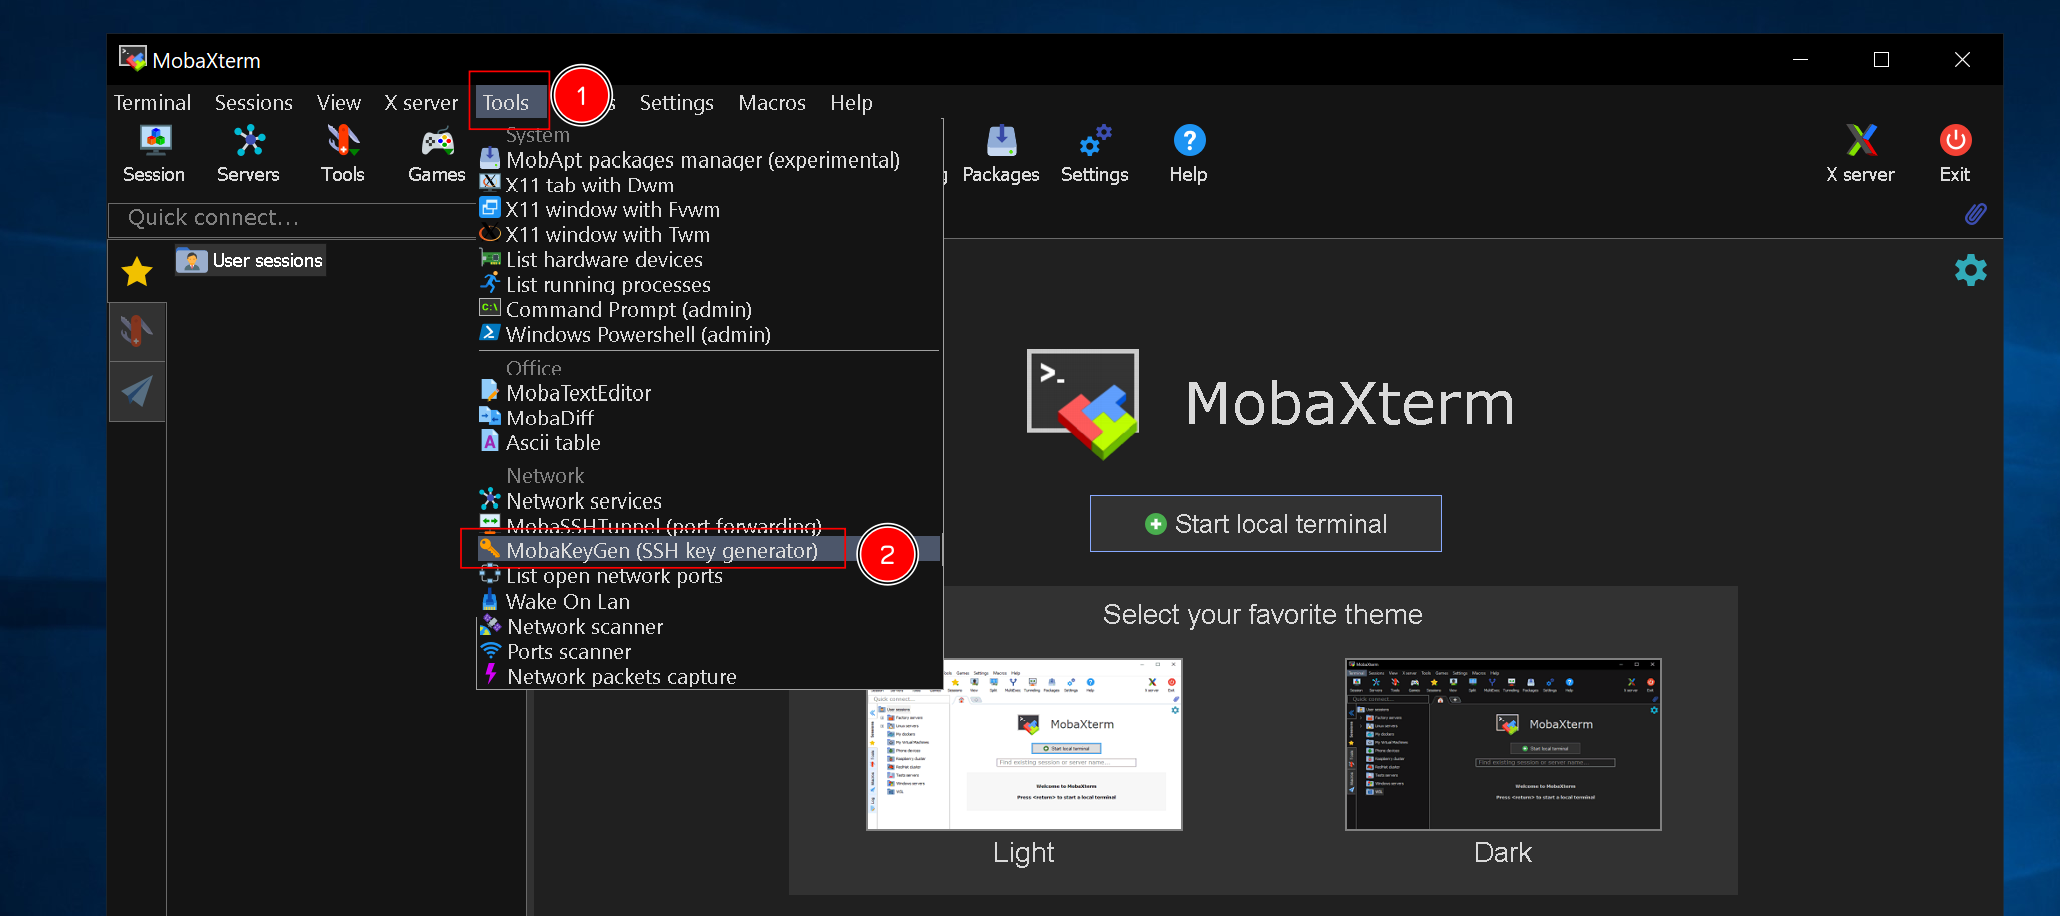
First, let’s generate keys for ssh. In the interface, select Tools – MobaKeyGen.

Click Generate in the window, move the mouse a little to generate the key, then, optionally, write a comment to the key, set a password and confirm it.

Then click Save public key, select the folder to save and the name of the file. We also produce for a private key.

I kept it on my desktop, I recommend you keep your keys so they can’t be easily found and stolen. Then highlight and copy the public key from the generator window.

After that, paste the key on the server in the user’s home directory in the ~/.ssh/authorized_keys file on a new line. Also, make sure that one key is on the same line. On the first line I have the key generated on Linux, and on the second – the one in mobaxterm. After that, save the file and exit.

Similarly, copy the key to the authorized_keys file on the router. Ideally, you should have made a second key, but we are sure you will manage it.
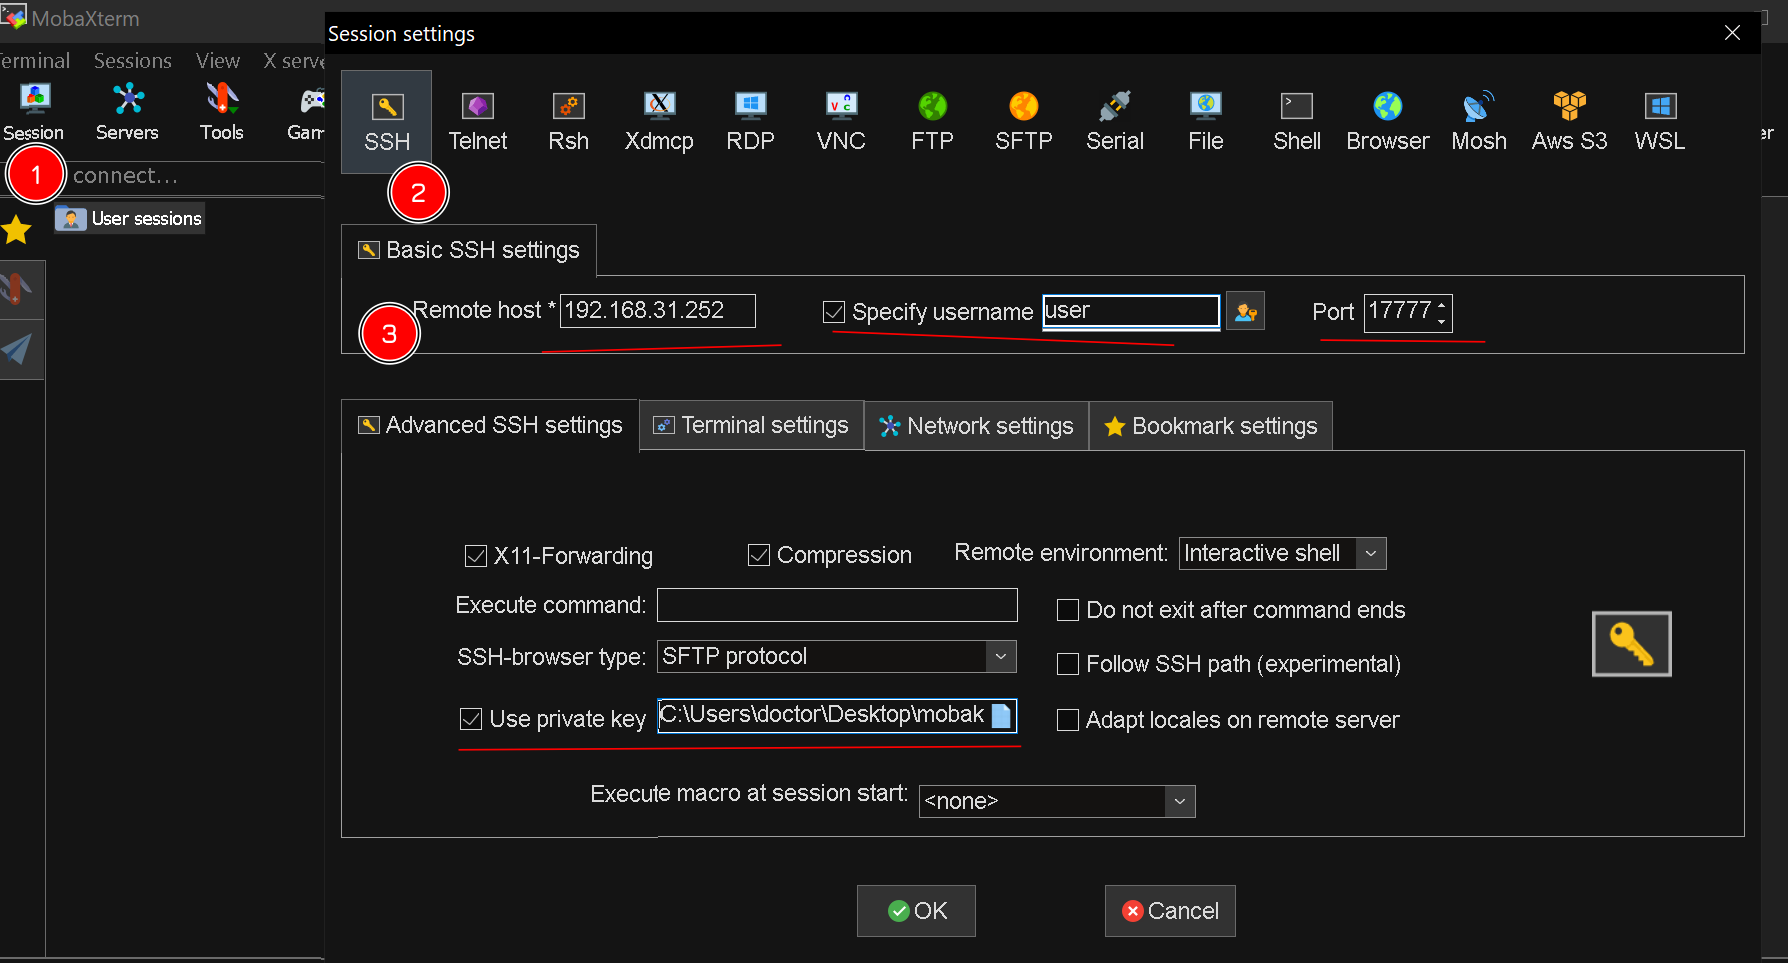
Next, close the generator window, select Session – SSH in mobaxterm and fill in the fields:
remote host: external address of the router
username: user
port: 17777
And at the bottom, in the Advanced SSH settings tab, check Use private key and select the private key that we saved before. After that, press OK.

When connected, mobaxterm will ask for a password for the key. We enter it.

After which you will get to the server.

Now let’s try to connect to the router using server1 as a jumphost. We also start – Session – SSH and fill in the fields:
remote host: internal address of the router
username: user
port: 22
Advanced ssh settings – private key – select a private key.
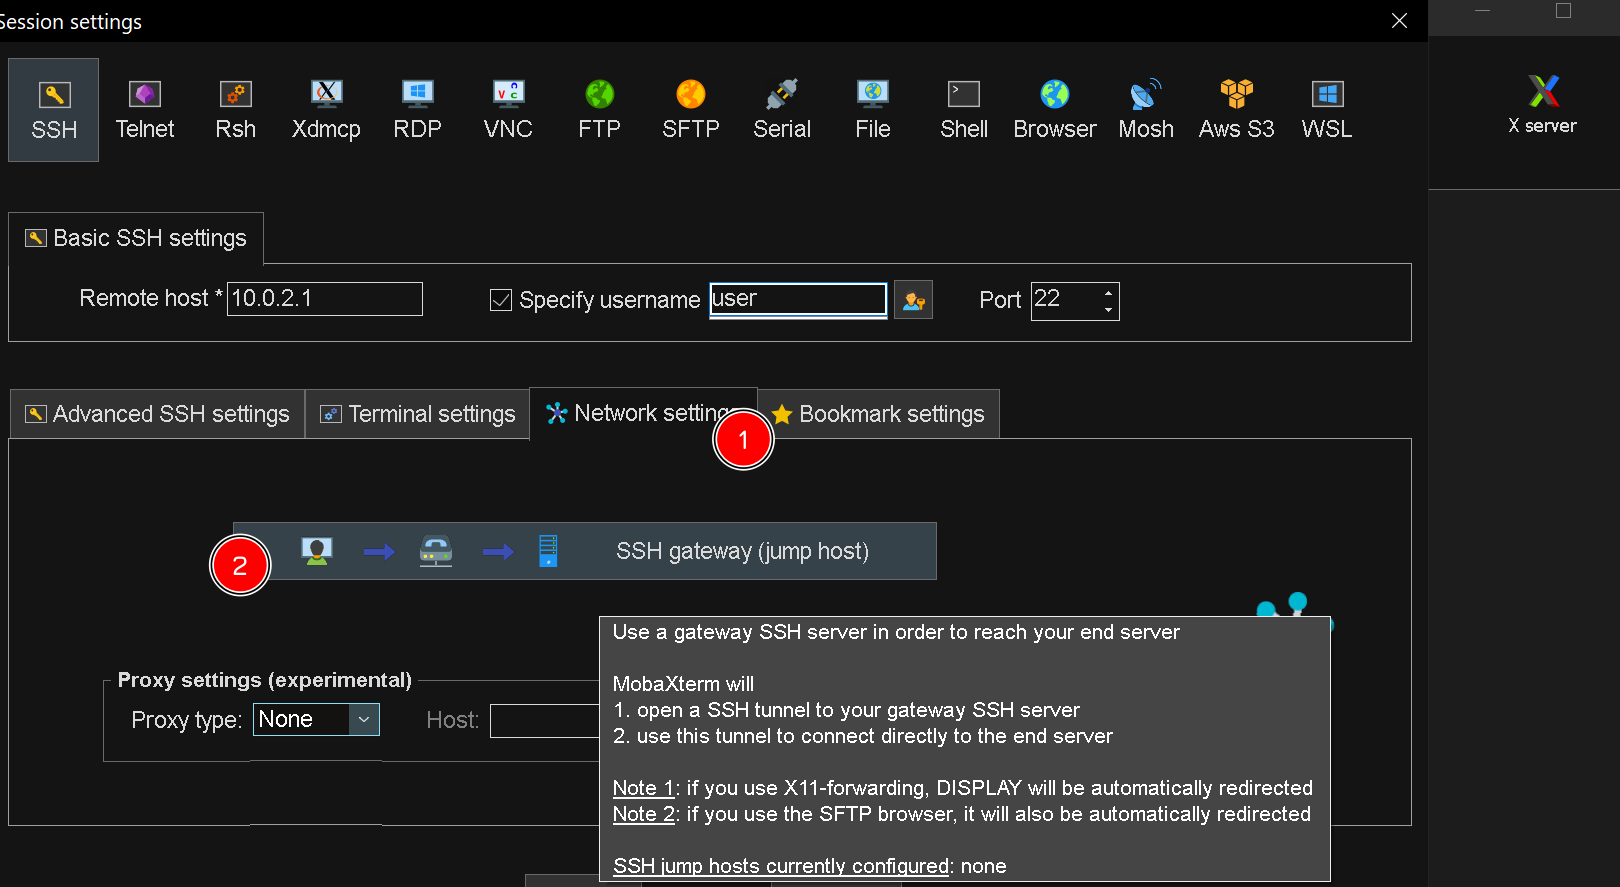
Next, open Network Settings and click on SSH Gateway.
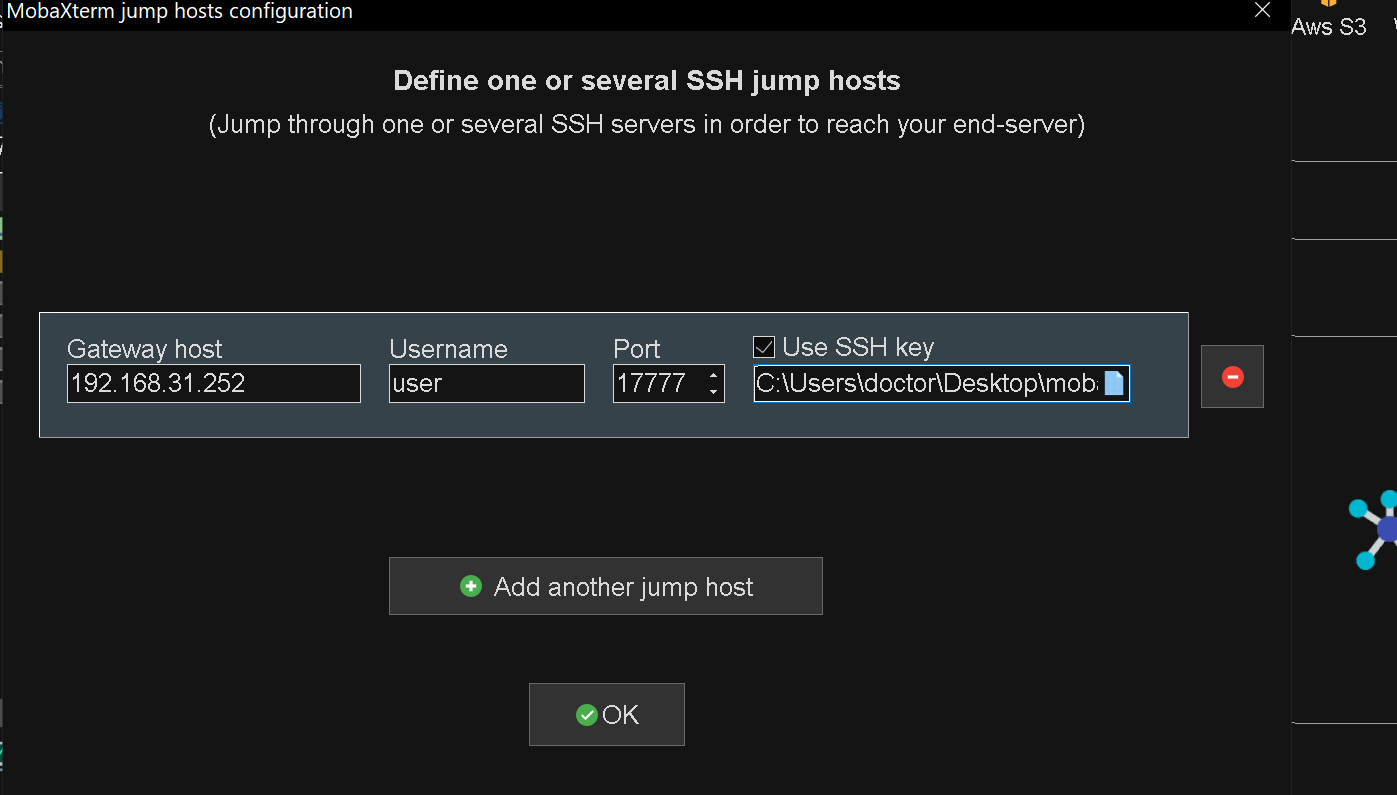
In the window, fill in exactly as you filled in server1, i.e. external address, port 17777 and private key from the server. By the way, there is a button here – add another jump host. In theory, your target servers could reside behind multiple jump hosts. But the essence is the same. Click OK, and then OK again.

And you will immediately get to the router. Mobaxterm has saved the key password and until you close it, you won’t need to enter key passwords like we did with the ssh agent.
A small task for you – rename server1 to jumphost, organize separate keys for host user1, bring up another server, drop the corresponding keys and connect to all hosts via jumphost.
Let’s summarize. We now have access to our infrastructure from the outside via ssh using jump host and port forwarding. We also figured out how to secure our connection a bit by disallowing root and keyless login.