Flipper Zero is a multifunctional device for interacting with digital access systems, and in this part we take a detailed look at how to work with iButton technology. In the seventh part of the series, you will learn how to read physical iButton keys, store them in the Flipper Zero’s memory, create new keys manually, and emulate them to access doors, intercoms, or other devices. Step-by-step instructions, a real-world interface, and practical examples are all you need to fully master iButton systems. This material is ideal for beginners, pentesters, technical specialists, and anyone who wants to understand in more depth how 1-Wire works in Flipper Zero.
Disclaimer: The information provided in this article is for educational and informational purposes only. The author is not responsible for any misuse or incorrect use of the Flipper Zero device.
Flipper Zero supports the 1-Wire device communication protocol, which is implemented in small electronic keys known as iButton keys. These keys are used for access control, temperature measurement, humidity measurement, cryptographic key storage, etc. It can also read, write, and emulate iButton access control keys thanks to the built-in iButton module, which supports Dallas, Cyfral, and Metakom key protocols.
After turning on Flipper Zero and entering the main menu, one of the main items is iButton – a section specially created for working with contact electronic keys that use the 1-Wire protocol. To get started, you need to:
press the center button to enter the main menu;
scroll to “iButton”;
press again to open the corresponding submenu.
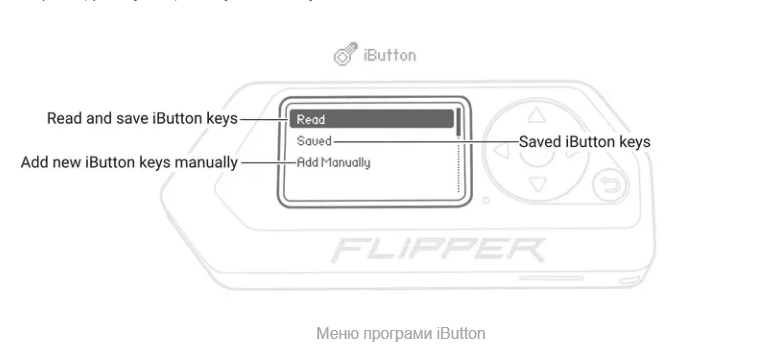
This section is the main access point to all functions related to reading, managing, creating and emulating iButton type keys (Dallas, RW1990, etc.). Without entering here you will not be able to read physical keys or run emulation. This is a separate subsystem, completely isolated from other Flipper modules (RFID, NFC, IR, etc.). Once you enter the menu, you will see four main options:
Read – read the key from the physical device;
Saved – view and manage already saved keys;
Add manually – create a key manually;
Back – exit to the main Flipper menu.
All actions with iButton keys are performed only through this section, so it is always the first step in any work with this technology.
The Flipper Zero has a built-in iButton module consisting of an iButton contact pad and three spring-loaded pogo pins located on the iButton PCB.
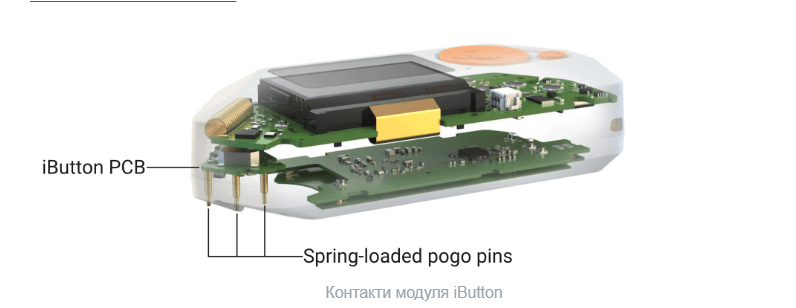
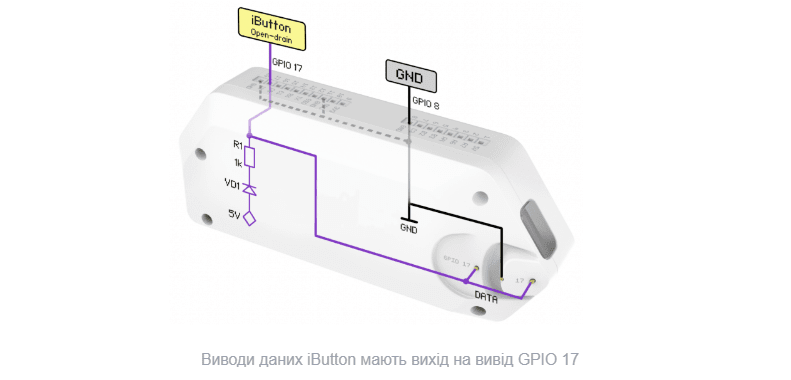
Two pins are for data transmission and output to GPIO pin 17. The rest of the middle pin is grounded.
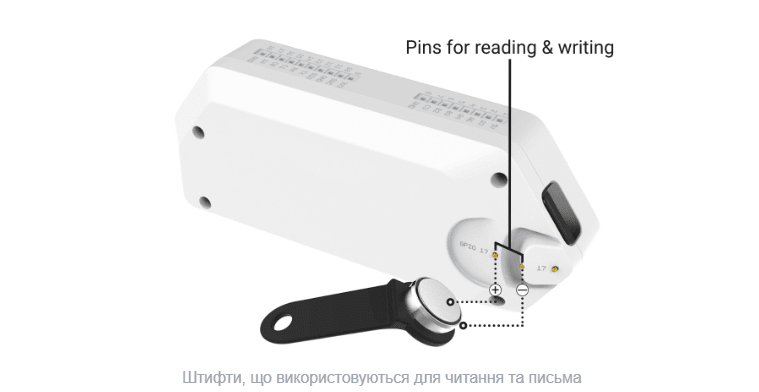
The flat part of the contact pad allows you to connect an iButton (Slave) to the Flipper Zero (Master). The left data pin and the middle ground pin are used to read and write iButtons.
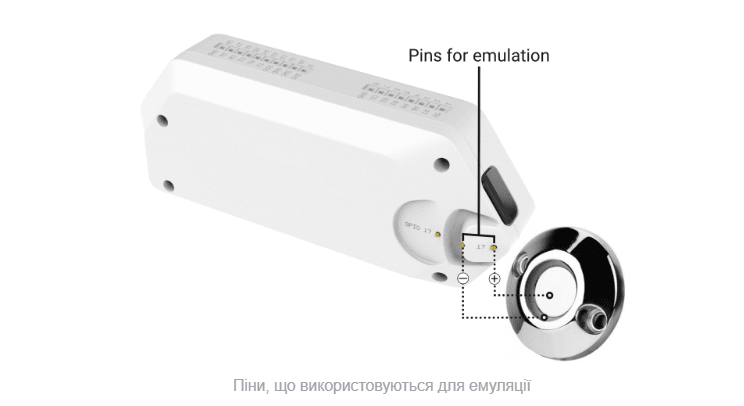
The protruding part of the contact pad allows you to connect the Flipper Zero (Slave) to an iButton reader (Master). The right data pin and the middle ground pin are used to emulate iButton keys.
After entering the iButton section, the first menu item is the Read function, which allows you to read a real physical iButton key by applying it to the Flipper. To do this:
select Read;
wait for the message “Touch iButton to the panel”;
place the iButton key on the front metal pad of the Flipper;
wait 1-2 seconds until the reading is complete;
view the key ID on the screen;
press the button to save it.
The read key is a 64-bit code in HEX format, for example 01:32:FF:AB:76:88:4C:20. This number is the device identifier that the access system accepts. After reading, Flipper allows you to save the key to the internal database (on microSD), as well as give it a clear name.
This function allows you to copy the iButton very quickly, even if you just got access to the physical key for a moment. In systems where there are no additional levels of protection, this reading is completely sufficient for further full-fledged emulation.
The second item in the menu — Saved — is a repository of all read or manually created keys. Here you can:
see a list of all available keys;
view the HEX value of each ID;
edit the key name;
remove unnecessary or duplicates;
select a key for further emulation.
Each time a new key is read or manually created, an entry is automatically added to this list. Each key is displayed as a separate file, for example:
key_1.ibtn;

office_door.ibtn;

garage_test.ibtn.
Each file includes:
name (which you specify yourself);
key ID;
creation date (in the file system).
This section allows you to keep full control over all available keys, quickly switch between them, and organize the database. If you have multiple access points (doors, gates, warehouses, turnstiles), this section will become your personal digital key holder.
The fourth function — Add manually — allows you to create a new iButton key yourself without a physical device. This is extremely useful in test environments or when the exact serial number of the key is known. To do this:
select Add manually;
a HEX code input field will appear on the screen;
enter the required 16 characters manually (in the format 00:11:22:33:44:55:66:77);
click the save button;
give the key a name (for example, test_key).
Flipper will immediately save this key in the Saved section and allow you to work with it as if it were a real one. You will be able to:
emulate this key;
copy it to another device;
change the ID later;
use as a blank for mass testing.
This is an ideal tool for technicians, pentesters, or engineers who want to test how a system reacts to unauthorized or modified keys. It is also useful if you need to quickly “recover” a key that you remember or have in your database.
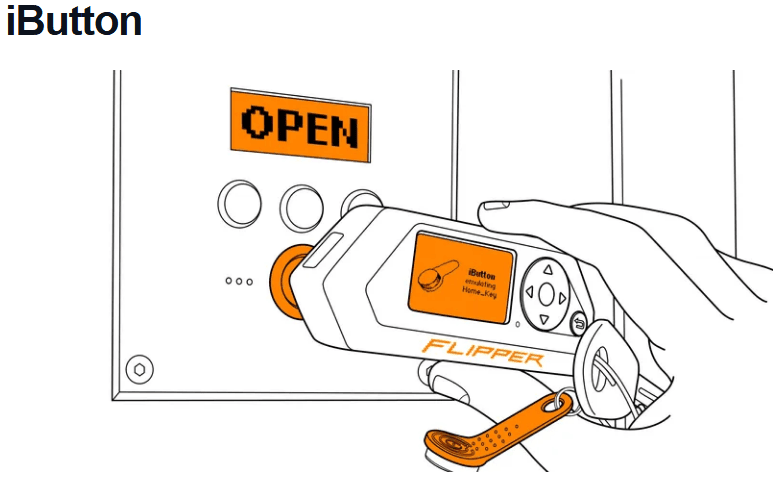
Working with iButtons in Flipper Zero is a simple, convenient and powerful way to interact with access control systems that use the 1-Wire protocol. Thanks to the built-in module, Flipper can not only read physical keys, but also store them, quickly switch between them and emulate them for further use. The iButton menu is logically divided: a separate option for reading, a separate one for managing already stored keys, and even the ability to create a new key manually without having a physical sample.
This makes Flipper a universal tool for everyday use, as well as for technical testing, pentests, security system analysis or simply convenient duplication of your own keys. When working with this module, it is important to remember: although Flipper provides great capabilities, the responsibility for their use lies with the user himself. Use these functions ethically, consciously and only within the limits of permitted access.