If you want to create an innovative Arduino-based device, a touch lamp would be a great option. In this part, we use the CapacitiveSensor library, which allows you to measure the capacitance of the human body and control the light using touch.

You will create a lamp that turns the light on and off when touched with a conductive material.
You’ll be using the CapacitiveSensor library by Paul Badger for this project. This library allows you to measure the capacitance of your body. Capacitance is a measure of how much electrical charge something can store. The library checks two pins on your Arduino (one is a sender, the other a receiver), and measures the time it takes for them to have the same state. These pins will be connected to a metal object like aluminum foil. As you get closer to the object, your body will absorb some of the charge, causing it to take longer for the two pins to be the same.
The most recent version of the CapacitiveSensor library is here: arduino.cc/capacitive. Download the file to your computer and unzip it. Open your Arduino sketch folder (it will be in your “Documents” folder by default). In the folder, create a new directory named “libraries”. Place the CapacitiveSensor folder you unzipped in this folder and restart the Arduino software. Click the File>Examples menu in the Arduino software, and you’ll see a new entry for “CapacitiveSensor”. The library you added included an example project. Open the CapacitiveSensorSketch example and compile it. If you don’t get any errors, you’ll know you installed it correctly.

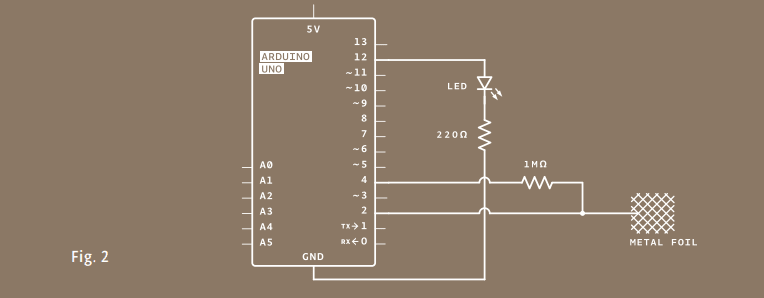
Connect an LED to pin 12, and connect the cathode to ground through a 220-ohm resistor as shown.
Connect digital pins 2 and 4 to your breadboard. Connect the two pins with a 1-megahom resistor. In the same row as pin 2, insert a long wire (8-10cm at least) that extends away from the breadboard, not connected to anything on the other end. This will become your touch sensor.
There’s no need to supply 5V to your breadboard in this project. Digital pin 4 supplies the current to the sensor.

Just like with other LED projects, diffusing the light will make this much more attractive. Ping pong balls, little lampshades from paper or plastic, whatever you have handy will work. You can hide the sensor behind something solid and it will still work.
Capacitance can be measured through non-conductive materials like wood and plastic. Increasing the surface area of the sensor with a larger conductive surface will make it more sensitve; try connecting aluminum foil, or copper mesh to your wire. You could make a base for the lamp out of cardboard, thin wood, or cloth, and line the inner surface with foil attached to your sensor wire. The whole base of the lamp would then act as a touch sensor. Update the threshold variable in the code when you make these changes to ensure that you’re still getting a reliable result.
At the beginning of your program, include the CapacitiveSensor library. You include it the same way you would a native Arduino library like the Servo library in the earlier projects.
Create a named instance of the library. When you use this library, you tell the instance what pins it will be using to send and receive information. In this case, pin 4 sends to the conductive sensor material through the resistor, and pin 2 is the sense pin.
Set up a variable for the sensing threshold at which the lamp will turn on. You’ll change this number after you test the sensor’s functionality. Then define the pin your LED will be on.
In the setup() function, open a Serial connection at 9600 bps. You’ll use this to see the values the sensor reads. Also, make your ledPin an OUTPUT.
In the loop() function, create a variable of type long to hold the sensor’s value. The library returns the sensor value using a command called CapacitiveSensor() that takes an argument identifying the number of samples you want to read. If you read only a few samples, it’s possible you’ll see a lot of variation in the sensor. If you take too many samples, you could introduce a lag as it reads the sensor multiple times. 30 samples is a good starting value. Print the sensor value to the serial monitor.
With an if()…else statement, check to see if the sensor value is higher than the threshold. If it is, turn the LED on. If it is not, turn it off.
Then add a small delay() before ending the loop().
#include <CapacitiveSensor.h>
CapacitiveSensor capSensor = CapacitiveSensor(4,2);
int threshold = 1000;
const int ledPin = 12;
void setup() {
 Serial.begin(9600);
 pinMode(ledPin, OUTPUT);
}
void loop() {
 long sensorValue = capSensor.capacitiveSensor(30);
 Serial.println(sensorValue);
 if(sensorValue > threshold) {
 digitalWrite(ledPin, HIGH);
 }
 else {
 digitalWrite(ledPin, LOW);
 }
 delay(10);
}
After programming the Arduino, you’ll want to find out what the sensor values are when it’s touched. Open the serial monitor and note the value coming from the sensor when you’re not touching it. Press gently on the bare wire you have exposed from your breadboard. The number should increase. Try pressing more firmly and see if it changes.
Once you have an idea of the range of values you’re getting from the sensor, go back to the sketch and change the threshold variable to a number that is greater than the sensor’s value when it is not touched, but less than its value when pressed. Upload the sketch with the new value. The light should come on reliably when you touch the wire, and turn off when it’s left alone. If you aren’t getting the light to turn on, try lowering the threshold a little more.

You probably noticed that the values from the sensor changed depending on how much of your finger was touching the conductor. Can you use this to get other interactions with the LED? What about multiple sensors for fading the light brighter and darker? If you place a different value resistor between pins 2 and 4 it will change the sensitivity. Is this useful for your interface?
Third party libraries like Paul Badger’s CapacitiveSensor are useful tools for expanding the capabilities of the Arduino. Once installed, they behave similarly to libraries that are bundled with the core software